How-To Geek
How to change the background in microsoft powerpoint.
Add a unique touch by inserting a picture, color, gradient, or texture into your presentation's background.

Quick Links
Change the background for select slides in powerpoint, add a background for all slides in powerpoint.
In your Microsoft PowerPoint presentations, you can change your slides' background to a picture , solid color fill, gradient fill, texture fill, and even pattern fill. You can apply a custom background to all or select slides in your presentation. Here's how.
Related: How to Use an Image as the Background in PowerPoint
To use a custom background only for select slides, first, open your presentation with the Microsoft PowerPoint app.
When PowerPoint launches, in the ribbon at the top , click the "View" tab.
On the "View" tab, in the far left corner, click "Normal" to view your presentation in a normal mode.
From the slides list to the left of your screen, select the slides in which you want to use a custom background. To select multiple slides, hold down Ctrl (Windows) or Command (Mac) while clicking slides.
Once your slides are selected, in PowerPoint's ribbon at the top, click the "Design" tab.
On the "Design" tab, from the "Customize" section, select "Format Background."
To the right of PowerPoint's interface, you will see a "Format Background" pane. Here, in the "Fill" section, you will select a custom background for your slides.
Your options are:
- Solid Fill : To apply a single solid color fill to your slides, choose this option.
- Gradient Fill : To use a gradient color fill, select this option.
- Picture or Texture Fill : If you'd like to use an image or texture as your slides' background, click this option. You can then select an image by clicking "Insert" or choose a texture by clicking "Texture."
- Pattern Fill : To use one of PowerPoint's several textures as your background, select this option.
Your changes will reflect on your slides in real-time. When you have finished configuring your custom background, close the "Format Background" pane by clicking "X" in the pane's top-right corner.
And that's it. Don't forget to save your presentation to keep your changes.
In a similar way, you can also change the background in Google Slides .
Related: How to Change the Background in Google Slides
You can configure a single custom background and apply it to all the slides in your current presentation. This saves you a lot of time as you do not have to manually edit each slide's background.
To do so, open your presentation with Microsoft PowerPoint. In the app's ribbon at the top, click the "Design" tab.
On the "Design" tab, in the "Customize" section, click "Format Background."
On the right of your screen, a "Format Background" pane will open. In this pane, using the "Fill" section, you will specify a background for all your slides.
The options you can choose from are:
- Solid Fill : Use this option to apply a solid color fill to all your slides.
- Gradient Fill : Select this option to apply a gradient color fill to all your slides.
- Picture or Texture Fill : To use an image or a texture as the background, click this option. You can then click "Insert" to add a picture to use as your background, or click "Texture" to use a texture as your slides' background.
- Pattern Fill : Click this option to view various patterns that you can use as the background for your presentation.
Once you have configured your background, apply it to all your slides by clicking "Apply to All" at the bottom of the "Format Background" pane.
And instantly, all the slides in your presentation will start using the newly specified background. Happy presenting!
If you often use a specific style for your presentations, it is worth creating a custom PowerPoint template to then base all your presentations on it.
Related: How to Create a Custom Template in PowerPoint
- PRO Courses Guides New Tech Help Pro Expert Videos About wikiHow Pro Upgrade Sign In
- EDIT Edit this Article
- EXPLORE Tech Help Pro About Us Random Article Quizzes Request a New Article Community Dashboard This Or That Game Popular Categories Arts and Entertainment Artwork Books Movies Computers and Electronics Computers Phone Skills Technology Hacks Health Men's Health Mental Health Women's Health Relationships Dating Love Relationship Issues Hobbies and Crafts Crafts Drawing Games Education & Communication Communication Skills Personal Development Studying Personal Care and Style Fashion Hair Care Personal Hygiene Youth Personal Care School Stuff Dating All Categories Arts and Entertainment Finance and Business Home and Garden Relationship Quizzes Cars & Other Vehicles Food and Entertaining Personal Care and Style Sports and Fitness Computers and Electronics Health Pets and Animals Travel Education & Communication Hobbies and Crafts Philosophy and Religion Work World Family Life Holidays and Traditions Relationships Youth
- Browse Articles
- Learn Something New
- Quizzes Hot
- This Or That Game New
- Train Your Brain
- Explore More
- Support wikiHow
- About wikiHow
- Log in / Sign up
- Computers and Electronics
- Presentation Software
- PowerPoint Presentations
2 Easy Ways to Change the Background on PowerPoint Slides
Last Updated: March 10, 2024 Fact Checked
Using PowerPoint
Using google slides.
This article was co-authored by wikiHow staff writer, Rain Kengly . Rain Kengly is a wikiHow Technology Writer. As a storytelling enthusiast with a penchant for technology, they hope to create long-lasting connections with readers from all around the globe. Rain graduated from San Francisco State University with a BA in Cinema. This article has been fact-checked, ensuring the accuracy of any cited facts and confirming the authority of its sources. This article has been viewed 444,866 times. Learn more...
Microsoft PowerPoint contains built-in tools that allow you to customize the backgrounds of your slides with vibrant colors, patterns, photos, and gradients. You can also upload your PPT to Google Drive to edit it in Slides. Here's how to change the background on PowerPoint Slides using your Windows or Mac computer.
Changing the Background in PowerPoint
- Select the slide you want to change and click the Design tab. Click Format Background and click Fill .
- You can change the background to Solid , Gradient , Picture or Texture or Pattern .
- To apply the background to all slides, click Apply to All .

- PowerPoint is available to download for Windows and Mac . You can also use PowerPoint online at https://www.office.com/ .

- Use the Direction menu to view different gradient pattern options. Use the Gradient stops slider to adjust where each color begins and ends.

- Click File to select the location of your custom image. Or, if you prefer, choose one of the preset textures from the list.
- You can move the Transparency slider to adjust how opaque the image or texture will appear. If you choose a “busy” image or pattern, you may want to raise the transparency so the text on your slide remains easy to read.

- Modify the colors in these patterns with the Foreground and Background menus beneath the pattern palette.

- If you only want the new background to appear on the current slide, click Close to save the changes.
- If you want every slide in your presentation to have the new background, click Apply to All .

- Once the upload is complete, a confirmation will appear at the bottom of the screen. Double-click the name of your PowerPoint file in that box to launch it in the viewer.
- When the preview of your presentation appears, click “Open with” and select “Google Slides.” It may take a few moments for the slide data to appear.

- If your desired background image is on your computer, click Upload , then click Choose an image to upload . Go to the image location, click Open , then Select .
- To use an image from your Google account, click Google Drive and navigate to the location of your desired background image. You can search for the image name in the search box if you’re not sure where it’s located. Once you find it, double-click it to save the selection.

- If you don’t like your background selection, click Reset Theme to try again.
Community Q&A
- If all of your slides are similar in format aside from the background (e.g., headers, footers, watermarks), consider creating a template or “slide master” . With a slide master, changes you make to the master slide will propagate to the rest of the slides, eliminating the need to edit these details in each slide manually. [2] X Research source Thanks Helpful 0 Not Helpful 0
- Editing a Microsoft PowerPoint document in Google Slides may slightly change other formatting details in your presentation. Make sure to browse through all of your slides to be sure they look how you want them to. Thanks Helpful 0 Not Helpful 0

You Might Also Like

- ↑ https://support.microsoft.com/en-us/office/change-the-background-of-slides-3ac2075c-f51b-4fbd-b356-b4c6748ec966#OfficeVersion=windows
- ↑ https://support.office.com/en-us/article/Apply-a-built-in-theme-to-a-slide-master-1e67f3ec-8838-4884-93ac-796b2bf0f035?ui=en-US&rs=en-US&ad=US
About This Article

To change the background on one or more PowerPoint slides, start by selecting the slides you want to change in the left panel. To select multiple slides, just hold down the Control key on a PC or the Command key on a Mac as you click each slide. Next, click the ""Design"" tab and select ""Format Background"" in the ""Customize"" section of the toolbar. The Format Background panel will open to the ""Fill"" tab, which gives you several options for changing the background. Choose a ""Solid fill"" to make the background a single color, or ""Gradient Fill"" to customize a gradient blend of two or more colors. If you'd rather use a pattern as the background, select ""Pattern fill"" to choose a design and color scheme. If you want to use an image as the background, select ""Picture or texture fill."" You can either select a background texture from the ""Texture"" menu or click ""Insert"" to choose an image from your computer, OneDrive, or Bing Image Search. Once you've decided on a background image, you can adjust the alignment and transparency on the Fill tab. You can also edit the image using the other tabs at the top of the Format Background panel—click the pentagon-shaped icon to apply different texture effects to your image, or the photo tab to customize the image's sharpness, brightness, contrast, and color balance. Once you're happy with your background, click ""Apply to All"" to change the background of the selected slides. Did this summary help you? Yes No
- Send fan mail to authors
Is this article up to date?

Featured Articles

Trending Articles

Watch Articles

- Terms of Use
- Privacy Policy
- Do Not Sell or Share My Info
- Not Selling Info
Keep up with tech in just 5 minutes a week!
How to Change the Background in Microsoft PowerPoint
Make your presentation look pro
The slide background is one visual you don’t want to forget about when creating a presentation. Whether a subtle shade, matching color, or image, here’s how to customize the background in Microsoft PowerPoint for one slide or all.
Change the Background for Individual Slides
If you want to change the background for a single slide or give each slide its own look, you can pick from colors, gradients, patterns, and more.
- Head to the slide you want to change in your slideshow.
- Go to the Design tab and select Format Background . Alternatively, right-click a blank spot on the slide and pick Format Background .

- When the sidebar opens on the right, you should see the Fill section expanded. If not, use the arrow on the left to display its settings.
- You can use one of four background styles: solid fill, gradient fill, picture or texture fill, and pattern fill.

- Once you select the fill, you’ll see the options displayed directly beneath. You can choose a solid color, gradient style, insert a picture, or pick a pattern.

- Optionally, check the box for Hide background graphics . This is handy if you’re using a PowerPoint template that provides images in the background.
You’ll see the change apply to the slide immediately, so if you change your mind, you can revert it.
To return the background to its original appearance, select Reset Background at the bottom of the Format Background pane.

Change the Background for All Slides
To keep your presentation’s appearance consistent, you might want to change the background for all slides to match. You can use the same options, colors, gradients, or patterns for every slide in the show.
- Go to a slide, open the Design tab, and select Format Background .
- When the sidebar opens on the right, choose the background type in the Fill section.
- Select the settings for the fill style, like the color, gradient, image, or pattern.
- At the bottom of the sidebar, select Apply to All .

- Like when modifying the background for a single PowerPoint slide, you’ll see the change right away.

To return all slides to the original background, choose one of the slides and change the background in the sidebar. Then, pick Apply to All .
If each slide had a unique background before you made the change to all slide backgrounds, you’ll need to revert each one individually. The Reset Background button mentioned above is only available for single slides.
Tip : If you didn’t make any other changes to your slideshow after adjusting the background, you can use the Undo option in the Quick Access Toolbar .

Whether you want to use your company’s colors, insert a watermark, or apply an attractive gradient, you can change the background on a PowerPoint slide in just a few steps.
For more, look at these tricks and tips for improving your PowerPoint presentations .

Sandy Writtenhouse is a freelance technology writer and former Project, Department, and Program Manager. She turned her education, job experience, and love of technology into a full-time writing career. With all sorts of gadgets in her home and her hands, she seeks to help others make life easier through technology. Read Sandy's Full Bio
Read More Posts:

Leave a Reply
Your email address will not be published. Required fields are marked *
- Slidesgo School
- PowerPoint Tutorials
How to Change Background Image and Color in PowerPoint

When creating a presentation, the background image takes on special relevance, as it is able to convey different emotions, as well as it can play an important role in the readability of the text. That is why this aspect must be taken care of as much as the content itself.
In this post we are going to show you step by step how to add a background image and color in PowerPoint .
How to change a background image in PowerPoint
How to change the background color in powerpoint.
Putting a picture as a background on your PowerPoint presentation helps to give it a more personal style that can serve to reinforce the content of your presentation.
The first thing to do is to choose which image you want to use. Think about what you need to convey to find a matching photo, and keep in mind the overall style of the presentation, so that everything goes in harmony. You should also pay attention to the content, so that it does not lose visibility. For example, we have chosen a picture related to nature, with green tones, to add to the background of this zero waste cardboard background template.

Open the PowerPoint document, choose the slide you want to change the background and click on the Design section in the top menu. Then click on the Format Background tab. A new section will open on the right side. There, select the Picture or Texture Fill - Insert option. Choose From a File to insert the image from your own pc or select any of the different options that appear, and you're done!
Among the options that will appear in the window on the right, you will find one to add transparency to the background image. In addition, whenever you want or need to revert the changes, you can click the Reset Background button to return to the original.
On the other hand, if you want to apply the new photo to the whole presentation, just click on the bottom button Apply to All in the menu on the right. With this option, the background will also appear by default on the new slides you create.
As you can see, in just a couple of clicks you can set a background image in PowerPoint . And if you need inspiration to choose the right one, we invite you to read this post, in which we give you some tips to captivate your audience with the photographs in your presentation .
Pro Tip : Try to generate contrast by using dark text and light colored images, or vice versa. And always use good quality photos, so they don't pixelate.
Another option you can use to customize your presentation is to add a background color to a slide , as we are going to do below in the watercolor texture template. To do this, just click on the top menu Design - Format Background . A menu will open on the right. Choose the Solid Fill option and select the color of your choice (we recommend using the theme colors included in the template, to maintain visual harmony). As with the background image, here you can also click Apply to All to change it in the slide set.
There are other options that can help you add a different touch to your presentation, such as Gradient or Pattern, which you will also see in the right menu mentioned above.
If you need more information we recommend you also read this post on how to change colors in a PowerPoint presentation .
Now you know how to change the background in PowerPoint , test your creativity and impress everyone with your presentations. If you need more ideas, Slidesgo offers you a wide variety of templates in different colors, which you can edit and customize according to your needs.
Do you find this article useful?
Related tutorials.

How to print PowerPoint notes
Crafting an impactful PowerPoint slideshow and delivering a captivating presentation are distinct skills. The first focuses on designing appealing visuals to convey a clear message, while the second involves employing effective presentation techniques to ensure the audience grasps the idea. The content of this article will help you with the latter part of this process, guiding future presenters on how to print PowerPoint with speaker notes to enhance your presentations success and effectiveness.

Discover Our Online Presentation Software for Free
We have great news for you today! If you’ve been a Slidesgo fan for years (or months, or weeks, or days, or mere hours, we welcome everyone!), you’ll probably know for now that our templates are available mostly in two formats: for use in Google Slides and PowerPoint.Google Slides is a free tool, since you only need a Google account in order to use it. PowerPoint, on the other hand, is part of the Microsoft Office suite, so it’s not a free program, but that didn’t stop it from being one of the most popular options in the world!What if we...

Webinar: Presentation Audit
With more than 15,000 templates released on Slidesgo and a user base composed of millions of people, we estimate that the total number of presentations created adds up to… um, a lot! Our team of professional designers work very hard to provide you with editable slides so that the only thing you need to do is, well, customize the elements to your liking. Starting from any given template, the results may vary a lot depending on the person who edited the contents.Have you ever wondered “Is my presentation good enough?” and wished that an expert on presentations looked at your template...

How to Change Slides Orientation in Google Slides
A change of perspective is always good! Do you want your public to look at your slides in a new way? Changing slides orientation will do the work. In this tutorial you’re going to learn how to go from horizontal slides, to vertical ones (and vice versa!).
How to change and format the background of your PowerPoint slides to custom designs
- You can change the background of your PowerPoint slides through the "Format Background" feature.
- To change the background of your PowerPoint slides to one of the four available options, start by right-clicking a slide or going to the "Design" tab in the top menu bar.
- The process will look the same regardless of what computer you're using, as long as you're using the most up-to-date version of PowerPoint.
- You can customize your PowerPoint slide backgrounds even more by adjusting the text, colors, and more.
- Visit Business Insider's Tech Reference library for more stories .
Though you can always choose a premade template, you may want to customize your PowerPoint slide backgrounds manually.
You can add a custom background to one or more slides, and you'll also have the option to "Apply to All" as well. When changing your PowerPoint slide backgrounds, there are four options: solid fill, gradient fill, picture or texture fill, or pattern fill. Each option offers different adjustments to fine-tune your background, depending on its type.
To do this, you'll need to access the "Format Background" menu by right-clicking or selecting the option in the "Design" tab at the top. Either method will open the same window on the right side of your screen, and the process will look the same on both Mac and PCs.
Here's how to use the "Format Background" feature to change your PowerPoint slide background.
Check out the products mentioned in this article:
Microsoft office (from $149.99 at best buy), apple macbook pro (from $1,299.00 at apple), acer chromebook 15 (from $179.99 at walmart), how to change the background of your powerpoint slides.
1. Open PowerPoint on your Mac or PC and create a new presentation or open one you've already started.
2. Right-click on any slide.
3. Select "Format Background…" from the pop-up menu that appears.
4. You can also select the "Design" tab on the top menu.
5. Click the "Format Background" icon on the right-hand side below a paint can icon.
6 . In the window that appears on the right-hand side, choose from the solid fill, gradient fill, picture or texture fill, or pattern fill. Solid fill will automatically load first.
7. For the gradient fill, select a preset gradient or make a custom one.
8. If you select text or picture fill, PowerPoint will automatically load one of the textures, which you can change by clicking the "Texture" option.
9. To add your image, click the "Clipboard" button if you have one already copied. If it's a usable image, PowerPoint will automatically fill the slide.
1o. If the image is not usable, select "Insert…" to manually upload an image from your computer.
11. After clicking "Insert" in the pop-up window, PowerPoint will use this image to fill the slide.
12. To change the pattern fill, select one of the presets and use the paint cans below to change the foreground and background colors of stripes, polka dots, or other patterns.
13. Hit the "Apply to All" button at the bottom to apply the changes to all your slides.
14. If you wish to apply a background to multiple slides, but not all of them, use the COMMAND + SHIFT + A or CTRL + SHIFT + A keyboard shortcut to select two or more slides.
Related coverage from Tech Reference :
How to download and access microsoft powerpoint on your mac computer, how to convert google slides to a powerpoint presentation in 4 easy steps, how to embed a youtube video into your microsoft powerpoint presentations using a mac or pc, how to convert a powerpoint to google slides in 2 different ways, yes, you can use microsoft word on a chromebook — here's how to install it.
Insider Inc. receives a commission when you buy through our links.
Watch: These basement renovations hide slides and secret rooms
- Main content

How to Change Slide Background in PowerPoint

Change the Background of PowerPoint Slides to a Color, Gradient or Picture
by Avantix Learning Team | Updated September 7, 2023
Applies to: Microsoft ® PowerPoint ® 2013, 2016, 2019, 2021 and 365 (Windows)
In PowerPoint, you can change the background of individual slides, selected slides based on a layout, or all slides based on a Slide Master. Slide backgrounds can be changed to a color, pattern, gradient, texture or picture. In this article, we'll review applying color, gradient and picture backgrounds.
It's important to understand that every PowerPoint presentation (or template) uses themes. The Document Theme (or overall theme) includes a Font Theme, a Color Theme, an Effect Theme and a Slide Master with a set of layouts (typically one master set). Some themes may contain multiple slide masters which can be tricky to use.
You can apply a theme in Normal View by clicking the Design tab in the Ribbon and then clicking a theme in the Themes gallery. You can also apply a Font Theme, Color Theme, or Effect Theme by clicking the Design tab in the Ribbon, clicking the More arrow in Variants and then selecting one of the theme options. If you change the Document Theme or Color Theme, you may change the background of all of your slides.
Recommended article: How to Remove the Background From an Image in PowerPoint (2 Ways)
Do you want to learn more about PowerPoint? Check out our virtual classroom or in-person PowerPoint courses >
Note that applying slide backgrounds is different from inserting a picture on a slide, resizing it and sending it to the back.
In this article, we're using the Format Background task pane to change slide backgrounds, not the Ribbon.
Change the background of a slide to a color
To change the background color of a slide:
- Go to Normal View (you may need to click the Normal button on the bottom right of the screen).
- Display the slide with the slide background you want to change.
- Right-click a blank part of the slide. A drop-down menu appears.
- Select Format Background. The Format Background task pane appears.
- If necessary, click the Fill icon at the top of the task pane.
- Click Solid Color and then select a color from the color drop-down menu. Do not click Apply to All.
In the example below, a solid color is selected for the background:

Change the background of a slide to a gradient
To change the background of a slide to a gradient:
- Go to Normal View (click the Normal button on the bottom right of the screen).
- Click Gradient fill.
- If you want to use a Preset gradient, select one from the Preset drop-down menu.
- If you want to change the type of gradient, select a type from the Type drop-down menu. These include Linear, Radial, Rectangular or Path.
- If you want to change the direction of the gradient, select a direction from the Direction drop-down menu.
- If you want to set an angle (for linear gradients), select an angle from the Angle drop-down menu.
- If you want to change the color of a gradient stop, under Gradient stops, click the stop and select a color from the Color drop-down menu. Repeat for other gradient stops. To delete a stop, click it and click the Remove Gradient Stop (x) to the right of the gradient stops. It's usually easiest to have 2 stops. You can also change the Position, Transparency and Brightness settings for each gradient stop. Do not click Apply to All.
In the Format background task pane below, note there are two stop points with different colors:

Change the background of a slide to a picture
To change the background of a slide to a picture:
- Click Picture or Texture Fill.
- In PowerPoint 2013 or 2016, under Insert, click Picture from File. If a dialog box appears, click Offline. In PowerPoint 2019 or 365, under Picture Source, click Insert. A dialog box appears. Click Insert from File.
- Navigate to the folder with the picture you want to use.
- Double-click the picture. Do not click Apply to All.
Note that Picture or texture fill is selected for the background in the following example (in PowerPoint 365 which is similar in 2013, 2016 and 2019):

Change the background of multiple slides in Slide Master View
If you change the background of a Slide Master, all of the layouts based on that Slide Master (in the Slide Master set) should change unless an individual layout's background has been changed. In most presentations, there is only one Slide Master and its associated layouts but there can be more than one Slide Master. Here, we'll assume there is only one Slide Master.
Change the background of all slides to a color using the Slide Master
To change the background color of all slides using the Slide Master:
- If you are not in Slide Master View, click the View tab in the Ribbon and then click Slide Master in the Master Views group.
- Click the Slide Master on the top left in the thumbnails (this thumbnail is larger and normally appears with a 1 beside it).
- Right-click a blank area on the slide on the right. A drop-down menu appears.
- Click Solid Color and then select a color from the color drop-down menu.
- Go to Normal View by clicking the Normal button on the bottom right of the screen to view the changes.
Change the background of all slides to a gradient using the Slide Master
To change the background of all slides to a gradient using the Slide Master:
Change the background of all slides to a picture using the Slide Master
To change the background of all slides to a picture (stored on your hard drive or a shared drive) using the Slide Master:
- Double-click the picture.
Change the background of slides using a specific layout in Slide Master View
In a PowerPoint presentation, every slide is assigned a layout. If you change the background of a slide layout in Slide Master View, all slides using that layout should change. However, if a slide background has been changed for an individual slide in Normal View, it no longer follows the background of its associated slide layout.
To apply or change a slide's layout:
- In Normal View, display the slide with the layout you want to change
- Click the Home tab in the Ribbon and select Layout in the Slides group. A drop-down menu appears.
- Click the layout you want to apply.
Change the background of slides using a specific layout to a color
To change the background color of slides using a specific layout in Slide Master View:
- Click the desired slide layout on the left in the thumbnails. When you point to a slide layout, a pop-up appears with the name of the layout.
Change the background of slides using a specific layout to a gradient
To change the background of slides using a specific layout to a gradient in Slide Master View:
Change the background of slides using a specific layout to a picture
To change the background picture of slides using a specific layout in Slide Master View:
Note that Picture or texture fill is selected for the background (in PowerPoint 365 which is very similar in 2013, 2016 and 2019):
Summary and considerations
You can use the Ribbon to apply backgrounds as well but the Format Background task pane offers the most flexibility.
if you want to change the background of multiple slides, it's usually best to change either the Slide Master or layouts in Slide Master View.
A picture background can be problematic if you want to format, crop or animate the picture. As an alternative, you may want to consider inserting a picture and sending it to the back as opposed to changing the background to a picture. You an insert pictures on a slide in both Normal View or on a slide master or layouts in Slide Master View.
If you are having difficulty editing slide backgrounds, you may have multiple masters and associated layouts. In Slide Master View, scroll down on the left in the thumbnails to see if there are more masters and associated layouts. Right-click any master and / or layouts that you don't need and select Delete from the drop-down menu. Note that you cannot delete a layout or master that is being used by one or more slides in Normal View.
Subscribe to get more articles like this one
Did you find this article helpful? If you would like to receive new articles, JOIN our email list.
More resources
How to Add Slide Numbers in PowerPoint
10 Great PowerPoint Drawing Tricks and Shortcuts
PowerPoint Slide Show Shortcuts (50+ Keyboard Shortcuts)
How to Hide or Unhide Slides in PowerPoint (with Shortcuts)
How to Change Picture Brightness or Contrast in PowerPoint (2 Ways)
Related courses
Microsoft PowerPoint: Intermediate / Advanced
Microsoft PowerPoint: Design for Non-Designers
Microsoft PowerPoint: Animations Bootcamp
Microsoft Excel: Intermediate / Advanced
VIEW MORE COURSES >
Our instructor-led courses are delivered in virtual classroom format or at our downtown Toronto location at 18 King Street East, Suite 1400, Toronto, Ontario, Canada (some in-person classroom courses may also be delivered at an alternate downtown Toronto location). Contact us at [email protected] if you'd like to arrange custom instructor-led virtual classroom or onsite training on a date that's convenient for you.
Copyright 2024 Avantix ® Learning
You may also like

How to Insert or Type E with an Accent Mark in PowerPoint (È, É, Ê, Ë, è, é, ê, or ë)
You can insert or type e with an accent mark in PowerPoint using built-in tools or keyboard shortcuts (including Alt code shortcuts). The letter e can be inserted with an accent in both upper or lower case in text boxes or placeholders on slides, the slide master or layouts. The following are common accents in upper or lower case – È, É, Ê, Ë, è, é, ê, or ë.

How to Fade a Picture or Part of a Picture in PowerPoint (Using a Gradient)
You can fade a picture in PowerPoint by drawing a rectangle shape on top of the picture and then filling the rectangle with a gradient from opaque to transparent. This technique is often used to fade an image into the background of a slide. Since the rectangle is placed on top of the image and then text may be placed on top of the rectangle, you may need to reorder the objects.

How to Lock an Image, Shape or Other Object in PowerPoint
You can now lock an image, shape or other object in PowerPoint. Objects can be locked in Normal View or Slide Master View. Only PowerPoint 365 users can lock objects to prevent moving and resizing. This is helpful if you want to select and move other objects on the slide or prevent others from moving or resizing an object. You can lock items using the context menu or the Selection Pane.
Microsoft, the Microsoft logo, Microsoft Office and related Microsoft applications and logos are registered trademarks of Microsoft Corporation in Canada, US and other countries. All other trademarks are the property of the registered owners.
Avantix Learning |18 King Street East, Suite 1400, Toronto, Ontario, Canada M5C 1C4 | Contact us at [email protected]
Our Courses
Avantix Learning courses are offered online in virtual classroom format or as in-person classroom training. Our hands-on, instructor-led courses are available both as public scheduled courses or on demand as a custom training solution.
All Avantix Learning courses include a comprehensive course manual including tips, tricks and shortcuts as well as sample and exercise files.
VIEW COURSES >
Contact us at [email protected] for more information about any of our courses or to arrange custom training.
Privacy Overview
Pin it on pinterest.
- Print Friendly

Powerpoint Assist
Tips for Powerpoint by Regina Griffin
How To Change Background In PowerPoint
Looking to enhance your PowerPoint presentations and impress your audience? Changing the background can make a world of difference.
Explore the reasons why changing the background in PowerPoint is important, along with a step-by-step guide on how to do it.
Get tips on choosing the right background, learn about common mistakes to avoid, and elevate your PowerPoint game with insights from Oregon-based teacher Regina Griffin.
Key Takeaways:
- Adding a background to your PowerPoint presentation can make it more visually appealing and professional.
- You can easily change the background in PowerPoint by accessing the “Design” tab and selecting “Format Background”.
- When choosing a background, keep your audience in mind, use high-quality images, and avoid busy or distracting backgrounds. Always remember to save your changes.
Why Change the Background in PowerPoint?
Changing the background in PowerPoint serves multiple purposes. It can add visual interest, create a professional look, and help in aligning the presentation with a specific theme or branding.
By selecting a background that complements the content and overall tone of the presentation, helps in capturing the audience’s attention and conveying information effectively. Consistent use of brand colors or imagery in the background also reinforces brand identity and fosters a sense of familiarity among viewers. A well-chosen background can make text and graphics stand out, improving readability and retention of key points.
Customizing the background further allows for creativity and personalization, making the presentation unique and memorable. It enhances the overall aesthetics, making the slides visually appealing. It can signal professionalism and attention to detail, leaving a positive impression on the audience.
To Add Visual Interest
Changing the background helps in adding visual interest to your slides by incorporating elements like images, textures, or patterns that engage the audience.
Imagine a presentation where each slide is a canvas waiting to come alive. By selecting the right background, you can create a cohesive visual narrative that complements your content and leaves a lasting impression on your viewers. Introducing dynamic imagery as a background can transport your audience to different environments or evoke specific emotions.
Experimenting with textures, such as subtle gradients or textured overlays , adds depth and dimension to your slides. These subtle design elements can significantly enhance the overall aesthetic appeal of your presentation.
To Create a Professional Look
Changing the background plays a crucial role in creating a professional look for your PowerPoint presentation, conveying a sense of polish and professionalism to your audience.
By selecting a clean background design, you can enhance readability and draw attention to the content on your slides. A well-chosen background not only adds visual appeal but also helps maintain consistency throughout your presentation. Opting for a sleek and minimalistic backdrop can prevent distractions and ensure focus remains on your key points.
Incorporating subtle gradients or textures can add depth to your slides, making them visually engaging without overwhelming the audience. Remember, the background should complement your content, so choose colors and patterns that align with your branding or the topic of your presentation.
To Match a Theme or Branding
Changing the background allows you to align your presentation with a specific theme or branding, ensuring consistency in colors, styles, and visual elements across slides.
When selecting a theme for your presentation, keep in mind the overall message you want to convey and the emotions you want to evoke in your audience. Maintaining brand identity is crucial as it helps in building a strong visual association with your company or message.
Color coordination plays a significant role in creating a cohesive and visually appealing presentation. Use colors that reflect your brand’s personality or the theme you are focusing on.
Consistency in style, like fonts, graphics, and layouts, adds a professional touch to your slides, making them more engaging and memorable for your viewers.
How to Change the Background in PowerPoint?
To change the background in PowerPoint, you can follow a few simple steps starting with opening the presentation and navigating to the ‘Design’ tab.
Once you are on the ‘Design’ tab, look for the option labeled ‘Format Background’ typically located towards the right side of the toolbar. Clicking on this option will open a dialog box that offers a range of customization choices. From here, you can modify the background color, apply gradients, insert images, or even add patterns to give your presentation a personalized touch.
Step 1: Open the Powerpoint Presentation
The first step in changing the background is to open your PowerPoint presentation on a compatible device such as Android, Microsoft Windows, or any other supported platform.
Once you have your PowerPoint presentation opened on your preferred device, navigate to the ‘Design’ tab located in the top menu bar.
From the ‘Design’ tab, look for the ‘Background’ group which contains various customization options to enhance the appearance of your slides.
Click on the ‘Format Background’ button to access a range of background options including solid colors, gradients, patterns, pictures, or even applying custom designs .
Step 2: Go to the “Design” Tab
Next, navigate to the ‘Design’ tab within PowerPoint to access a range of design options and features for customizing your presentation background.
Once you are in the ‘Design’ tab, you will find a plethora of tools that can help you enhance the visual appeal of your presentation. To start customizing your background, look for the ‘Background Styles’ group, where you can select from a variety of pre-designed backgrounds or choose to create your own. Make use of the ‘Format Background’ option to experiment with solid colors, gradients, patterns, pictures, or even add transparency to your background.
Exploring the ‘Design Ideas’ feature can provide you with creative suggestions on layout, color schemes, and fonts that can uplift the overall look of your slides. Don’t forget to check out the ‘Slide Size’ and ‘Slide Orientation’ options within the tab to ensure your presentation is optimized for different viewing platforms. By taking advantage of the design tools under the ‘Design’ tab, you can transform your presentation into a visually engaging and professional-looking masterpiece.
Step 3: Select “Format Background”
After accessing the ‘Design’ tab, choose the ‘Format Background’ option to open a menu where you can make changes to the presentation background.
Once you select the ‘Format Background’ option, a dialog box will appear, offering various customization tools and settings. This menu serves as your hub for altering the background color, adding gradients, inserting patterns, or even applying a picture as the backdrop. Utilize the ‘Fill’ tab within this menu to access a plethora of design options, including changing the transparency, adjusting brightness, and modifying tints. You can also explore the ‘Apply to All’ feature to apply the same background style across all slides, ensuring consistency and coherence in your presentation.
Step 4: Choose a Background Option
Select a background option that aligns with your presentation’s theme or style preferences, whether it’s a preset design, an image, or a textured background.
When choosing a background for your presentation, it’s crucial to consider the overall mood and message you want to convey. Each option offers a unique way to enhance your slides and captivate your audience. Whether you opt for a sleek preset design to maintain a professional look or a vibrant image to add visual interest, your background choice should complement your content. Textures, on the other hand , can evoke a tactile sense and add depth to your slides. Keep in mind the color palette of your presentation and ensure that the background harmonizes with it for a polished finish.
Step 5: Customize the Background
Customize the background further by adjusting elements such as gradients , colors , pictures , or textures to tailor the visual presentation to your specific needs and preferences.
Gradients can add depth and dimension to your slides by creating a smooth transition between colors. To modify gradients, select the object or text box, go to the ‘Format’ tab, click on ‘Shape Fill,’ and choose ‘Gradient.’ Experiment with different gradient styles and colors to find the perfect look for your presentation.
- Colors play a crucial role in setting the overall tone of your slides. You can change the color scheme by selecting the ‘Design’ tab, then ‘Variants,’ and choosing a color combination that complements your content. You can manually pick colors using the ‘Eyedropper’ tool for precise customization.
Step 6: Apply the Changes
Once you are satisfied with the background modifications, apply the changes to ensure that your presentation reflects the updated design elements effectively.
To implement the changes you have made to the background, simply go to the ‘Settings’ or ‘Customize’ section of your design interface and navigate to the ‘Background’ tab. Locate the ‘Apply Changes’ button or a similar option that saves your modifications. By clicking on this, you will solidify the alterations you have customized, transforming your initial template into a unique and cohesive showcase of your style and preferences.
Tips for Choosing the Right Background
When selecting a background for your PowerPoint presentation, consider factors such as the audience, image quality, and simplicity to ensure an effective visual impact.
It is crucial to think about your audience while choosing the background. Are they professionals who would prefer a clean, sleek design, or a more creative group that would appreciate vibrant visuals?
High image quality is essential to avoid any pixelation or blurriness, which can distract from your content.
Design simplicity plays a big role as well; a cluttered background might overwhelm viewers. Opt for a clean background to make your content stand out and maintain a professional look.
Consider the Audience
Tailor the background choice based on your audience demographics and preferences, ensuring that the colors, images, and textures resonate with their visual expectations.
When selecting PowerPoint backgrounds, it’s vital to consider who will be viewing your presentation. Different generations may respond better to specific color palettes – younger audiences might be drawn to vibrant, bold shades, while older demographics may prefer more subdued tones. Incorporate imagery that connects with your audience’s interests – for a corporate presentation, sleek and professional graphics work best, while a creative industry may call for more innovative visuals. Textures can add depth and interest to your slides, so be mindful of how they complement your overall message and branding.
Use High-Quality Images
Opt for high-quality images when incorporating visuals into your background to maintain clarity, professionalism, and visual impact in your PowerPoint slides.
Utilizing high-resolution images in your PowerPoint presentations can significantly enhance the overall look and feel of your slides. The crisp details and sharp colors of high-quality images make your content stand out, capturing the audience’s attention effectively.
Visual appeal plays a crucial role in engaging your viewers and conveying your message effectively. Choose images that complement your content and reinforce your key points. Remember, the background visuals should not overpower the text or distract from the message you want to convey.
Keep it Simple
Simplicity can be key when choosing a background for your PowerPoint presentation, as clean and uncomplicated designs often convey information more effectively.
Opting for minimalistic backgrounds not only enhances the overall aesthetic appeal of your slides but also ensures that your content stands out without distractions. Visual clarity is essential in maintaining audience focus, and a simple background can help achieve that effortlessly.
- Minimal design elements reduce clutter and make the information more digestible for viewers.
- Clean backgrounds create a professional look that is suitable for various types of presentations.
Common Mistakes to Avoid
In PowerPoint presentations, it’s crucial to avoid common mistakes such as using busy or distracting backgrounds that can overshadow your content and detract from the message.
Opting for intricate patterns or vibrant colors might seem appealing at first glance, but they often lead to diminished readability and hinder visual focus.
Furthermore, cluttered backgrounds can make it challenging for your audience to concentrate on the key points of your presentation.
Remember, the primary goal is to enhance your message, not to overshadow it with unnecessary visual elements.
Using Busy or Distracting Backgrounds
One common mistake is using busy or distracting backgrounds that overwhelm the content, making it challenging for the audience to focus on the key information.
These visually overloaded backgrounds can detract from the main points you are trying to communicate, causing confusion and reducing the impact of your presentation.
When there is too much going on in the background, it can divert the viewers’ attention away from the essential content, leading to a disconnect between what you are saying and what they are processing visually.
This can result in decreased retention of information and a lack of engagement from your audience, ultimately undermining the effectiveness of your message.
Not Checking the Background on Different Devices
Failing to test your background on various devices like tablets, phones, or different operating systems can lead to inconsistencies in appearance and layout across platforms.
If you skip the step of checking how your background displays on different devices, users may encounter issues such as distorted images, overlapping text, or improper alignment.
By ignoring the importance of device compatibility , you risk alienating a significant portion of your audience who access your content through mobile devices or alternative platforms.
Ensuring that the background maintains its integrity and remains visually appealing across all devices is crucial for maintaining a professional and polished online presence.
Forgetting to Save the Changes
Forgetting to save your background changes in PowerPoint can result in loss of customization and reverting to default settings, potentially undermining your presentation’s visual impact.
When you invest time and effort into tweaking your presentation’s background elements to reflect your unique style or brand, it is crucial to remember that without saving these modifications, all your hard work can simply vanish into thin air. A sudden power outage or system crash may erase all unsaved changes, leaving you with the standard, generic PowerPoint backdrop. This oversight not only disrupts the consistency of your design but also poses a serious risk to your data security and time efficiency.
Frequently Asked Questions
How to change background in powerpoint.
To change the background in PowerPoint, follow these steps: 1. Open your PowerPoint presentation. 2. Click on the slide that you want to change the background for. 3. Navigate to the “Design” tab. 4. Click on the “Format Background” button. 5. Choose the desired background option, such as a solid color, gradient, or picture. 6. Customize the background using the options available. 7. Click “Apply to All” if you want the background to be applied to all slides. 8. Click “Close” to save your changes.
Can I use my image as a background in PowerPoint?
Yes, you can use your image as a background in PowerPoint. To do this, follow these steps: 1. Open your PowerPoint presentation. 2. Click on the slide that you want to change the background for. 3. Navigate to the “Design” tab. 4. Click on the “Format Background” button. 5. Choose the “Picture or Texture Fill” option. 6. Click “File” and select the image you want to use as the background. 7. Customize the background using the options available. 8. Click “Apply to All” if you want the background to be applied to all slides. 9. Click “Close” to save your changes.
How can I insert a solid color background in PowerPoint?
To insert a solid color background in PowerPoint, follow these steps: 1. Open your PowerPoint presentation. 2. Click on the slide that you want to change the background for. 3. Navigate to the “Design” tab. 4. Click on the “Format Background” button. 5. Choose the “Solid Fill” option. 6. Select the desired color from the color picker or enter the RGB or HEX code. 7. Customize the background using the options available. 8. Click “Apply to All” if you want the background to be applied to all slides. 9. Click “Close” to save your changes.
Is it possible to add a gradient background in PowerPoint?
Yes, you can add a gradient background in PowerPoint. To do this, follow these steps: 1. Open your PowerPoint presentation. 2. Click on the slide that you want to change the background for. 3. Navigate to the “Design” tab. 4. Click on the “Format Background” button. 5. Choose the “Gradient Fill” option. 6. Select the desired gradient type. 7. Customize the gradient using the options available. 8. Click “Apply to All” if you want the background to be applied to all slides. 9. Click “Close” to save your changes.
How can I change the background for all slides in my presentation?
To change the background for all slides in your presentation, follow these steps: 1. Open your PowerPoint presentation. 2. Navigate to the “Design” tab. 3. Click on the “Format Background” button. 4. Choose the desired background option. 5. Customize the background using the options available. 6. Click “Apply to All Slides” to apply the background to all slides. 7. Click “Close” to save your changes.
Can I revert to the original background in PowerPoint?
Yes, you can revert to the original background in PowerPoint by following these steps: 1. Open your PowerPoint presentation. 2. Navigate to the “Design” tab. 3. Click on the “Format Background” button. 4. Choose the “Reset Background” option. 5. Click “Apply to All” if you want to reset the background for all slides. 6. Click “Close” to save your changes.
Similar Posts
How to tick mark in powerpoint.
Have you ever wondered how to make your PowerPoint presentations more engaging and interactive? Tick marks could be the solution you’re looking for! In this tutorial by Regina Griffin, a teacher from Oregon, US, we will explore the basics of PowerPoint, including creating a new presentation, adding text and images, and customizing slide layouts. We…
How To Apply Animation To All Slides In PowerPoint
Are you looking to take your PowerPoint presentations to the next level? Adding animation can be a game changer. In this article, we will explore the benefits of using animation in PowerPoint, from engaging your audience to highlighting key points. We will also discuss different types of animations you can use, such as entrance, emphasis,…
How To Enable Content Updates From Office.com In PowerPoint
Are you looking to enhance your PowerPoint presentations with the latest templates and features? Enabling content updates from Office.com is the way to go! In this article, we will explore the benefits of enabling content updates, step-by-step instructions on how to do it in PowerPoint, and what to do if you don’t see the option….
How To Draw A Line Without An Arrow In PowerPoint
Looking to enhance your PowerPoint presentations with different types of lines? Explore the different types of lines available in PowerPoint, including straight, curved, and freeform lines. Learn how to draw a line without an arrow in PowerPoint using simple steps. Discover the benefits of drawing lines without arrows, such as aesthetics and improved presentation quality….
How To Embed A YouTube Video In PowerPoint 2007
In a world where visual aids are key to engaging presentations, knowing how to seamlessly embed YouTube videos into your PowerPoint presentation can take your slides to the next level. This step-by-step guide will walk you through the process of embedding a YouTube video in PowerPoint 2007. From finding the perfect video to customizing its…
How To Convert Video In PowerPoint To Mp4
Are you tired of facing compatibility issues with your PowerPoint presentations? Do you want to ensure that your videos play seamlessly on different devices? We will discuss the benefits of converting video in PowerPoint to MP4 format. From improved compatibility to better quality and smaller file sizes, MP4 is the way to go. Follow our…
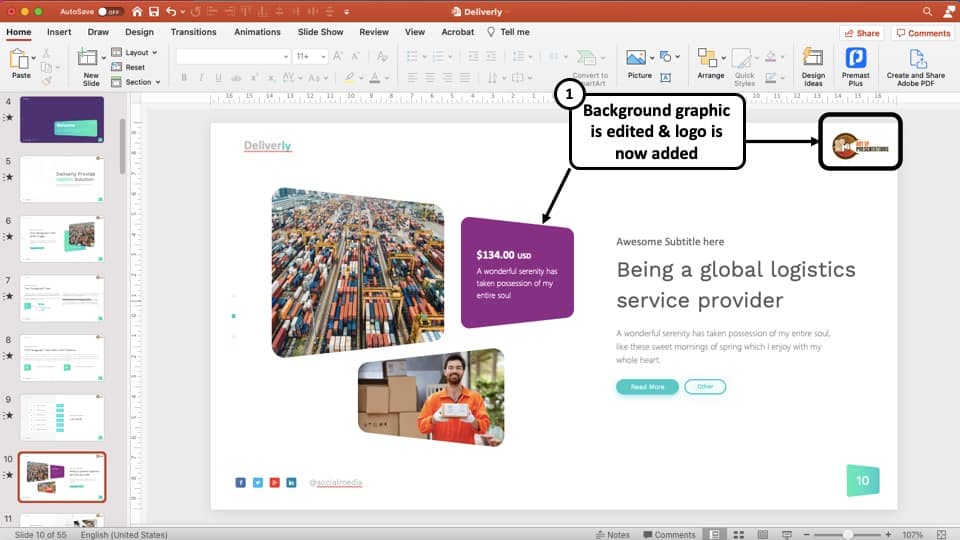
How to Edit Background Graphics in PowerPoint? A Quick Guide!
By: Author Shrot Katewa

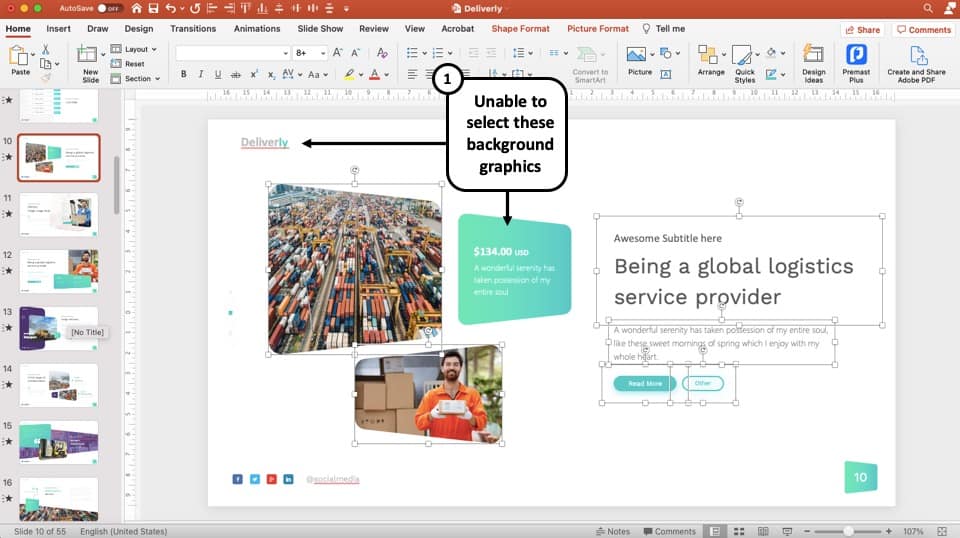
Every once in a while, you will come across this issue where you just can’t select, resize, or even delete an element on the slide! Annoying as it is, if you are in a hurry, it can be a real pain and make matters worse! These elements remain in the background on the slide, and can often interfere with the elements that you’ve added to the slide! So, how do you edit these background graphics in PowerPoint?
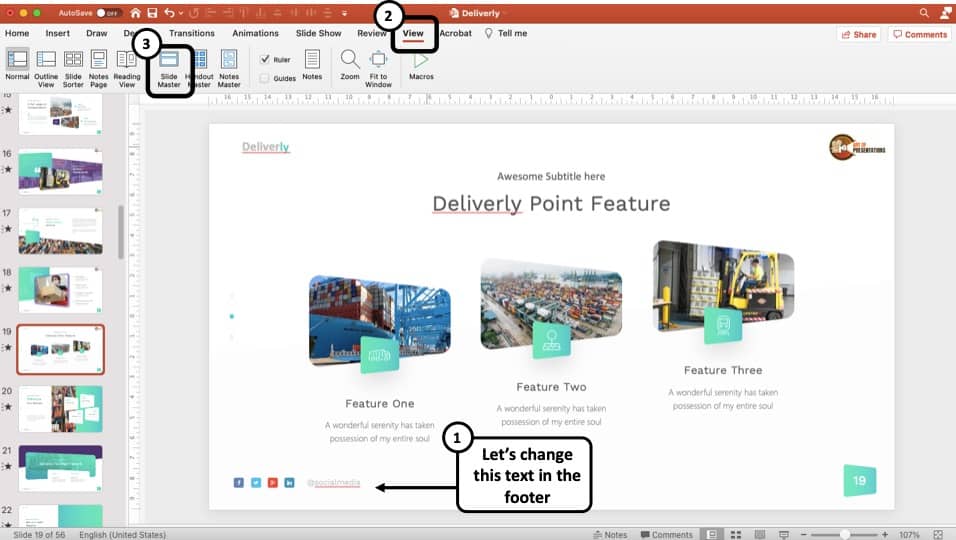
To edit the background graphics in PowerPoint, first select the slide in the Normal View. Next, click on the “View” tab. Then, click on “Slide Master”. This will open the master layout of your presentation. Select the graphic on the slide, and edit or delete it as required. Lastly, exit slide master.
It may perhaps be a little difficult to understand exactly how to edit the background graphics on PowerPoint without a visual reference. So, in this article, I will help you understand the process step-by-step with pictures so that you can understand what you need to do. Plus, I will also help you understand how to add or delete placeholders, images in the background and edit the text in the footer!
So, let’s get started!
A Quick Note Before We Begin – if you want to make jaw-dropping presentations, I would recommend using one of these Presentation Designs . The best part is – it is only $16.5 a month, but you get to download and use as many presentation designs as you like! I personally use it from time-to-time, and it makes my task of making beautiful presentations really quick and easy!
How to Access Background Graphics in Slide Master View in PowerPoint?
So, the first thing you need to understand is how do you access these background graphics as PowerPoint doesn’t even allow you to select it! Well, the trick is to open the Slide Master.
Slides Master view is one of the special features of Microsoft PowerPoint. This feature allows you to quickly modify your slide layouts in your presentation file. It allows you to also add placeholders and graphics to your slide!
To access background graphics in the slides master view, here’s what you need to do:
Step 1: Open the PowerPoint Presentation
The first step is to open your presentation file in the PowerPoint application. Go to the specific slide where you are unable to select a particular element on your slide.
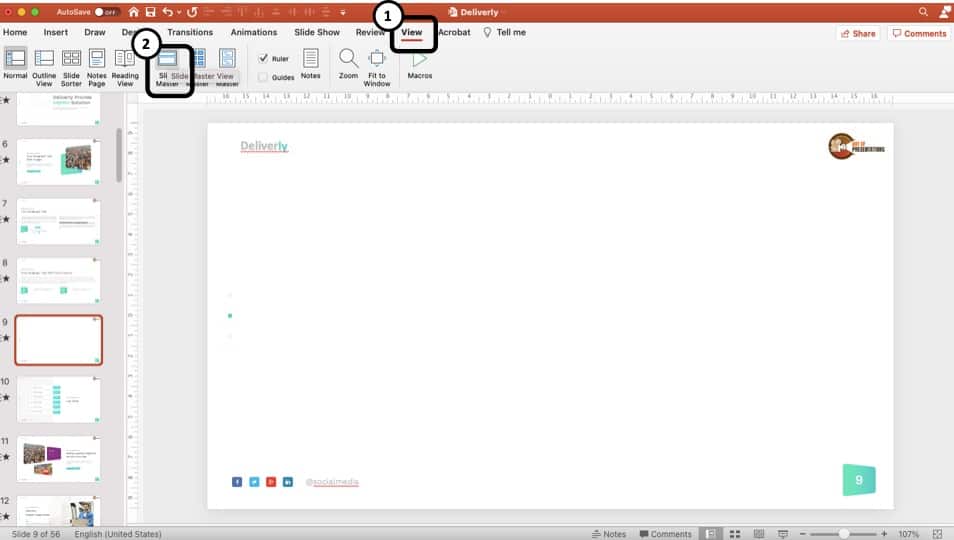
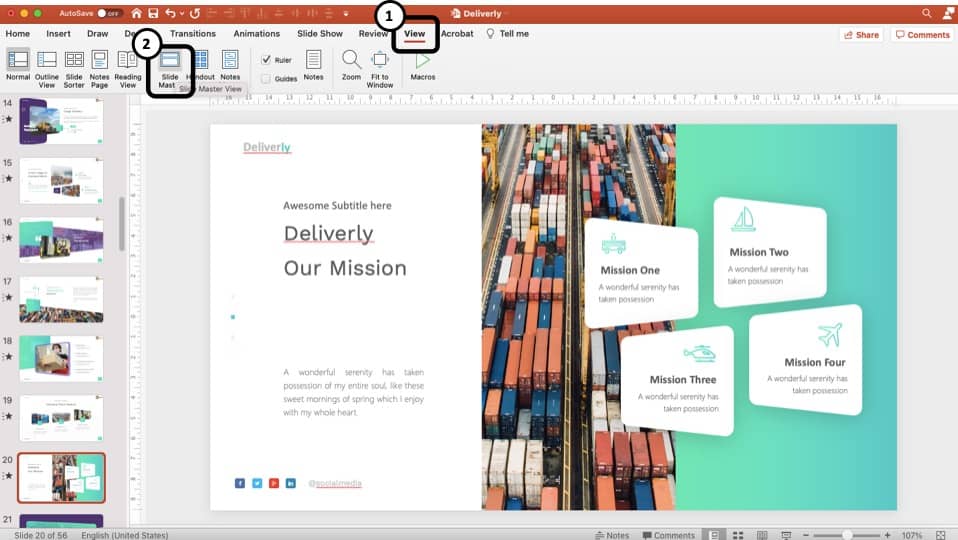
Step 2: Click on “View”, and then select “Slide Master”

Now click on the “View” tab located on the top of the screen and select “Slides Master” from the “Master View” section.
Step 3: Enable the “Hide Background Graphics” option
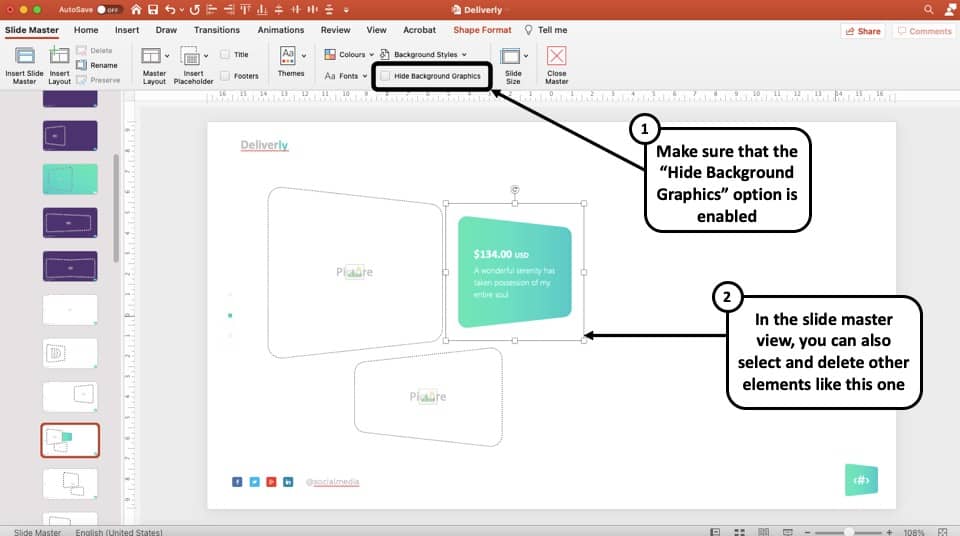
In the slide master view, find the “Hide background graphics” located in the “Background” ribbon. If the button is grey, that means you can now access the background graphics.
How to Edit Background Graphics in PowerPoint?
When editing the background graphics in PowerPoint, there are 2 things that we need to keep in mind!
- Edit background graphics for all your slides – this option is usually used when you want to add, edit or delete background graphics to all slide. For example, if you want to add or remove page number from all the slides, or add a logo to all the slides.
- Edit background graphics for a specific slide – this option is used when you want to edit placeholders on a specific slide. For instance, if you want to edit the image on a slide, or change the text placeholder, or even change the color of the shape of a graphic used on a particular slide
In this section, I’m going to discuss both methods step-by-step.
Edit Background Graphics for all the Slides in Slide Master
When you want to make a change to be visible on all your slides (such as adding a logo), you can use the Master Slide in the Slide Master View.
Let’s see how this is done –
Step 1: Enter the Slide Master View in PowerPoint
Open the presentation file in the PowerPoint application and choose “View>Slide Master” to open the file in slide master view.
Step 2: Scroll up to locate the “Master Slide”
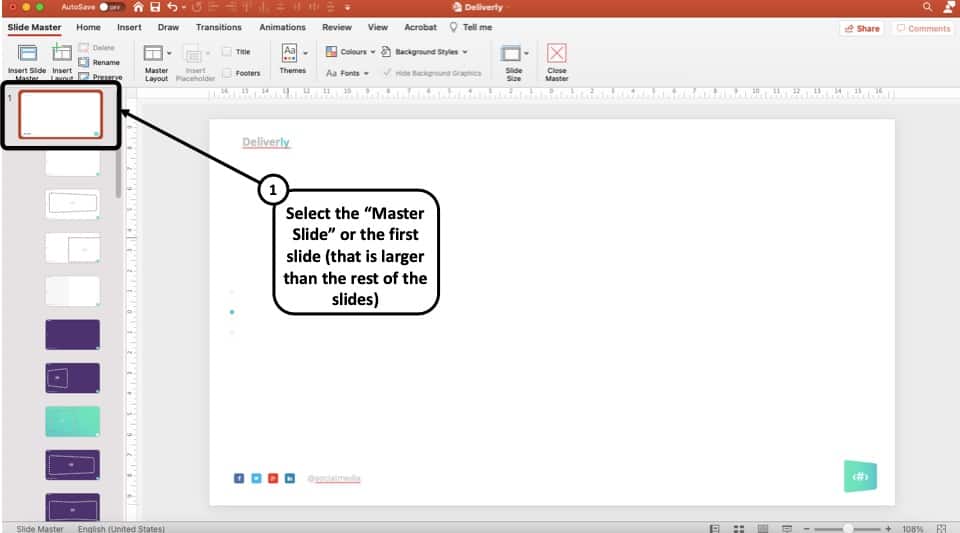
In the slide master view, scroll up in the left navigation panel and select the master slide (the first slide).
Step 3: Add a logo to the Master Slide
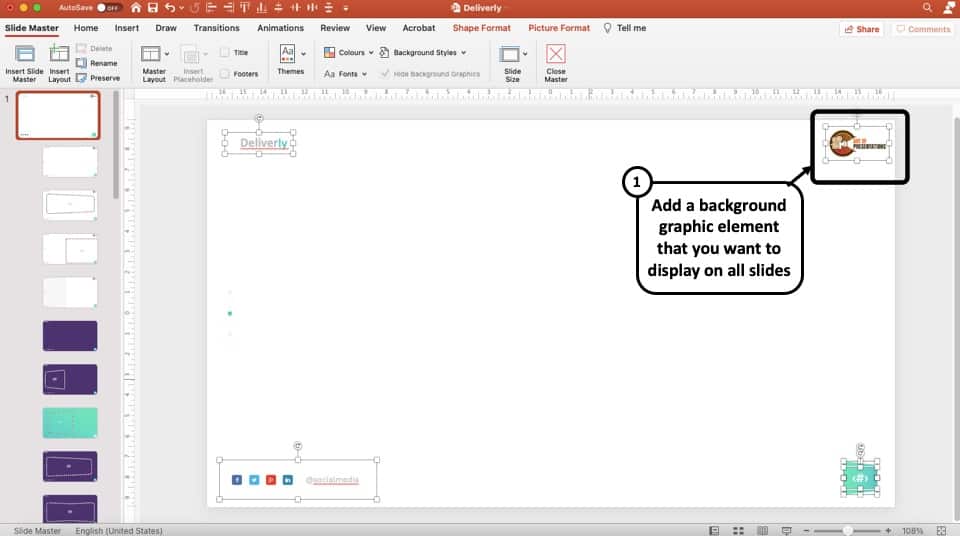
For this example, I’m going to add the logo of Art of Presentations to the “Master Slide” in the top right corner of the slide. You can add any logo or any other image file for the purpose of an example.
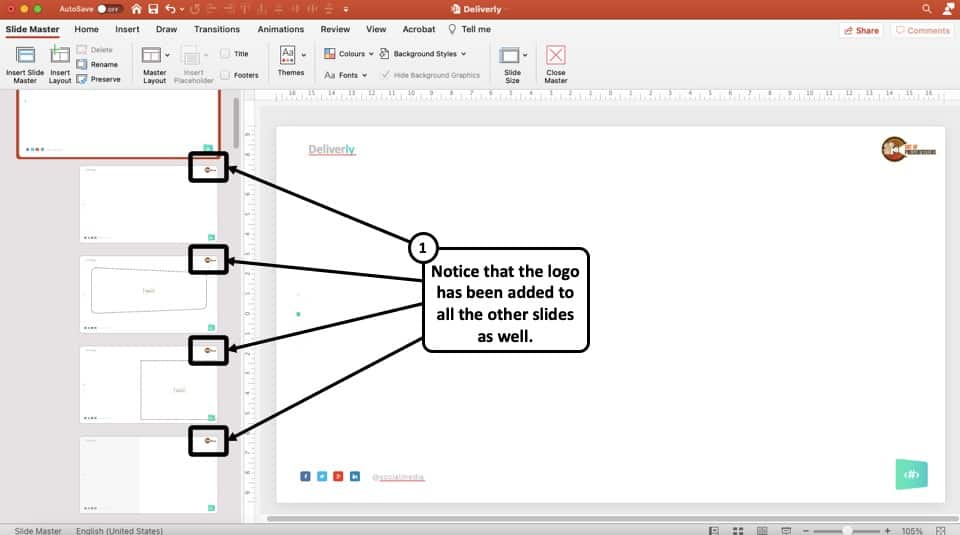
As you may have noticed, as soon as you add the logo to the master slide, the logo is visible on all the slides in the same position i.e. top right corner of the slide.
This is how you can edit or add background graphics all at once to all your slides. Now, you can also go to each slide and paste the logo on every single slide. But, that’s just very cumbersome and takes a lot of time! This is a much better way to add or edit graphics that should be visible on all slides.
Edit Background Graphics for a Specific Slide
Now, the problem with the previous method is that it is limited only to adding or editing elements that are supposed to be visible on every single slide. But, what if you want to edit an element to just one slide? How do you edit the background graphic for a specific slide?
Let’s take a look –
Step 1: Open the Slide Master View
As always, select the slide for which you want to edit the background graphic and click on “ View ” and then on “ Slide Master ” to open the slide master view in PowerPoint. You will automatically land on the slide layout of the specific slide in question.
Step 2: Select the specific background graphic on the slide
Next, all you need to do is just select the element that you want to edit on the slide. You will notice that even though you were not able to select the object in the “ Normal View “, you will now be able to select the element in the “ Slide Master View “!
Let’s say we want to change the color of this background element. Here’s what you need to do next.
Step 3: Change the Shape Fill Color
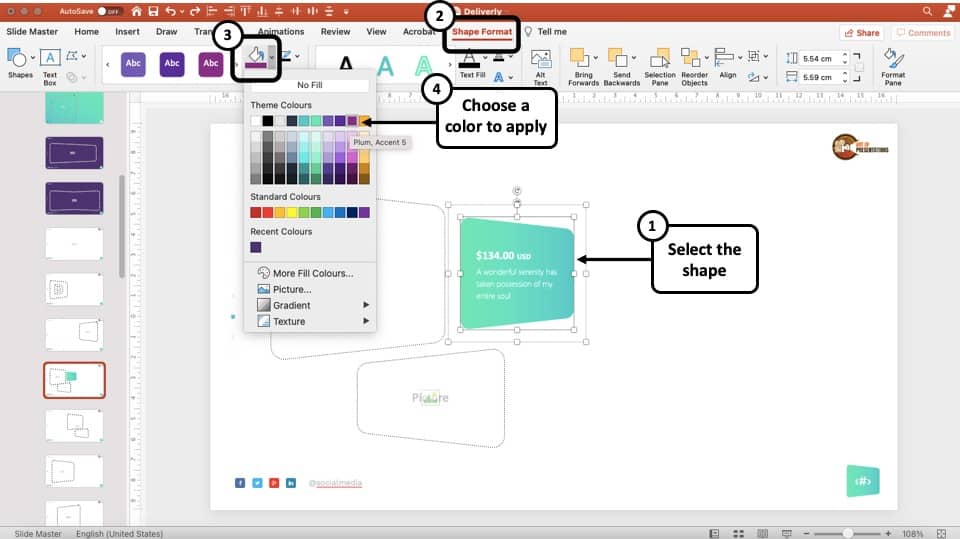
For this example, we plan to change the color of the background graphic. To do that, select the shape. Then, click on “ Shape Format “. Next, select the “ Shape Fill ” option, and select the desired color.
Step 4: Go back to the Slide Master View
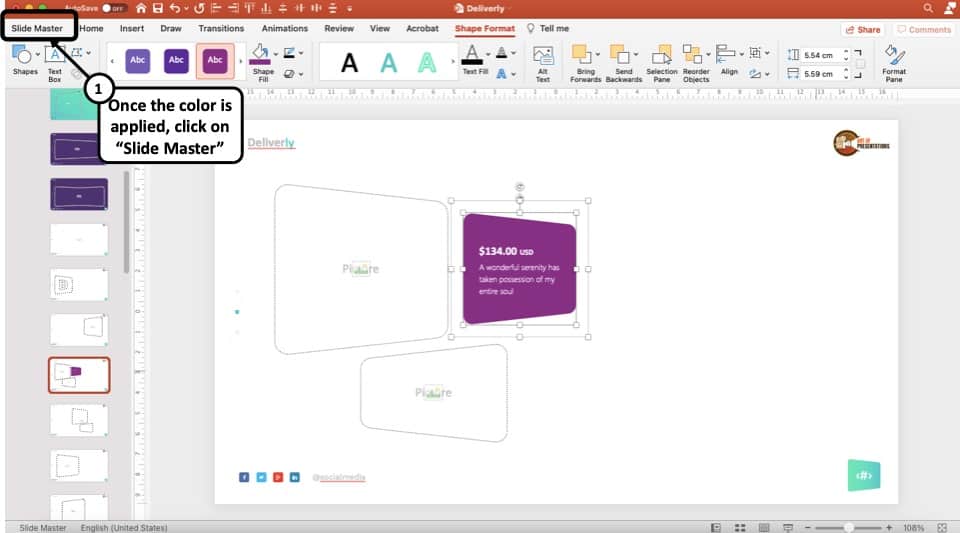
It is important to remember to go back to the slide master view. To do that, simply click on the “Slide Master” menu in the top left corner (as shown in the image above).
Step 5: Exit the Slide Master
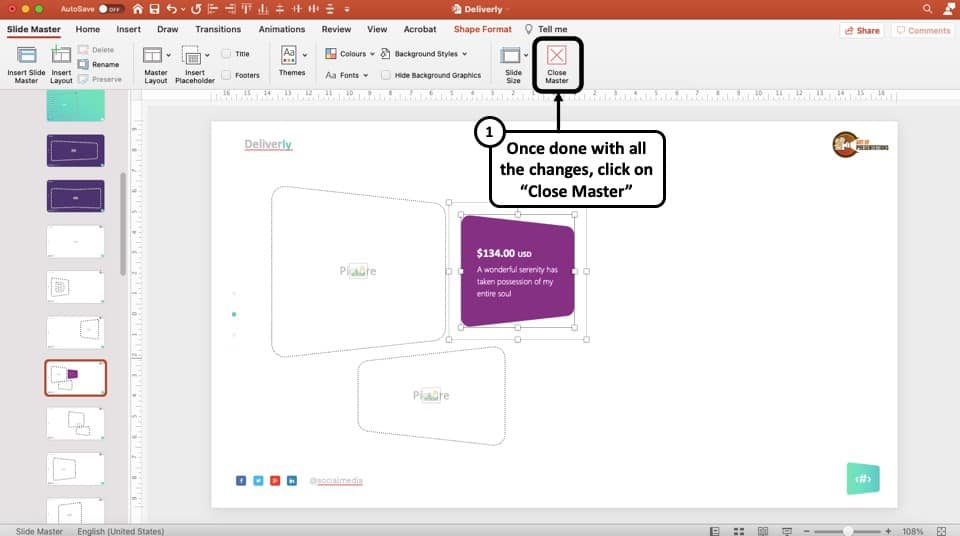
Once you are done making all the changes, the last step is really to exit the slide master view. To do that, simply click on the “ Exit Slide Master ” option visible (as showcased in the image).
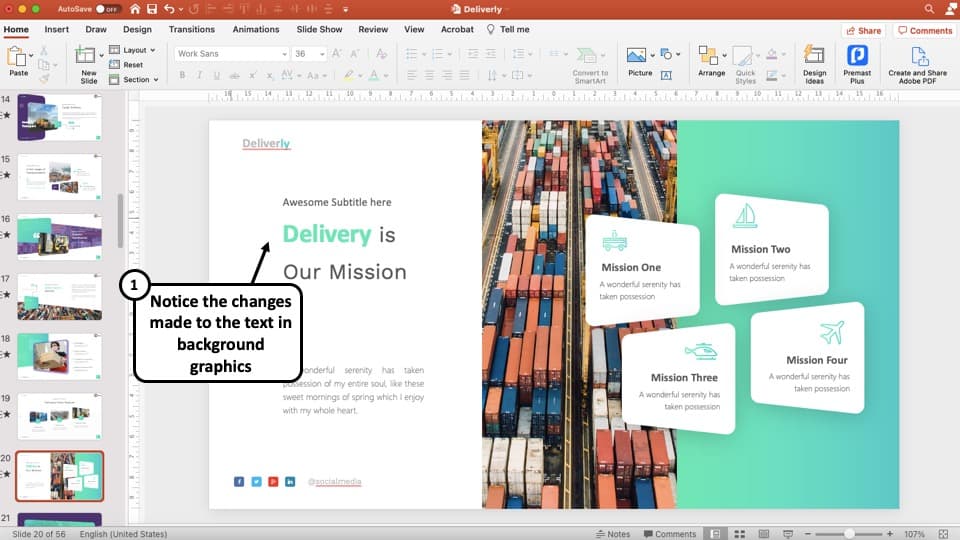
As you can see in the “Normal View”, not only have we managed to change the color of the element that we weren’t even able to select, but also we have added a logo to the slide (done through the master slide in the previous step).
How to Add Placeholders in the Slide Master View?
When learning about how to edit graphics in slide background, it is equally important to know how to add placeholders in the Slide Master View in PowerPoint!
Let’s understand this first before we move on to the other important parts of the article –
Step 1: Open “Slide Master” from “View” menu
Open the presentation slide on PowerPoint and from the “View” tab, click on “Slide Master”.
Step 2: Insert a new layout and add a placeholder

On the menu, click on the “ Insert Layout ” button to create a new layout.
Next, once the new layout has been added, click on “ Insert Placeholder ” to add a new placeholder to the slide.
Step 3: Add an Image Placeholder
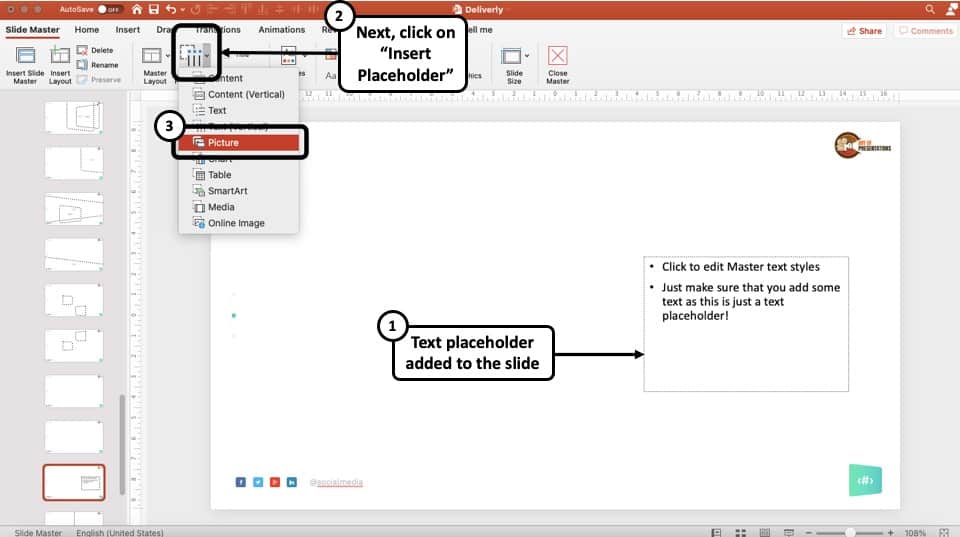
For this example, we will also add an image placeholder to the slide in addition to the text placeholder.
Step 4: Rename the Slide Layout and exit Slide Master
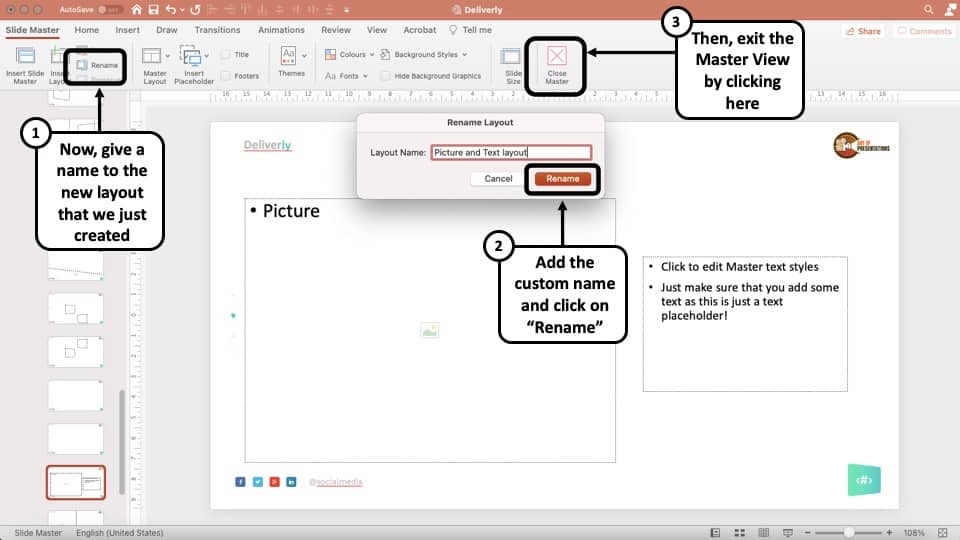
Once we are done adding the placeholders to the slide, simply rename the slide layout that we just created.
Once that’s done, simply click on “ Close Master “
Step 5: Insert the newly create slide layout

Our job is not done yet. In the normal view, you first need to insert the new slide layout that you have just created.
To do that, click on “Layout” under the “ Home ” ribbon. A dropdown menu will open that will contain all the various layouts present. Look for the one that contains the name for the layout we created and click on it.
That’s it! Finally, we are done. As you may notice, we now have successfully added placeholders to your PowerPoint presentation!
How to Edit Text in Background Graphics in PowerPoint?
So far, we have learned how to enable and disable background graphics. We have also learned how to add placeholders. Now, let’s learn how to edit the text in the background graphics in PowerPoint.
This process is quite simple. Here are the steps involved in editing text in background graphics in PowerPoint!
Step 1: Open the Slide Master
Open the slides in PowerPoint and click on “View>Slides Master” to open the presentation file in slide master view.
Step 2: Format the text and make the changes
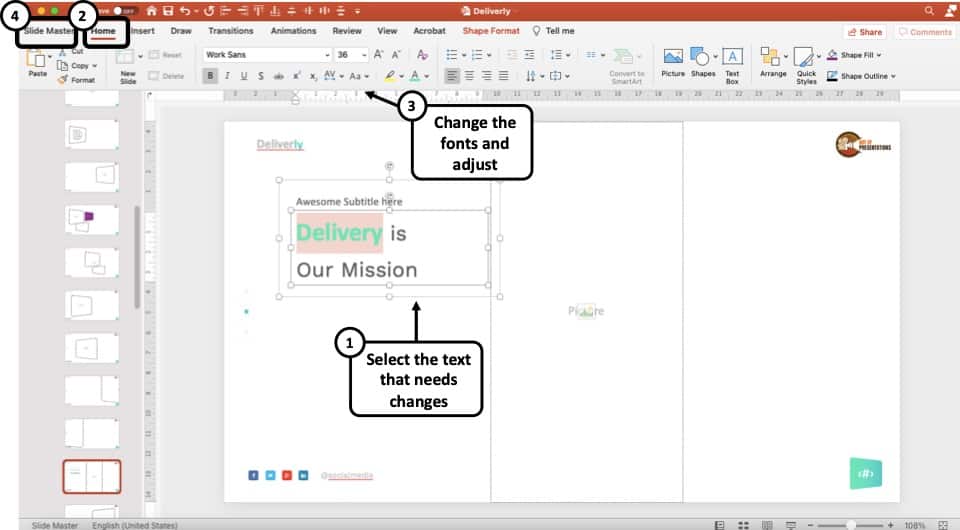
Format the text in order to edit text in the background graphics. To do that, first highlight the text. Then, click on “ Home “. Format the text as per your preference. Then, click “ Slide Master “
Step 3: Exit Slide Master
As a final step, simply click on “ Close Master ” to exit the slide master and enter the normal view. You should now be able to see the edits made to the text in background graphics in PowerPoint.
You can also make changes to master slide just the same way.
How to Edit Footer in PowerPoint Slide Master?
We’ve now learned the basics of how to access, edit and format background graphics. Thus, changing the footer from the slide background in PowerPoint shall not be difficult. Here’s what you need to do –
As usual, go to slide master view by clicking on the “View” tab and then the “Slide Master” tab.
Step 2: Scroll up to the Master Slide

In the slide master view, scroll up in the left slide navigation pane and select the first slide.
Step 3: Edit the Footer and Exit Slide Master
Now edit the footer as per your requirement. Here, I’ve changed the text for the social handles to represent my brand i.e. “Art of Presentations”. (as shown in the image above)
Step 4: Switch to Normal View to Validate Changes
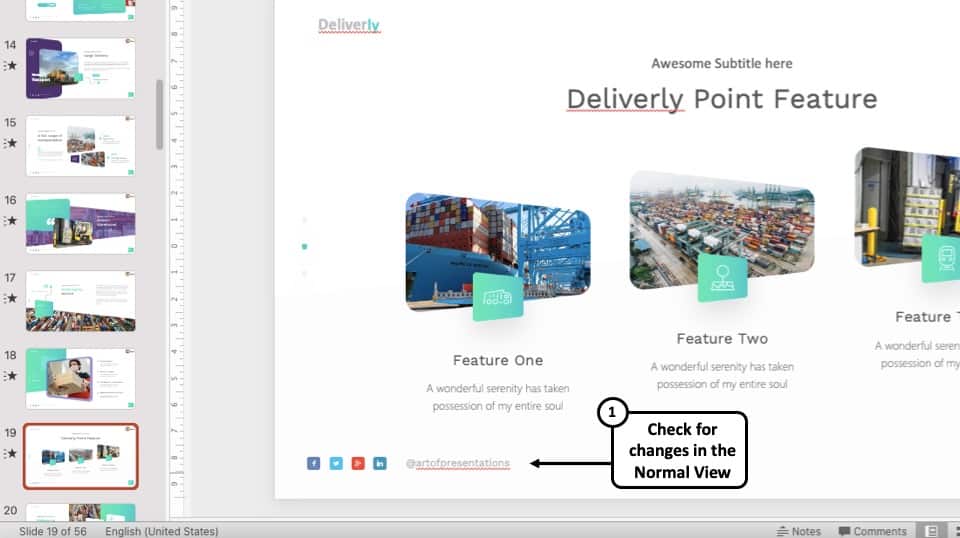
After finishing editing, switch to normal view. You will notice that your changes have been applied to all the slides that are using this slide master layout.
How to Unlock and Edit Images in Slide Master in PowerPoint?
When it comes to background graphics, it feels like images are the most annoying especially when we are unable to select or change the image. This can happen when the images are used as background graphics in the slide master view.
Nevertheless, here’s what you need to do –
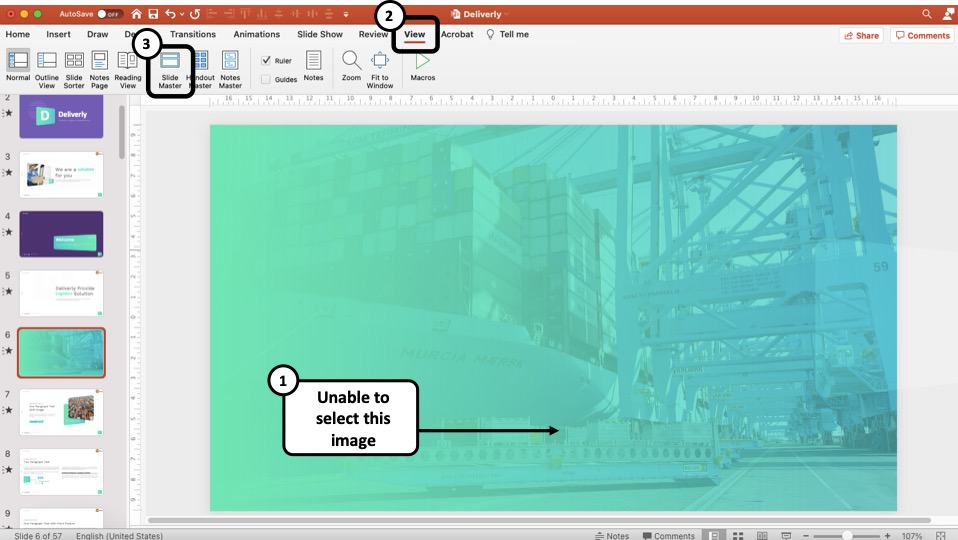
First, open the slide in PowerPoint that contains the image that you are unable to select in the Normal View. Then, you can click on “ View “. Click on “ Slide Master ”
Step 2: Locate and select the image

Sometimes, there can be shape layers added on top of the image. Remove the layers and access the image. You can now right-click on the image and format it the way you normally would format an image!
Furthermore, you can also choose to delete the image from the slide background or the slide master view. Alternatively, you can also cut the image and paste it on the slide in the normal view to make the image more accessible.
Step 3: Ensure that the slide has a solid white fill
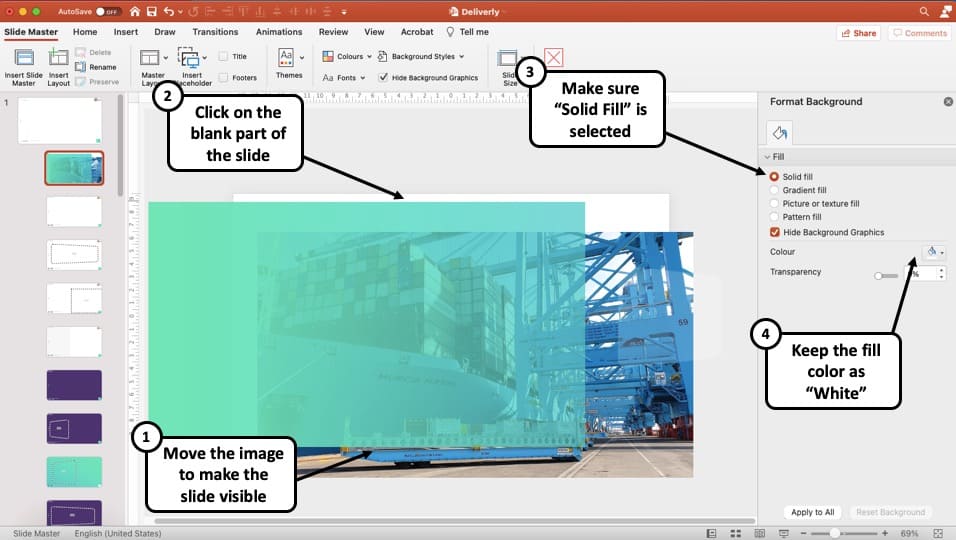
One last thing that you need to check is that the slide doesn’t have a picture fill. Sometimes, you may not be able to grab the image even in the slide master. This can happen when the background of the slide has a picture fill. Meaning, an image has been used to fill a slide!
To counter this issue, right-click anywhere on the slide, and then click on “Format Options”. In the format pane on the right, make sure that the fill selected is “ Solid Fill “. Also, choose the color of the solid fill as “ White “. This will ensure there is no picture fill done for the slide!
More PowerPoint Related Topics
- How to Crop a Picture in PowerPoint? [Complete Step-by-Step Tutorial!]
- How to Give a Presentation on Zoom? A Helpful Resource!
- How to Convert a PowerPoint to PDF? [A Simple Guide!]
- PowerPoint vs Google Slides: Which is Better? [ULTIMATE Test!]
- How to Change Bullet Style in PowerPoint? A Complete Guide
Credit to Wayhomestudio (provided by Freepik) for the featured image of this article
How to Change the Slide Background PowerPoint

PowerPoint presentations are an essential part of modern communication. They are used in business, education, and entertainment to convey information and ideas. One of the most important aspects of a PowerPoint presentation is the background. The background sets the tone for the entire presentation and can make or break the audience’s engagement.
In this blog post, we will explore different methods to change the PowerPoint background. Whether you want to use a solid color, gradient, pattern, or image, I will show you how to customize your presentation to make it stand out.
Table of Contents
How to change powerpoint slide background.
1. Open a document in PowerPoint. Navigate to the slide you want to modify.

2. On the slide preview on the left side panel, right-click the slide and then select Format Background…

3. A panel on the right side will appear. If you want to change the background color, select Solid fill and select the Color . You may also adjust its Transparency parameter.

4. Next, you have the option for Gradient Fill . This background type has a dozen parameters to play with. It may look threatening, but it’s relatively easy to understand.

5. If you want to add a photo as a slide background, go to Picture or texture fill and click Insert . After that, select the photo destination and insert the file into PowerPoint.

6. Lastly, you have the option for Pattern fill . This background style is simple. You can select one among many patterns and adjust the Foreground and Background color for it.

7. If you want to apply this background to all slides, click Apply to All .

8. Otherwise, you can close the panel when done.

10. You have changed the slide background in a PowerPoint document.

As a general rule of thumb, make sure the background provides enough contrast so the text can still be seen. If a compromise is needed, consider changing the font color or modifying the background color/photo style .
Frequently Asked Questions
Below are some possible questions people might ask about this article’s topic.
Can I use my own image as the slide background in PowerPoint?
Certainly, you can personalize your slide background in PowerPoint by using your own image. To accomplish this, follow these steps: Open your PowerPoint presentation, select the specific slide for background modification, access the Design tab in the PowerPoint ribbon, click on the Format Background button, choose Picture or texture fill , use the Insert button to select your desired image as the background, and fine-tune settings such as transparency to meet your preferences.
How do I remove the background from an image in PowerPoint?
To remove the background from an image in PowerPoint, simply follow these steps: First, insert the image into your PowerPoint slide. Then, click on the image to select it. Next, navigate to the Format tab within the PowerPoint ribbon and locate the Remove Background button. Utilize the Mark Areas to Keep and Mark Areas to Remove tools to precisely refine your selection. Finally, once you’ve achieved the desired result, click on the Keep Changes button to apply the modifications.
How do I change the background color of all slides in PowerPoint?
To change the background color of all slides in PowerPoint, follow these straightforward steps: First, open your PowerPoint presentation. Then, proceed to the Design tab within the PowerPoint ribbon. Click on the Background Styles button, which will lead you to the Format Background option. Choose Solid fill and pick your desired background color. To ensure consistency across all slides, click on the Apply to All button, and the selected color will be applied to all slides in your presentation.
About The Author
Related posts.

How to Fit Picture into PowerPoint Slide Automatically

How to Make a Typewriter or Command Line Animation in PowerPoint

Setting All PowerPoint Slides to Switch After 10 Seconds

Easily Change PowerPoint’s Default Bullets

How to Change Background of Only One Slide in PowerPoint

PowerPoint is a versatile tool that allows you to create engaging and informative presentations. However, the software can sometimes be tricky to navigate, especially when it comes to changing backgrounds. In this article, we will take a comprehensive look at how to change the background of only one slide in PowerPoint. We will cover everything from customizing background options to troubleshooting common issues to make sure that you can achieve the perfect presentation you’re looking for.
Table of Contents
Step-by-Step Guide to Changing Backgrounds in PowerPoint
The first thing to understand is how to change backgrounds in PowerPoint. Here are the steps to follow:
- Select the slide you want to change the background for
- Go to the “Design” tab in the top menu bar
- Select “Background Styles” on the right-hand side of the toolbar
- Choose “Format Background” at the bottom of the dropdown menu
- The “Format Background” dialog box will appear. Here, you can choose the type of fill you want to use and customize the colors and effects
- Once you have made your selections, click “Apply to Selected Slides” to change the background only for the slide you have selected
It’s important to note that you can also change the background for all slides in your presentation. To do this, select the “Apply to All Slides” option in the “Format Background” dialog box. This will change the background for every slide in your presentation.
Another useful feature is the ability to add a picture as your background. To do this, select the “Picture or Texture Fill” option in the “Format Background” dialog box. From there, you can choose an image from your computer or online and adjust the transparency and other settings to create a unique and visually appealing background for your presentation.
Customizing Your Slides: Background Options in PowerPoint
There are many background options available in PowerPoint, which allow you to customize your slides to match your presentation’s style and message. You can choose between solid colors, gradients, textures, patterns, and pictures. Additionally, you can add effects such as shadows and transparency to your backgrounds for a more dynamic look.
To access the different background options, follow the same steps outlined above to bring up the “Format Background” dialog box. From there, choose the type of fill you want to use and customize the colors, effects, and transparency as desired. Don’t be afraid to play around with different options until you find the perfect fit for your presentation.
It’s important to keep in mind that the background of your slides should not distract from the content of your presentation. Choose a background that complements your message and enhances the overall look of your slides. If you’re unsure about which background to use, consider using a simple solid color or a subtle gradient. Remember, the goal is to make your presentation visually appealing and easy to follow, not overwhelming or distracting.
The Benefits of Changing Backgrounds on Individual Slides
Changing the background of only one slide can provide several benefits for your presentation. Here are a few reasons why you might want to consider it:
- Creating emphasis: You can draw attention to a specific point or message by making it stand out with a unique background
- Setting the tone: Different backgrounds can convey different moods and emotions, helping you set the tone for your presentation
- Improving readability: By choosing a background that complements your content, you can help your audience read and understand your slides more easily
- Enhancing branding: If you’re creating a presentation for your business or organization, using a branded background can help reinforce your brand identity
Another benefit of changing backgrounds on individual slides is that it can help break up the monotony of your presentation. By using different backgrounds, you can create visual interest and keep your audience engaged throughout your presentation.
Additionally, changing backgrounds can be a useful tool for organizing your presentation. For example, you might use a different background for each section of your presentation, making it easier for your audience to follow along and understand the structure of your presentation.
Why You Might Want to Change Only One Slide’s Background in PowerPoint
There are several reasons why you might want to change only one slide’s background in PowerPoint. For example:
- You have a specific point or message you want to emphasize on that particular slide
- You want to distinguish one section of your presentation from another
- You want to match the background to the content on the slide
Another reason why you might want to change only one slide’s background in PowerPoint is to create a visual break in your presentation. By using a different background on one slide, you can create a pause or transition between two sections of your presentation. This can help your audience to refocus and stay engaged throughout your presentation.
Troubleshooting: Common Issues When Changing Backgrounds in PowerPoint
While changing backgrounds in PowerPoint is a relatively straightforward process, some issues may arise. Here are some common problems and their solutions:
- The background doesn’t change: Make sure you have selected the slide you want to change, and that you have chosen “Apply to Selected Slides”
- The background appears distorted: Check that the size of your background image matches the size of your slide
- The chosen background color or image clashes with the content on the slide: If this happens, try selecting a different color or image that complements your content
Another common issue when changing backgrounds in PowerPoint is that the background image or color may not appear as expected when the presentation is viewed on a different device or screen. This can be due to differences in screen resolution or color settings. To avoid this problem, it is recommended to test your presentation on different devices and adjust the background accordingly.
Additionally, if you are using a high-resolution image as your background, it may slow down the performance of your presentation. To avoid this, try compressing the image or using a lower resolution version. You can also consider using a solid color background instead of an image to improve performance.
Time-Saving Tips for Changing Only One Slide’s Background in PowerPoint
If you’re pressed for time or want to streamline the process of changing backgrounds in PowerPoint, here are a few tips:
- Use the “Eyedropper” tool to match colors: If you want to use a color from another part of your presentation, you can use the Eyedropper tool to pick up that color and apply it to your background
- Save a custom background design: If you have created a custom background design that you want to reuse for other slides, save it as a PowerPoint template to make it easily accessible for future use
- Use shortcuts: Rather than clicking through the menus to access the background options, use keyboard shortcuts to save time. On a PC, press Alt+D+B. On a Mac, press Command+Shift+B
Another useful tip for changing only one slide’s background in PowerPoint is to use the “Format Background” option. This option allows you to choose from a variety of background styles, such as gradients, textures, and pictures. You can also adjust the transparency and brightness of the background to create a unique look for your slide. To access this option, right-click on the slide and select “Format Background” from the drop-down menu.
Making Your Presentation Stand Out with Unique Backgrounds on Individual Slides
Using unique backgrounds on individual slides can make your presentation stand out and grab your audience’s attention. Consider choosing backgrounds that include relevant images, patterns, or textures that complement your message and add visual interest. Don’t be afraid to get creative and experiment until you find the perfect design for each slide.
Another way to make your presentation stand out is by using animations and transitions between slides. These can add a dynamic element to your presentation and keep your audience engaged. However, be careful not to overdo it and make sure the animations and transitions are relevant to the content of your presentation.
It’s also important to consider the color scheme of your presentation. Choose colors that are easy on the eyes and complement each other. Avoid using too many bright or clashing colors, as this can be distracting and take away from your message. Stick to a consistent color scheme throughout your presentation to create a cohesive look.
How to Choose the Right Background for Each Slide in Your Presentation
Choosing the right background for each slide in your presentation is crucial in ensuring your message is effectively conveyed to your audience. To help with your selection process, consider the following:
- The purpose of the slide: What is the main message or point you wish to convey?
- Your audience: Consider your audience’s expectations, preferences, and needs. What type of design would best appeal to them?
- Your brand identity: Choose colors, patterns, and images that reflect your brand’s identity and messaging
Another important factor to consider when choosing a background for your presentation is the overall tone and mood you want to convey. For example, if you are presenting on a serious or somber topic, you may want to choose a more muted or subdued background. On the other hand, if your presentation is meant to be lively and engaging, you may want to choose a more vibrant and colorful background.
It’s also important to consider the readability of your text when choosing a background. Make sure the background color or pattern doesn’t make it difficult for your audience to read the text on your slides. A good rule of thumb is to choose a background that provides enough contrast with your text to make it easily readable.
Advanced Techniques for Customizing Backgrounds on Only One Slide in PowerPoint
If you’re comfortable working with PowerPoint and want to take your background customization to the next level, here are a few advanced techniques:
- Add custom shapes: Use PowerPoint’s shape tools to add custom shapes to your background, such as dots, stars, or arrows. This can add visual interest and dimension to your design
- Add animations: By adding simple animations to your background elements, you can create a dynamic and engaging slide
- Use layered backgrounds: Create layered backgrounds by adding multiple images or shapes. This can create a rich, textured design that is both dynamic and eye-catching
Hopefully, this article has provided you with a comprehensive guide on how to change the background of only one slide in PowerPoint. Whether you’re a PowerPoint novice or an advanced user, these tips and techniques will help you create presentations that stand out and effectively communicate your message.
By humans, for humans - Best rated articles:
Excel report templates: build better reports faster, top 9 power bi dashboard examples, excel waterfall charts: how to create one that doesn't suck, beyond ai - discover our handpicked bi resources.
Explore Zebra BI's expert-selected resources combining technology and insight for practical, in-depth BI strategies.

We’ve been experimenting with AI-generated content, and sometimes it gets carried away. Give us a feedback and help us learn and improve! 🤍
Note: This is an experimental AI-generated article. Your help is welcome. Share your feedback with us and help us improve.

How to Change PowerPoint to Portrait? A Step-by-Step Guide
Table of contents.
PowerPoint slides typically use a landscape orientation, where the width of the slide is wider than its height. This layout has become the norm for presentations because it matches the shape of many projectors and computer screens, ensuring that your content looks its best when displayed to your audience.
Landscape and Portrait Slide Sizes?
In PowerPoint, slides are typically set to Landscape orientation by default, coming in two sizes:
- Standard : 4:3 ratio (10×7.5 inches)
- Widescreen : 16:9 ratio (13.33×7.5 inches)
For Portrait slides, the default size is 10×5.626 inches.
Landscape orientation provides a wider space for your content, making it great for including visuals like images, charts, graphs, and tables. The text flows naturally from left to right, which is easier for viewers to read and understand.
On the other hand, Portrait orientation has a taller, narrower layout, with the height exceeding the width. While it’s not as common in presentations, Portrait orientation might be useful for specific situations where a different layout is needed.
How to Change PowerPoint to Portrait
On windows:.
Step 1 – Open your presentation: Launch Microsoft PowerPoint and open the presentation you want to modify.
Step 2 – Access the Design tab: Locate the ribbon at the top of the PowerPoint window. Click on the “Design” tab.
Step 3 – Find the Slide Size options: Within the “Design” tab, look for the “Customize” group on the right-hand side. Click the dropdown menu under the label “Slide Size.”
Step 4 – Choose “Custom Slide Size”: Several pre-defined sizes will appear. Instead of selecting one of those, choose the option at the very bottom: “Custom Slide Size.”
Step 5 – Set Orientation to Portrait: A new window titled “Slide Size” will pop up. Under the “Orientation” section, you’ll see two radio buttons: “Landscape” (which is the default) and “Portrait.” Click the radio button next to “Portrait” to switch the orientation.
Step 6 – Click “OK”: Once you’ve chosen “Portrait,” simply click the “OK” button at the bottom of the “Slide Size” window.
Step 7 – Choosing Between “Maximize” and “Ensure Fit”
After clicking “OK” in the previous step, PowerPoint might prompt you with a choice between two options:
- Maximize: This option enlarges your existing slide content to fill the entire portrait space. However, this may cause some elements to appear distorted or cut off.
- Ensure Fit: This option shrinks your slide content to fit proportionally within the portrait layout. This ensures everything stays visible but may leave extra blank space around the edges.
- Open your PowerPoint presentation.
- Go to the File menu and select Page Setup.
- In the “Page Setup” dialog box, under Orientation, choose Portrait. You can also adjust the width and height values here if needed.
Recommendations:
- For presentations intended to be shown on a screen: Choose “Maximize” to utilize the full portrait area. Text and images might need slight adjustments to avoid being cropped.
- For printing handouts or notes: Opt for “Ensure Fit” to guarantee all content remains visible on the printed page, even if there’s extra space.
Are you a Google Slides user? Check our guide on How To Make Google Slides Vertical here !
How to Make a Single Slide Portrait in PowerPoint?
While PowerPoint doesn’t directly support both orientations within a single file, you can achieve this by linking separate presentations. Here’s how:
Step 1: Open your landscape presentation.
Step 2: Navigate to the slide where you want to insert the link.
Step 3: Add a text box or select existing text to act as the link.
Step 4: Go to Insert > Action.
Step 5: Choose between “Mouse Click” (triggers when you click the text) or “Mouse Over” (triggers when you hover over the text).
Step 6: Select “Hyperlink to:” and choose “Other PowerPoint Presentation” from the dropdown.
Step 7: Locate and select your portrait presentation. Then in “Hyperlink to Slide”, select the slide you want to start from.
Step 8: Click “OK.”
Now, during your presentation, clicking (or hovering, if you chose Mouse Over) the designated text will seamlessly switch to your portrait presentation.
Remember these things while linking the presentation :
- Ensure both presentations are saved in the same folder to avoid broken links.
- Consider using a clear call to action on the linked text, like “Click here for details” or “View data in portrait mode.”
Benefits of Portrait Orientation
There are several reasons why you might need to change the orientation to portrait:
1. Enhanced Viewing Experience
- Vertical Content Suitability : Documents, articles, and social media feeds primarily consist of text, making portrait orientation more efficient in utilizing the screen’s height. This allows for better readability with fewer scrolls needed to view content.
- Focused Viewing : Portrait orientation gives a better view of vertical content like portraits or tall buildings, allowing you to focus on the details without distractions.
2. Considering Device Limits
- Comfortable Handheld Use : Holding a phone or tablet in portrait orientation is often more comfortable for long periods.
- Optimized Screen Space : On smaller screens, portrait orientation might be the only way to see everything without zooming or scrolling sideways.
3. Tailoring to Application Needs
- App-Specific Design : Certain applications are primarily designed for portrait orientation, and using them in landscape mode may result in functionality or display issues.
- Seamless Reading Experience : Many ebooks and webcomics are formatted for vertical scrolling, making portrait orientation preferable for a smooth and uninterrupted reading experience.
Tips for Creating Visually Appealing Portrait Slides
Choosing the Right Images:
- Pick clear, well-lit portraits without blurriness or pixelation.
- Make sure the images match the slide content, avoiding generic stock photos.
- Select portraits that convey emotions and resonate with the audience, considering facial expressions and mood.
- Aim for diversity by including various genders, ethnicities, ages, and backgrounds.
Composition and Design:
- Crop images strategically to highlight the subject’s face and remove distracting background elements.
- Position portraits carefully within the slide layout for balance.
- Use empty space effectively to avoid clutter and draw attention to the portrait.
- Coordinate the color scheme of the portrait with other slide elements.
Text and Content:
- Keep text brief on the portrait slide to avoid overshadowing the image.
- Choose a clear, readable font that matches the overall style.
- Place text thoughtfully to ensure important parts of the portrait are visible.
Additional Considerations:
- Use filters sparingly to enhance the mood without compromising image quality.
- Consider adding subtle overlays or textures for visual interest.
- Maintain a consistent visual style for a professional look.
Closing Thoughts
Changing PowerPoint to portrait orientation is a straightforward process that lets you customize your presentations to fit different purposes. Whether you’re making a vertical infographic or getting slides ready for a poster presentation, these steps will help you easily switch between landscape and portrait orientations in Microsoft PowerPoint.
Frequently Asked Questions
Why change slide orientation in powerpoint.
While landscape dominates presentations, switching to portrait in PowerPoint can be beneficial for showcasing tall content like portraits and infographics, creating handouts, adapting to specific screens, or adding visual variety. However, this format has limitations – you can’t mix orientations and content might require adjustments. Choose the orientation that best suits your content and presentation goals.
Can I mix Portrait and Landscape slides in one presentation?
While directly combining them isn’t possible, you can achieve a similar effect. Here’s how:
Create two separate presentations: One in landscape and another in portrait.
Link the presentations: Insert hyperlinks in your main presentation (landscape) to specific slides in the portrait presentation.
Does changing one slide’s orientation affect the whole presentation?
Yes. By default, all slides in a presentation share the same orientation (landscape or portrait). Changing one slide’s orientation will automatically adjust the entire presentation to match.
Can I revert my portrait PowerPoint back to landscape?
Yes, you can easily revert to landscape by adjusting the slide size settings.
Are there specific templates designed for portrait presentations?
Some templates are optimized for portrait mode, or you can customize existing ones.
Is there a quick way to switch between Landscape and Portrait in PowerPoint?
Unfortunately, there’s no single shortcut key to change the entire presentation’s orientation. However, you can access the orientation settings through the following methods:
- Go to the “Design” tab. In the “Customize” section, you’ll find the “Slide Size” option. Clicking the dropdown menu allows you to choose between Landscape and Portrait.
- Right-click on any slide. Select “Size and Layout” from the context menu. A window will appear where you can choose the desired orientation.
How to put PowerPoint in portrait mode for handouts?
In Print settings under “Handouts,” choose a portrait layout option like “2 Slides per Page (Portrait)” to display your slides in portrait on printed handouts.
What happens to my existing content if I change the orientation to portrait?
PowerPoint will attempt to scale your existing content to fit the new orientation. However, depending on the amount of content and its layout, adjustments might be necessary to ensure everything displays correctly.
Will my presentation work on all projectors if it’s in portrait orientation?
While most modern projectors can handle portrait presentations, some older models might have limitations. It’s recommended to test your presentation on the specific projector beforehand if unsure.
Save Time and Effortlessly Create Presentations with SlidesAI

- Backgrounds in PowerPoint Video
- PowerPoint Slide Masters Video
- Picture backgrounds Video
- Remove backgrounds Video

Backgrounds in PowerPoint

Let’s start from scratch and add a colorful or subtle background to a PowerPoint slide. Also, how to match a color from an image, and a few design tips about backgrounds.
Backgrounds: First steps
If you want to start from scratch, just right-click on a blank part of the slide. Click Format Background and a menu appears on the right-hand side. You can use colors, pictures, or textures.
Remember, this is the background of your presentation, so don’t be afraid to use white or black. Don’t let the background overwhelm your presentation.
Webinar: Working with Photos in Office
In this course, we are going to work with backgrounds in PowerPoint.
You could start with a theme that controls backgrounds, and colors and fonts.
But if you want to start from scratch, that's what we are going to dig into.
So here I have almost a blank slide and to get to the background menu, I just right-click on my mouse and I can see Format Background . Now, one thing, you want to make sure is click on a blank part of the slide.
If I click on this image, or I click over here on this text box, I get a different menu when I right-click.
So, some place no element, right-click, Format Background , and it opens up this menu. Let's jump into Solid fill .
Let me just click on this Fill color box and it gives me colors.
Now, even though this is a blank presentation, it has a theme-the Office theme, and each theme has its own palette of colors. That's why, these are chosen.
But you also can use standard colors, or you can click here for More Colors .
First, there is a color wheel, you can choose a color, or you can go up to Custom . Custom is great because you can plug in values.
There is a thing called RGB colors and they have a number value.
If you get those from your design, you can plug those in and get the exact color.
Let's say for your company colors, you can put that in your PowerPoint.
But, there is also a shortcut for that, and this is new in PowerPoint 2013.
Let me go over here to Color and go down to this Eyedropper tool and click that.
And I move. Now, the very tip of this eyedropper, if you put it on a color – one, if you rest it there, it shows you the RGB colors.
But if you click it, there you go, it turns the background to that color, right from that image.
Couple of things about color. One – don't be afraid to use white or black.
I mean this is your background. The star is your foreground of your presentation.
Also, if you use a strong color, it is going to limit the color palette.
I mean. Think about the PowerPoints we have seen, where you had those blue, dark blue backgrounds.
If we put black text on them, it is really hard to read.
Also, if you are going to be in an auditorium, some place dark where the audience is dark, make sure you use a dark or black background.
Okay, let's go on. Let's show Gradient fill . Click that and you can see it, kind of blends, light in color.
In fact, the top part here is white and the color comes in at the bottom corner.
Now, if you look over the menu, there are tons of different ways you could fiddle with this, as much as you want.
I'll just show you a preset or two. If I click this one, now the light is at the bottom, and the corners are dark.
Finally, we are going to show a Texture fill .
And, go down here to this box, this little box here, this is Texture . It shows you some pre-made ones.
There is some marble, there is cloth, there are some other things that you can use. This is a Paper bag that I like.
You click on that. Now one thing with a strong background is that it is hard to read text on that. So, you can lighten that up with this Transparency tool.
It is a bar you just click on it and move it to get the lightness that you want.
You can see what you want, and click, and there, you have it.
If you like this background, just go down here to Apply to All .
And you can click that and it applies that background to all of the slides.
Now, to do more with pictures and watermarks, we need to learn a little bit about the Slide Master , and we'll do that in the next video.

Need more help?
Want more options.
Explore subscription benefits, browse training courses, learn how to secure your device, and more.

Microsoft 365 subscription benefits

Microsoft 365 training

Microsoft security

Accessibility center
Communities help you ask and answer questions, give feedback, and hear from experts with rich knowledge.

Ask the Microsoft Community

Microsoft Tech Community

Windows Insiders
Microsoft 365 Insiders
Was this information helpful?
Thank you for your feedback.
IMAGES
VIDEO
COMMENTS
Format the slide background with a photo. On the ribbon, select the Design tab. At the far-right end, select Format Background. The Format Background pane opens on the right side of the window. Under Fill, select Picture or texture fill. Under Picture Source, select Insert. Choose where you want to get the image from, then navigate to the image ...
Once your slides are selected, in PowerPoint's ribbon at the top, click the "Design" tab. On the "Design" tab, from the "Customize" section, select "Format Background." To the right of PowerPoint's interface, you will see a "Format Background" pane. Here, in the "Fill" section, you will select a custom background for your slides.
Changing the Background in PowerPoint. Select the slide you want to change and click the Design tab. Click Format Background and click Fill. You can change the background to Solid, Gradient, Picture or Texture or Pattern. To apply the background to all slides, click Apply to All. Method 1.
Head to the slide you want to change in your slideshow. Go to the Design tab and select Format Background. Alternatively, right-click a blank spot on the slide and pick Format Background . When the sidebar opens on the right, you should see the Fill section expanded. If not, use the arrow on the left to display its settings.
Insert a background picture on a slide. Right-click the margin of the slide and then select Format Background. In the Format Background pane, choose Picture or texture fill. (This option is unavailable if you haven't Copied a picture.) To adjust the picture's relative lightness, slide the Transparency bar to the right.
Open the PowerPoint document, choose the slide you want to change the background and click on the Design section in the top menu. Then click on the Format Background tab. A new section will open on the right side. There, select the Picture or Texture Fill - Insert option. Choose From a File to insert the image from your own pc or select any of ...
By customizing it, you can add a unique look that reflects your topic or personal style. Right-click on the slide where you want to change the background and select Format Background. In the Format Background pane, choose Solid Fill. To the right of Color, click the box and pick a color. You can also use a picture as the background.
To change the background of your PowerPoint slides to one of the four available options, start by right-clicking a slide or going to the "Design" tab in the top menu bar. The process will look the ...
In this tutorial you will learn how to change a slide background in PowerPoint using two different methods. The second method is the most versatile.You will...
Change the background of a slide to a color. To change the background color of a slide: Go to Normal View (you may need to click the Normal button on the bottom right of the screen). Display the slide with the slide background you want to change. Right-click a blank part of the slide. A drop-down menu appears.
To change the background in PowerPoint, you can follow a few simple steps starting with opening the presentation and navigating to the 'Design' tab. Once you are on the 'Design' tab, look for the option labeled 'Format Background' typically located towards the right side of the toolbar.
Format the slide background with a photo. On the ribbon, select the Design tab. At the far-right end, select Format Background. The Format Background pane opens on the right side of the window. Under Fill, select Picture or texture fill. Under Picture Source, select Insert. Choose where you want to get the image from, then navigate to the image ...
A background is the color, gradient or picture behind your slide's content. By customizing it, you can add a unique look that reflects your topic or personal...
Change design themes and background colors in PowerPoint on your mobile device. ... You can use your mobile device to change the theme or background color of your PowerPoint slides. On your Android tablet or phone ... tap Home, and then tap Design. Tap Themes to see a gallery of available themes. Tap a design theme to apply it to your ...
How to add a background in PowerPoint - the right-click method. Method 2 - the Design tab option. To access this option, go to the Design tab on the ribbon. On the far right side, you will see the Format Background option. Clicking it will open the Format Background pane on the right side of your screen.
Improve your presentation's visual appeal and draw the audience's focus to the primary issue by switching to new and different background visuals in PowerPoi...
To edit the background graphics in PowerPoint, first select the slide in the Normal View. Next, click on the "View" tab. Then, click on "Slide Master". This will open the master layout of your presentation. Select the graphic on the slide, and edit or delete it as required. Lastly, exit slide master.
Click on the Design tab at the top of the PowerPoint window. Select the Format Background option in the Customize group. Select the Picture or Textures category. Choose the From File option under the Insert Picture From group. Browse through the pictures on your computer and click Insert to add one to your background.
Select Design > Format Background. OR. Right-click the margin of slide and select Format Background . In the Format Background pane, select Picture or texture fill. Select File. In the Insert Picture dialog box, choose the picture you want to use and then select Insert. Note: PowerPoint resizes the image to fill the entire slide background.
1. Open a document in PowerPoint. Navigate to the slide you want to modify. 2. On the slide preview on the left side panel, right-click the slide and then select Format Background…. 3. A panel on the right side will appear. If you want to change the background color, select Solid fill and select the Color. You may also adjust its Transparency ...
In this tutorial, you will learn how to change the slide backgrounds in PowerPoint.Don't forget to check out our site http://howtech.tv/ for more free how-to...
Here are the steps to follow: Select the slide you want to change the background for. Go to the "Design" tab in the top menu bar. Select "Background Styles" on the right-hand side of the toolbar. Choose "Format Background" at the bottom of the dropdown menu. The "Format Background" dialog box will appear.
How to Change PowerPoint to Portrait. On Windows: Step 1 - Open your presentation: Launch Microsoft PowerPoint and open the presentation you want to modify. Step 2 - Access the Design tab: Locate the ribbon at the top of the PowerPoint window. Click on the "Design" tab. Step 3 - Find the Slide Size options: Within the "Design" tab ...
Let's start from scratch and add a colorful or subtle background to a PowerPoint slide. Also, how to match a color from an image, and a few design tips about backgrounds. Backgrounds: First steps. If you want to start from scratch, just right-click on a blank part of the slide. Click Format Background and a menu appears on the right-hand side ...