The best presentation software
These powerpoint alternatives go beyond the basics..

The latest presentation apps have made it easier than ever to format slides and create professional-looking slideshows without giving off a "this is a template" vibe. Even standard PowerPoint alternatives have updated key features to make it easier than ever to collaborate and create presentations quickly, so you can spend more time prepping for your actual presentation.
If, like me, you've been using Google Slides unquestioningly for years, it's a whole new world out there. The newest crop of online presentation tools go way beyond the classic slideshow experience, with new features to keep your audience's attention, streamline the creation process with AI, and turn slide decks into videos and interactive conversations.
I've been testing these apps for the past few years, and this time, I spent several days tinkering with the top presentation software solutions out there to bring you the best of the best.
Beautiful.ai for AI-powered design
Prezi for non-linear, conversational presentations
Powtoon for video presentations
Genially for interactive, presenter-less presentations
Pitch for collaborating with your team on presentations
Zoho Show for a simple presentation app
Gamma for generative AI features

What makes the best presentation app?
How we evaluate and test apps.
Our best apps roundups are written by humans who've spent much of their careers using, testing, and writing about software. Unless explicitly stated, we spend dozens of hours researching and testing apps, using each app as it's intended to be used and evaluating it against the criteria we set for the category. We're never paid for placement in our articles from any app or for links to any site—we value the trust readers put in us to offer authentic evaluations of the categories and apps we review. For more details on our process, read the full rundown of how we select apps to feature on the Zapier blog .
When looking for the best presentation apps, I wanted utility players. After all, slideshows are used for just about everything, from pitch decks and product launches to class lectures and church sermons. With that in mind, here's what I was looking for:
Pre-built templates. The best presentation tools should have attractive, professional-looking templates to build presentations in a hurry.
Sharing and collaboration options. Whether you plan to share your webinar slides later, or you just want to collaborate with a coworker on a presentation, it should be easy to share files and collaborate in real-time.
Flexibility and customization options. Templates are great, but top presentation apps should enable you to customize just about everything—giving you the flexibility to build exactly what you need.
Affordability. Creating compelling presentations is important, but you shouldn't have to bust your budget to make it happen. With capable free tools on the market, affordability is a top consideration.
Standalone functionality. There's no reason to use multiple tools when one can do it all, so I didn't test any apps that require and work on top of another presentation app like PowerPoint or Google Slides.
Familiar, deck-based UI. For our purposes here, I only tested software that uses slides, with the familiar deck-based editor you expect from a "presentation" tool (versus, for example, a video creation app).
While many apps now offer AI features in one way or another, I found many of these features to be lacking still—they're often slow, struggle to pull in relevant imagery, and yield wildly inconsistent designs. For that reason, I opted not to make AI features a strict requirement (for now!), and I've still included apps that don't offer AI. (Of course, if you opt for one of those, you can still easily get AI-generated images from a separate tool and copy them into your presentation app of choice.)
Beyond that, I also looked for presentation apps that brought something unique to the table—features above and beyond what you can get for free from a legacy solution like PowerPoint or Google Slides. (And I opted not to test any brand new apps that are still in beta, since there are so many established options out there.)
Here's what my testing workflow looked like:
I went through any onboarding or guided tutorials.
I created a new deck, scanning through all available templates, noting how well-designed they were (and which were free versus paid).
I added new slides, deleted slides, edited text and images, and played around with other content types.
I changed presentation design settings, like color schemes and background images.
I reviewed and tested the sharing and collaboration options.
I tested out presenter view (when available).
After my first round of testing, I went back into the top performers to test any unique or niche features like AI, brand settings, interactive content, and more. With that, these are the best presentation apps I found—each one really brings something different or radically easy to the table.
The best presentation software: at a glance
The best free presentation software, canva (web, windows, mac, android, ios).

Canva pros:
Excellent free plan
Tons of amazing templates for all use cases
Feature-rich
Canva cons:
The Magic Design AI tool is still inconsistent and not super impressive
Canva offers one of the most robust free plans of all the presentation apps I tested. The app delays account creation until after you've created your first design, so you can get started building your presentation in seconds. Choose from an almost overwhelming number of beautiful templates (nearly all available for free), including those designed specifically for education or business use cases.
Anyone who's accidentally scrolled too far and been bumped to the next slide will appreciate Canva's editor interface, which eliminates that problem altogether with a smooth scroll that doesn't jump around. Choose from a handful of preset animations to add life to your presentations, or browse the library of audio and video files available to add. And Canva also has a number of options for sharing your presentation, including adding collaborators to your team, sharing directly to social media, and even via QR code.
Present directly from Canva, and let audience members submit their questions via Canva Live. Once you share a link to invite audience members to your presentation, they can send questions for you to answer. As the presenter, you'll see them pop up in your presenter view window, so you can keep the audience engaged and your presentation clear. Alternatively, record a presentation with a talking head bubble—you can even use an AI presenter here—to share remotely.
Canvas has added a number of AI-powered tools , but I wasn't super impressed by them yet. When I asked the Magic Design tool to generate a presentation from scratch, for example, the result was a bunch of unrelated images, inconsistent design, and surface-level copy. These features will likely improve in time, but for now, you're better off starting from one of Canva's many great templates.
Canva pricing: Free plan available; paid plans start at $119.99/year for 1 user and include additional features like Brand Kit, premium templates and stock assets, and additional AI-powered design tools.
The best presentation app for AI-powered design
Beautiful.ai (web, mac, windows).
Beautiful.ai pros:
True AI design
No fussing around with alignment
Still allows for customization
Beautiful.ai cons:
No free plan
Generative AI features aren't great yet
If you're like me, editing granular spacing issues is the absolute worst part of building a presentation. Beautiful.ai uses artificial intelligence to take a lot of the hassle and granular design requirements out of the presentation process, so you can focus on the content of a presentation without sacrificing professional design. If I needed to make presentations on a regular basis, this is the app I'd use.
Many apps have recently added AI design features, but Beautiful.ai has been doing it for years—and they've perfected the UX of AI design, ensuring the tool's reign as the most streamlined and user-friendly option for AI design.
The editor is a little different from most presentation apps, but it's still intuitive—and you'll start off with a quick two-minute tutorial. When creating a new slide, scroll through "inspiration slides" to find a layout you like; once you choose, the app will pull the layout and automatically adapt it to match the design of the rest of your presentation.
With 10 themes, several templated slides, over 40 fully-designed templates, and 23 different color palettes to choose from, Beautiful.ai strikes a perfect balance between automation and customization.
While Beautiful.ai doesn't offer a free plan, paid plans are reasonably priced and offer sharing and collaboration options that rival collab-focused apps like Google Slides. And speaking of Google, you can connect Beautiful.ai with Google Drive to save all your presentations there.
Note: I did test the newly released generative AI feature (called DesignerBot) and felt it wasn't much to write home about. It's great for adding individual slides to an existing presentation—automatically choosing the best layout and matching the design to the rest of the deck—but as with most other apps, it struggled to generate a quality presentation from scratch.
Beautiful.ai pricing: Plans start at $12/month for unlimited slides, AI content generation, viewer analytics, and more. Upgrade to a Team plan for $40/user/month to get extra collaboration and workspace features and custom brand controls.
If you're a founder looking for an AI presentation tool for your pitch deck, Slidebean is a great Beautiful.ai alternative for startups. The app offers a number of templates; a unique, content-first outline editor; and AI design help that you can toggle on or off for each slide. I didn't include it on the list mainly because of the price: the free plan is quite limited, and the paid all-access plan starts at $228/year.
The best presentation app for conversational presentations
Prezi (web, mac, windows, ios, android).

Prezi pros:
Doesn't restrict you to standard presentation structure
Lots of customization options
Prezi Video lets you display a presentation right over your webcam video
Prezi cons:
Steep learning curve
Struggling to squeeze information into a basic, linear presentation? Give Prezi a try. Unlike nearly all other presentation apps on the market, Prezi Present doesn't restrict the structure of your presentation to a straight line. The editor focuses on topics and subtopics and allows you to arrange them any way you want, so you can create a more conversational flow of information.
With the structural flexibility, you still get all the same customization features you expect from top presentation software, including fully-editable templates. There's a learning curve if you're unfamiliar with non-linear presentations, but templates offer a great jumping-off point, and Prezi's editor does a good job of making the process more approachable.
Plus, Prezi comes with two other apps: Prezi Design and Prezi Video. Prezi Video helps you take remote presentations to a new level. You can record a video where the presentation elements are displayed right over your webcam feed. Record and save the video to share later, or connect with your video conferencing tool of choice (including Zoom, Microsoft Teams, and Google Meet) to present live.
Prezi pricing: Free 14-day trial and a free plan that includes up to 5 visual projects; paid plans start at $5/month and include additional features like private presentations and Prezi Present.
The best presentation app for video presentations
Powtoon (web, ios, android).
Powtoon pros:
Timing automatically changes based on the content on the slide
Can toggle between slideshow and video
Can orient presentation as horizontal, vertical, or square
Powtoon cons:
Limited free plan
Powtoon makes it easy to create engaging videos by orienting the editor around a slide deck. Editing a Powtoon feels just like editing a presentation, but by the time you finish, you have a professional video.
You can edit your slides at any time, and when you hit play, a video plays through your deck—the feel is almost like an animated explainer video. Each slide includes the animations you choose and takes up as much time as is needed based on the content on the slide. Powtoon figures the timing automatically, and you can see in the bottom-right of the editor how much time is used on your current slide versus the total presentation. If you ever want to present as a slide deck, just toggle between Slideshow and Movie.
You'll likely need to subscribe to a paid plan to get the most out of Powtoon—like creating videos longer than three minutes, downloading them as MP4 files, and white-labeling your presentations—but doing so won't break the bank. Plus, you'll unlock tons of templates complete with animations and soundtracks.
One of my favorite Powtoon features is the ability to orient your video: you can choose horizontal orientation (like a normal presentation) or opt for vertical (for mobile) or square (for social media). When your presentation is ready, you can publish straight to YouTube, Wistia, Facebook Ads, and any number of other locations.
Powtoon pricing: Limited free plan available; paid plans start at $20/month and include white-labeling, priority support, additional storage, and more.
The best presentation app for interactive presentations
Genially (web).

Genially pros:
Don't need a presenter (it's interactive)
You can set universal branding guidelines
Unlimited creations on the free plan
Genially cons:
Free plan has some limitations worth looking into (e.g., can only make public presentations)
While many presentation apps are built for presenter-led decks, Genially 's interactive features and animated templates make it easy to build a self-led presentation. A variety of interactive buttons allow you to show viewers additional context on hover, have them skip to any page of your deck, and let them navigate to external links.
This presentation program offers a bunch of searchable templates, including some for business proposals, reports, social media presentations, and more (though most of those are available on premium plans only). Genially also includes Smart blocks —templated blocks of content for elements like data visualizations and image galleries.
My favorite feature is the brand settings. Premium users can set universal branding guidelines that include your logo, color scheme, fonts, images, and backgrounds, among other options. Think of them like a custom template, created and customized by you, that the whole team can use. Once set, your team can easily create on-brand presentations that automatically apply your brand settings, without even thinking about it.
Plus, Genially supports additional content like training materials, infographics, and interactive images—all subject to your brand presets.
Genially pricing: Free plan available with unlimited creations and views and access to templates; paid plans start at $7.49/month and include additional download options, privacy controls, offline viewing, premium templates, and more.
The best presentation app for collaborating with your team
Pitch (web, mac, windows, ios, android).

Pitch pros:
Google levels of collaboration
Assign slides to specific team members
Start live video calls straight from decks
Pitch cons:
User interface is a little different than you're used to
Need to collaborate on presentations with your team? Pitch is a Google Slides alternative that gets the job done. As far as decks go, Pitch includes all the beautifully-designed templates, customizability, and ease of use you expect from a top-notch presentation tool. But the app really shines when you add your team.
The right-hand sidebar is all about project management and collaboration: you can set and update the status of your deck, assign entire presentations or individual slides to team members, plus comment, react, or add notes. Save custom templates to make future presentations even easier and faster.
You can also invite collaborators from outside your company to work with you on individual decks. And if you opt for a paid plan, Pitch introduces workspace roles, shared private folders, and version history.
The "Go live" feature is a personal favorite—with just a click on the camera icon in the top-right, you can start a live video call. Any team members who open the presentation can hop in and collaborate in real-time.
Pitch pricing: Free plan offers unlimited presentations, custom templates, and live video collaboration; paid plans start at $8/user/month for additional workspace features, presentation analytics, and more.
The best simple presentation app
Zoho show (web, ios, android, chrome).

Zoho Show pros:
Simple and easy to use
Version history and ability to lock slides
Completely free
Zoho Show cons:
Templates are pretty basic
If you're looking for a simple, yet capable presentation app that's a step up from Google Slides, Zoho Show is a great option. It's completely free to use, offers a clean, intuitive editor, and includes a number of great templates.
While the handful of "Themes" offered are on the basic side, Zoho templates boast a more modern and professional design than much of what Google Slides or PowerPoint offer. And I love that you can set the font and color scheme for the whole template, right from the start.
The app doesn't skimp on collaboration or shareability either. You can invite collaborators via email or shareable link, and comments and version history make it easy to work together on presentations. Once you're ready to share, you can even broadcast your presentation to a remote audience right from within Zoho. Plus, you can one-click lock slides to prevent any more editing or hide individual slides to customize your presentation for different audiences.
You can even connect Zoho Show to Zapier , so you can do things like automatically create a presentation when something happens in one of the other apps you use most.
Zapier is the leader in workflow automation—integrating with 6,000+ apps from partners like Google, Salesforce, and Microsoft. Use interfaces, data tables, and logic to build secure, automated systems for your business-critical workflows across your organization's technology stack. Learn more .
Zoho Show pricing: Free
The best presentation app for generative AI
Gamma (web).

Gamma pros:
Creates fully fleshed-out presentations from a prompt
Chatbot-like experience
Can still manually edit the presentation
Gamma cons:
Not as much granular customization
I tested a lot of apps claiming to use AI to up your presentation game, and Gamma 's generative features were head and shoulders above the crowd.
Simply give the app a topic—or upload an outline, notes, or any other document or article—approve the outline, and pick a theme. The app will take it from there and create a fully fleshed-out presentation. It's far from perfect, but Gamma produced the most useful jumping-off point of all the AI presentation apps I tested.
Here's the key: Gamma is much more geared toward the iterative, chatbot experience familiar to ChatGPT users. Click on the Edit with AI button at the top of the right-hand menu to open the chat, and you'll see suggested prompts—or you can type in your own requests for how Gamma should alter the presentation.
Once you've done all you can with prompts, simply close the chat box to manually add the finishing touches. While you do sacrifice some granular customizability in exchange for the AI features, you can still choose your visual theme, change slide layouts, format text, and add any images, videos, or even app and web content.
Gamma pricing: Free plan includes unlimited users, 1 custom theme, 400 AI deck credits, and basic view analytics; upgrade to the Pro plan ("coming soon," as of this writing) for $10/user/month to get additional AI credits, advanced view analytics, custom fonts, and more.
What about the old standbys?
You might notice a few major presentation players aren't on this list, including OGs Microsoft PowerPoint, Apple Keynote, and Google Slides. These apps are perfectly adequate for creating basic presentations, and they're free if you have a Windows or Mac device or a Google account.
I didn't include them on the list because the presentation space has really developed in the last several years, and after testing them out, I found these behemoths haven't kept pace. If they weren't made by Microsoft/Apple/Google, I might not even be mentioning them. They're pretty basic tools, they're behind the curve when it comes to templates (both quantity and design), and they don't offer any uniquely valuable features like robust team collaboration, branding controls, video, and so on.
Some of these companies (think: Microsoft and Google) are openly working on some pretty impressive-sounding AI features, but they haven't been widely released to the public yet. Rest assured, I'm watching this space, and the next time we update this article, I'll retest tools like PowerPoint and Google Slides to see what new features are available.
In any case, if you're reading this, you're probably looking for an alternative that allows you to move away from one of the big 3, and as the presentation platforms featured above show, there's a ton to gain—in terms of features, usability, and more—when you do.
Related reading:
8 Canva AI tools to improve your design workflow
The best online whiteboards for collaboration
How to share a presentation on Zoom without sharing your browser tabs and address bar
This post was originally published in October 2014 and has since been updated with contributions from Danny Schreiber, Matthew Guay, Andrew Kunesh, and Krystina Martinez. The most recent update was in May 2023.
Get productivity tips delivered straight to your inbox
We’ll email you 1-3 times per week—and never share your information.

Kiera Abbamonte
Kiera’s a content writer who helps SaaS and eCommerce companies connect with customers and reach new audiences. Located in Boston, MA, she loves cinnamon coffee and a good baseball game. Catch up with her on Twitter @Kieraabbamonte.
- Presentations
Related articles

The 11 best AI marketing tools in 2024

The 6 best email clients for Mac in 2024

The 7 best Zoom alternatives in 2024

The best CRM software to manage your leads and customers in 2024
The best CRM software to manage your leads...
Improve your productivity automatically. Use Zapier to get your apps working together.

Like what you're reading?
Mastering the Prezi Zoom
Get your team on prezi – watch this on demand video.

Chelsi Nakano April 29, 2016
As cool as it is, there is such a thing as too much Prezi zoom. If you’ve ever sat through a presentation that felt more like a rollercoaster ride than a speech, you know what we mean. That 180º flip may feel from the stage, but you don’t want to send your audience running for motion sickness bags—they want to be taken on a visual journey, not a wild ride.
The good news is that there are a few simple rules that will help you find the balance between making your presentations dynamic and making them easy on your audience’s eyes. Take a look at the quick tutorial below to learn how to master the art of Prezi transitions, so you can start zooming effectively:
Now that you’ve become an expert, learn how to put your new skills to use. Here are three different ways to take advantage of Prezi’s zooming capabilities, complete with examples to help you get started. Take a look, and you’ll be creating “aha” moments of your own before you know it.
SHOW SPATIAL RELATIONSHIPS BETWEEN YOUR DIFFERENT POINTS.
You can pan across Prezi’s infinite canvas to show your audience how your ideas relate to one another. Whether you are leading them on a journey across different points on a map or walking them through the different steps of your customer life-cycle, fluid movement from one point to the next will help your audience better understand and remember your message. (To learn more about the science behind this, read this blog post about spatial visualization and how our brains work !)
To see meaningful panning in action, take a look at the prezi below. The state of Colorado comes to life as the audience moves from city to city.
DIVE INTO THE DETAILS.
Whether you’re explaining a complicated process or diving into heaps of data, your audience will appreciate seeing the details within the context of your larger message. Out of context, details can get lost in the shuffle or become meaningless. By zooming into the details from the birds-eye view of the big picture, you can help your audience understand their importance within your story.
Take a look at the chart in this presentation—by zooming into the inflection point, you can highlight information in context that would be difficult for your audience to glean from the big picture.
REVEAL THE BIG PICTURE.
Just as you can zoom in to highlight details within your presentation, you can also zoomout to show your audience how your ideas fit into a bigger picture. This kind of big reveal serves as a lightning rod moment within your talk—the moment when you bring your ideas together to become a much larger message.
In the presentation below, data scientist Sandy Pentland reveals the network laid by each of his main talking points by zooming out to show them all in a single frame.
When executed properly, Prezi’s zooming features can allow you to visualize your ideas in a way that will make them clearer and more engaging. Get started on a prezi for your next presentation—and don’t be too surprised if you see hear gasps and see jaws drop.

You might also like
The new and improved powerpoint converter, prezi awards 2018: show us your best stuff, introducing prezi charts: bring your data to life, give your team the tools they need to engage, like what you’re reading join the mailing list..
- Prezi for Teams
- Top Presentations
15 Best Presentation Software for 2021
- Share on Facebook
- Share on Twitter
By Bilyana Nikolaeva
in Insights
3 years ago
Viewed 8,234 times
Spread the word about this article:

On average a presentation takes up to 20 minutes and experts say we make an impression within the first 30 seconds. That is why it’s important to “dress” our great product/idea with an equally exciting design. Most often, presentations are cooked up by non-designers, which creates a specific need – for powerful presentation software, which can help communicate a message beautifully, effectively, and to suit any user’s skill level. We hand-picked 15 of the best presentation software for 2021 , which will help you create presentations online, share them, while shining in your best light. In the meanwhile, check out some useful ideas tips to spice up your presentations .
A web-based presentation tool, which means you can access your presentations wherever you are, with an internet connection. It is known for its animations, cartoons, and infographics, which help the user to create more interactive presentations and explainer-style videos.
Example by Focusky
Best Features: Very interactive; you can create a unique to your story by combining different “frames” (slides); create your own animations within the presentation Price: Free, but heavily subscription-based Learning curve: Very intuitive, nicely organized by categories, but it would require some time to learn the animation controls Available for: Online Perfect for: Marketing and education
To summarize, this presentation tool is best for marketers and education, where the creator can get the most out of the cool animation and cartoons available. In the last years, there is an increased interest in Powtoon and RenderForest and we expect that more and more people will use them in 2021. No surprise – if you look at our article about Graphic Design Trends in 2022 , everything is moving towards animation, cool 3D-s, cartoons, and illustrations – and these are all things that this software can offer for your presentation.
Prezi is an online presentation software, which resembles a mind map. In comparison, PowerPoint offers a linear way of presenting, whereas Prezi allows you to better show relationships between different elements of your presentation, show details, zoom in and zoom out and show an overall view of your topic. Compared to PowerPoint is more interactive, but with fewer functionalities and a choice of templates.
Example by PreziBase
Best Features: Interactive presentations and interesting transitions, zoom in/out details Price: The very basic features are free, but most of the interesting ones are paid, starting from $3/month and reaching up to $59/month. They offer a free trial. Learning curve: it requires learning and going through a lot of menus and functionalities, similar to PowerPoint Available for: Online / Limited use for iOS and Android (only viewing, not creating and editing) Perfect for: teachers, businesses, more experienced designers, and specific presentations needs, but not recommended for newbies
Prezi is best in showing relationships between different parts of your presentations. There are some challenges in editing, and viewing across devices and its best features are paid for. We recommend it for quick, mind-map-like presentations without the need for ultra-special design.
3. RenderForest Presentation Maker
RenderForest is an online presentation tool, which is famous for its explainer style and whiteboard animations. The presentation templates often offer various motion/video backgrounds, which helps to grab your audience’s attention. Currently, the company is working on releasing its Graphic Design Software, which will allow users to create printables and beautiful designs for social media. This shows that RenderForest’s team knows the market well and does its best to cater to its needs!
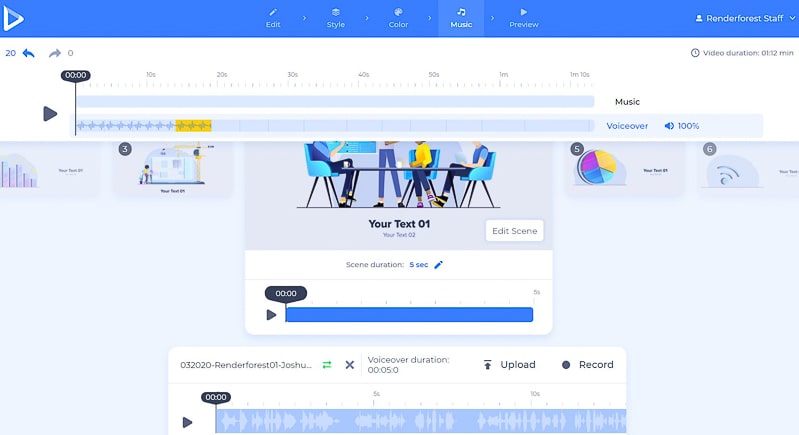
Example by Renderforest
Best Features: Video holders with text on shapes, cool transitions Price: There is a free version, the paid ones start at $20.34 per user/month Learning curve: Relatively easy to use, the simple interface helps the user Available for: Online / iOS / Android Perfect for: Education and business
Although not one of the cheapest solutions, it allows you to create engaging and interactive presentations with lots of cool animations. That makes RenderForest a great choice for more educational and marketing explainer-type videos/presentations.
4. Mentimeter
Mentimeter is a very interesting online presentation software. It allows your audience to engage with your presentation in real-time and you can create polls, ask questions, which are then displayed to your presentation. The answers from the audience remain anonymous so people are even more encouraged to participate.
Example by Mentimeter
Best Features: Launch live, interactive polls, surveys, quizzes and create things like word clouds in real-time Price: It has a free version, but the paid plans offer most of the attractive features – the basic plan costs $9.99 per user/month and the more advanced plan is $24.99 per user/month Learning curve: Easy to use; might need to explain to a less tech-savvy audience how to connect to your presentation Available for: Online / Android / iOS Perfect for: Educators, speakers, business and competitions
An excellent choice for educators, speakers, and businesses who want to engage the audience in real-time and display the results immediately. Clean, simple designs, that help you focus on the content.
5. Libre Office Impress
Libre Office is free presentation software, an open-source alternative to PowerPoint. As you can expect from a free product, it offers only the main features of its “big brother”, but it’s a good solution for people used to Microsoft’s productivity suite. The interface is very similar to PowerPoint, which again makes it comfortable to use for a certain audience. Users who need collaboration on presentations, clean interface, and more creative design solutions should steer away from this free presentation software because it will simply not cover their needs.
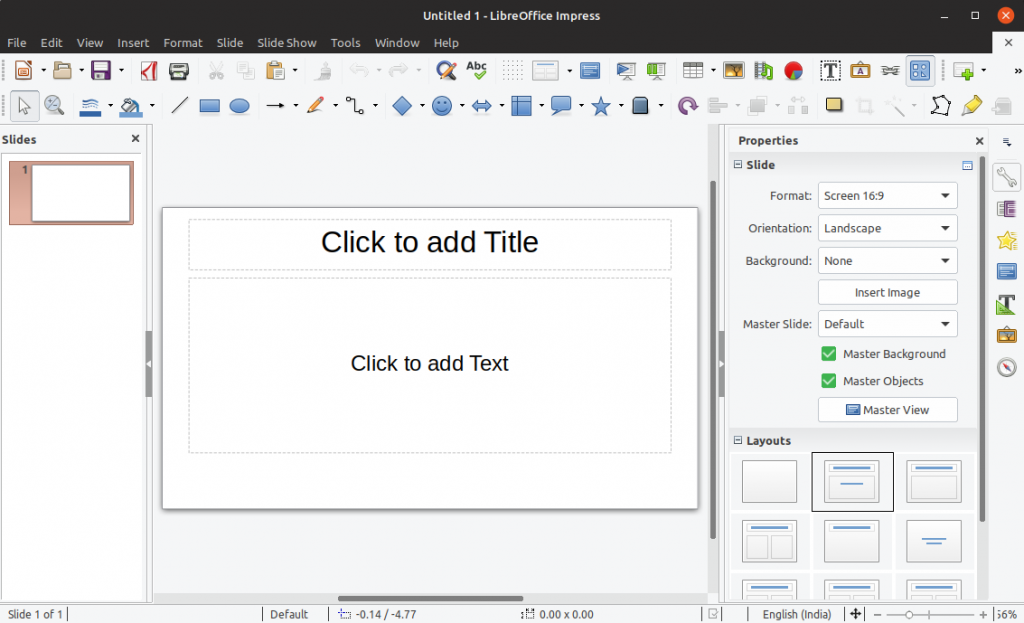
Example by Theodoros Bousios
Best Features: Free, compatible with older versions (Windows XP for example) Price: Free Learning curve: It will take some time to go through all the options and to get familiar with the interface; Available for: Windows / macOS / Linux / Android / iOS. Perfect for: people who want to use a free product and people with older operation systems
To summarize, Libre is free, compatible with older versions, it can cover your basic needs for a presentation, but the options are too many and available templates too little.
6. Zoho Show
Zoho Show is also an online presentation software, which has a very friendly user interface and great collaboration features. There are many functionalities, which help you create a beautiful design, but require some time and design knowledge to get it right. The premade templates are limited and this presentation software needs an internet connection to be able to edit and present.
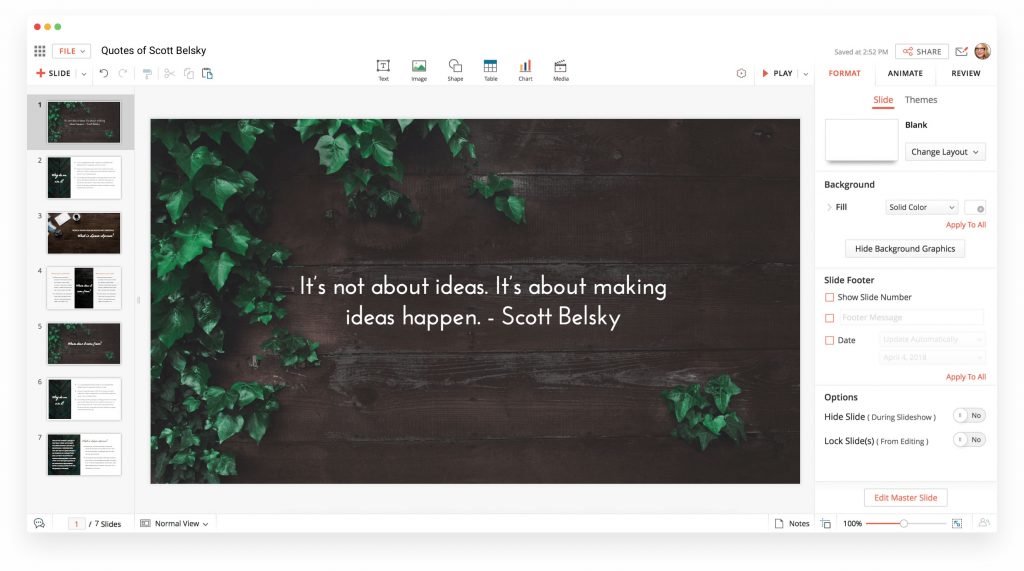
Image by Zoho
Best Features: Live broadcasting a presentation with live chat and commenting Price: Zoho Show is free for personal use. For business users, Zoho Show is included in the Zoho Docs enterprise pricing packages – €5 or €8 per user/month Learning curve: Available for: Online / Android / iOS Perfect for: non-profits, start-ups, personal use, teachers
To summarize, Zoho offers great collaboration features, but you need a connection to edit and present. It is suitable for quick, non-pretentious presentations, where you need some kind of collaboration.
7. ClearSlide Presenter
ClearSlide is a sales engagement platform, including an online presentation tool. Another online tool – SlideRocket, was acquired by ClearSlide and one of the differences is that ClearSlide is more costly and targeted at larger businesses. It’s a great platform for very specific needs – collaborating between sales and marketing teams, to achieve the company’s goals. It’s clear even by the interface:
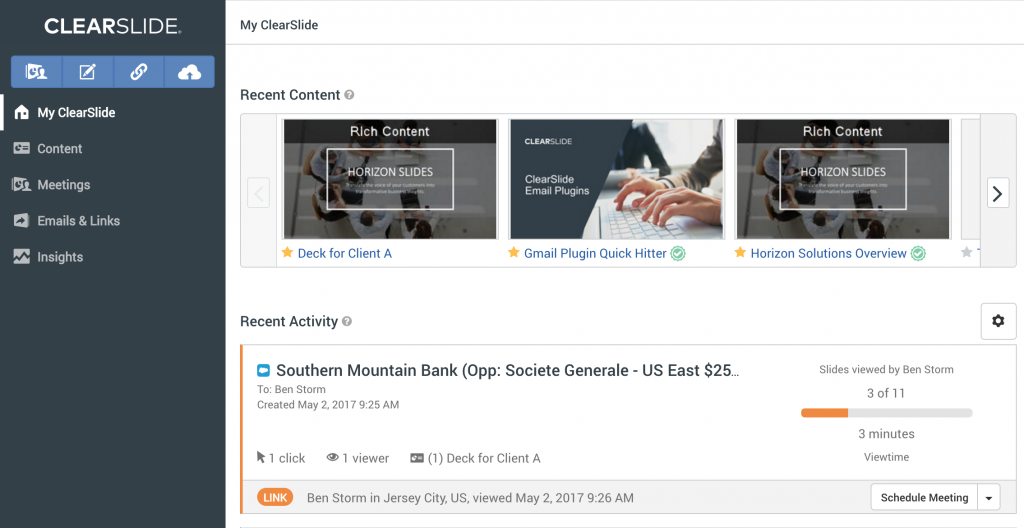
Image by ClearSlide
Best Features: Analytics for costumers’ engagement, video conferencing, screen sharing Price: They offer a free trial and you can see more about the payment plans here. Learning curve: Clear and simple interface, but it requires some time to get used to the tools Available for: Online Perfect for: Sales/business, managers (for coaching); not suitable for newbies, teachers, students
To summarize, ClearSide is perfect for presenting sales pitch , graphics, collaborate in larger teams. It is somehow restrictive for a non-designer because the templates are specific.
8. Piktochart
Piktochart allows you to make infographics, presentations, and printables quickly. Primarily known for its easy customizable infographics, Piktochart also has simple presentation templates and the company is constantly trying to update its library.
Example by Piktochart Knowledge Base
Best Features: Turning data-heavy content into simple visuals; nice transitions between slides Price: There is a free version and a paid one, starting at $29 per user/month. They offer a free trial. Learning curve: It requires time to get used to the options available and to navigate through Available for: Online Perfect for: Designers, teachers; it does not offer collaboration options, which might be needed by teams, students, etc.
Compared to other online presentation software is a bit costly and we could still ask a bit more from the presentation templates. We’d recommend it to someone who often uses infographics and wants to use a single platform to combine the infographics with a presentation. But why not check our free infographics as well?
Slides is online presentation software, initially aimed at developers and covering their presentation needs. Thus said, it does not offer offline editing, but you can present offline, after exporting your presentation.
Best Features: It allows you to use your phone as a remote control; Live Present Mode allows you to control what your audience sees; drop in code, iframes, and SVGs with ease. Price: Free, with paid plans starting at $7.00/month and $14-$18/month for pro and team packages. They offer a free trial. Learning curve: friendly interface, but too many functions and options, which might overwhelm the average user and beginner Available for: Online Perfect for: developers, designers, a little bit too specific for newbies
To summarize, it’s a very cool tool, giving you complete design freedom, but that is also why we do not recommend it to teachers, non-designers, or marketers. Developers and design gurus will love it.
Canva is a web-based solution that started with a mission – to make beautiful designed content available to everyone. The whole platform is organized so that a person without any prior design knowledge can easily create graphs, images, and presentations to impress. Although it is not the best tool for data visualization, it scores high in any other category. Needless to say, it has become a popular choice amongst non-designers.
Image by Iconfinder
Best Features: Plenty of beautiful templates to choose from and Canva school has plenty of tutorials and tips for free. It offers more free functionalities compared to other competitors. Price: Free, the offer different subscription plans, starting at $9.95 per user/month Learning curve: Very easy to use, most of the actions can be performed by drag-and-drop Available for: Online / iOS / Android Perfect for: newbies, marketers (who need a unified look across all their social media), non-profits, and teachers
Canva is becoming one of the most popular tools amongst non-designers for creating beautiful unified content. You can create entire presentations, flyers, and other materials with a single drag and drop.
11. Slidebean
Slidebean is the go-to online presentation software for last-minute projects, that look original and professional. Slidebean offers clean and easy-to-use templates and keeps track of your audience’s engagement.
Source Slidebean
Best Features: It allows you to arrange your content with the help of AI, which saves time creating a beautiful layout. You just pick a template, upload content, and let the AI offer you a nice layout. Premade animations, effects, and alignments are automatically applied to your content and create a cohesive look. Price: Free, paid versions starting from $8/month Learning curve: very easy to use since everything is made to fit the premade templates Available for: Windows / Mac / Android / iOS Perfect for: financial, academic, pitch, marketing, sales; everything quick with a clear structure
To summarize, if you are in a hurry, Slidebean will offer several layouts for your slides and speed up the process of creation. The platform targets primarily sales, marketing, and financial fields, and the available templates reflect that.
12. Google Slides
Google Slides is part of the G Suite business application. Its popularity has increased in the last years since it’s a web-based platform, allowing you to store, edit, and share your presentation, without the need of installing presentation software on your computer. All you need is a Google account and you are good to go.
Image by G Suite Updates blog
Best Features: It’s free for personal use, and offers great paid features for business – for example, seamless collaboration and commenting on a presentation, converting other presentations to Google Slides. Some other great features are the wide variety of fonts available (GoogleFonts, not need installing), easy embedding, plus it’s super intuitive and easy to use! Price: It’s free for individual use. For business use, the price starts at $5/user/month and plans of $10 and $25/user/month, for unlimited cloud storage and extra features Learning curve: Simple interface, but it will require some time to pick up. Similar to PowerPoint, only a bit lighter. Available for: Windows / Mac / Online Perfect for: businesses, freelancers, who need a user-friendly app with elementary features; great for collaborating teams, not so perfect for complex designs and tools, required by big enterprises
Perfect for personal use, well synchronized across different devices, similar to PowerPoint. Maybe you are a teacher and you like GoogleSlides because it is free and easy to use? Well, we’ve gathered some awesome FREE GoogleSlides and PowerPoint templates , specially made for education needs.
If you need something along the lines of PowerPoint but need the option for collaboration – a paid plan for GoogleSlides is your go-to choice.
13. Keynote
Keynote is an Apple product, very similar to Google Slides. All you need to do is create an iCloud account (similar to a Google account) and start using Keynote from there. Running Keynote on Windows also requires an internet connection and a modern browser. The latest version can also import and export PowerPoint formats if needed. All this sends Keynote higher in the list regarding the accessibility and shareability of this presentation software.
Image by Envato tuts+
Best Features: Simplicity of design, great drag and drop functions, polished transitions and animations, easy image editing/cropping; works great with multimedia; design templates with better aesthetic than an average slide deck; Price: Free for macOS and iOS Learning curve: Pretty easy to use for Mac users, a bit of learning curve for users, having experience with other software. Available for: Mac / Windows / Online Perfect for: businesses, marketers, people with not much of a design experience
Bottom line, if you are a Mac user, you love the sleek design and you are looking for cool aesthetics – Keynote is simple to use and free, why not use it?
14. Adobe Spark
Adobe Spark is a web and mobile-based media creation application, which helps you create social graphics, short videos, and web pages. What is immediately noticeable is the clean, crisp, simple, and modern designs, which focus you on the content. If you are looking for a funky, ornate design – Adobe Spark is not the right pick for you.
Example by Cikeys
Best Features: Beautiful templates, user-friendly interface, step-by-step creation, you can add audio to your slides (narrating) Price: There is a free version, the paid on starts at $9.79. The best templates, as with the competitors, are paid. They do not offer a free trial. Learning curve: Easy to use Available for: Online / iOS / Android Perfect for: quick presentations, teachers, basic presentations without jamming them with too much cool stuff.
Adobe Spark eliminates the cluster of design options and leads you step-by-step in creating elegant, simple presentations. Ideal for basic presentations, not the best for sales and marketing.
15. PowerPoint
PowerPoint certainly is a “classic” – it’s has been the most popular tool for creating presentations so far. What first started as a component of the Microsoft Office suite, now has improved shareability and accessibility. It can be used on the web (as part of Office on the web), works with Android, and iOS, and there is a Mobile app, as well as presentation software for mac.
Example by Abris DC
Best Features: Many people are familiar with the software, a wide variety of templates; improved accessibility across platforms; extensive tools and options Price: If you want to enjoy the full features of PowerPoint, you’ll need to subscribe to Microsoft 365 – they have payment plans for personal or business use. The price for personal use starts at $5.99/month or $59.99/year, and business plans start at $12.50 per user/month with an annual commitment. You can find more information here . The mobile applications are completely free to use, of course with some limitations. You can compare the available features across different platforms here. Learning curve: Due to the variety of options and the complexity of the menus, it might take some time to master all of its features. Something that could take a lot of time is editing the text, arranging the visuals, and picking the right transitions – overall, is time-consuming. Still, the interface remained easy to navigate over time and if you trust your design sense, you can achieve satisfying results. Available for: Windows / Mac / Online Perfect for: business, medical, accounting and students; creating concise presentations; but not so suitable for teachers, educators, start-ups and marketers who want to create more interactive and story-based presentations.
To this date, PowerPoint is keeping the lead as the most popular tool for creating presentations. Some of the downsides are that sometimes it can be time-consuming to come up with a good design and PP doesn’t offer collaboration tools and compared to other platforms. But we have a solution for at least one of your problems – we’ve selected 31 Modern PowerPoint templates to set the right tone for your presentation.
We made a quick summary for you…
Ok, not that we’ve looked at the 15 best presentation software for 2021, we decided to go one step further and compare them by price and popularity. Let’s have a look first at the new-comers:
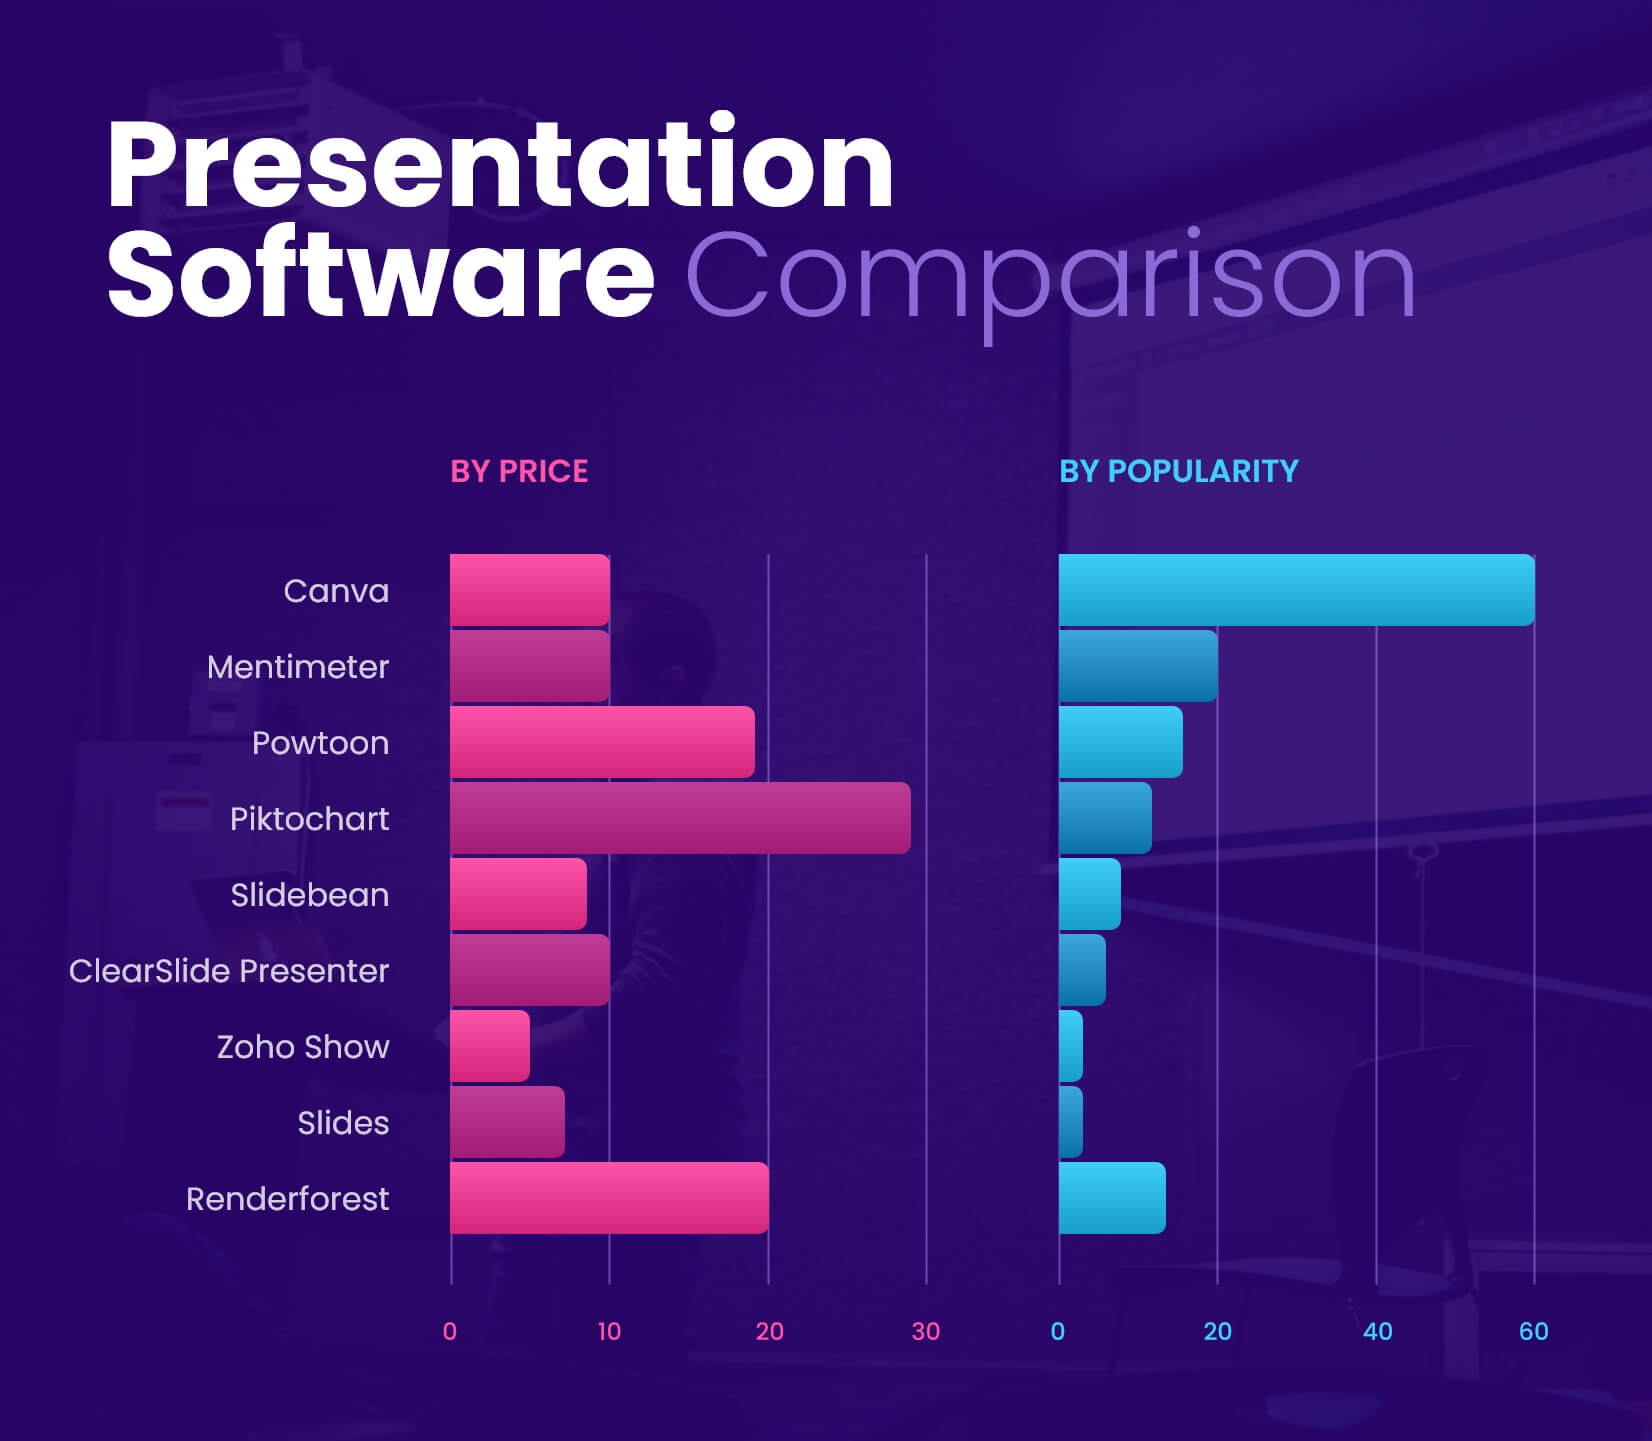
As you can see, the leaders from the uprising platforms are Canva and Mentimeter, with relatively low prices and with huge success amongst users . Powtoon, Piktochart, and Renderforest are a bit costly , but they are popular since they offer a lot of animation and interactive elements. Hey, but maybe some of the other tools are right for you? We encourage you to go on their websites, contact their support team, and see what they have to offer.
Then, let’s see how the veterans are ranking:
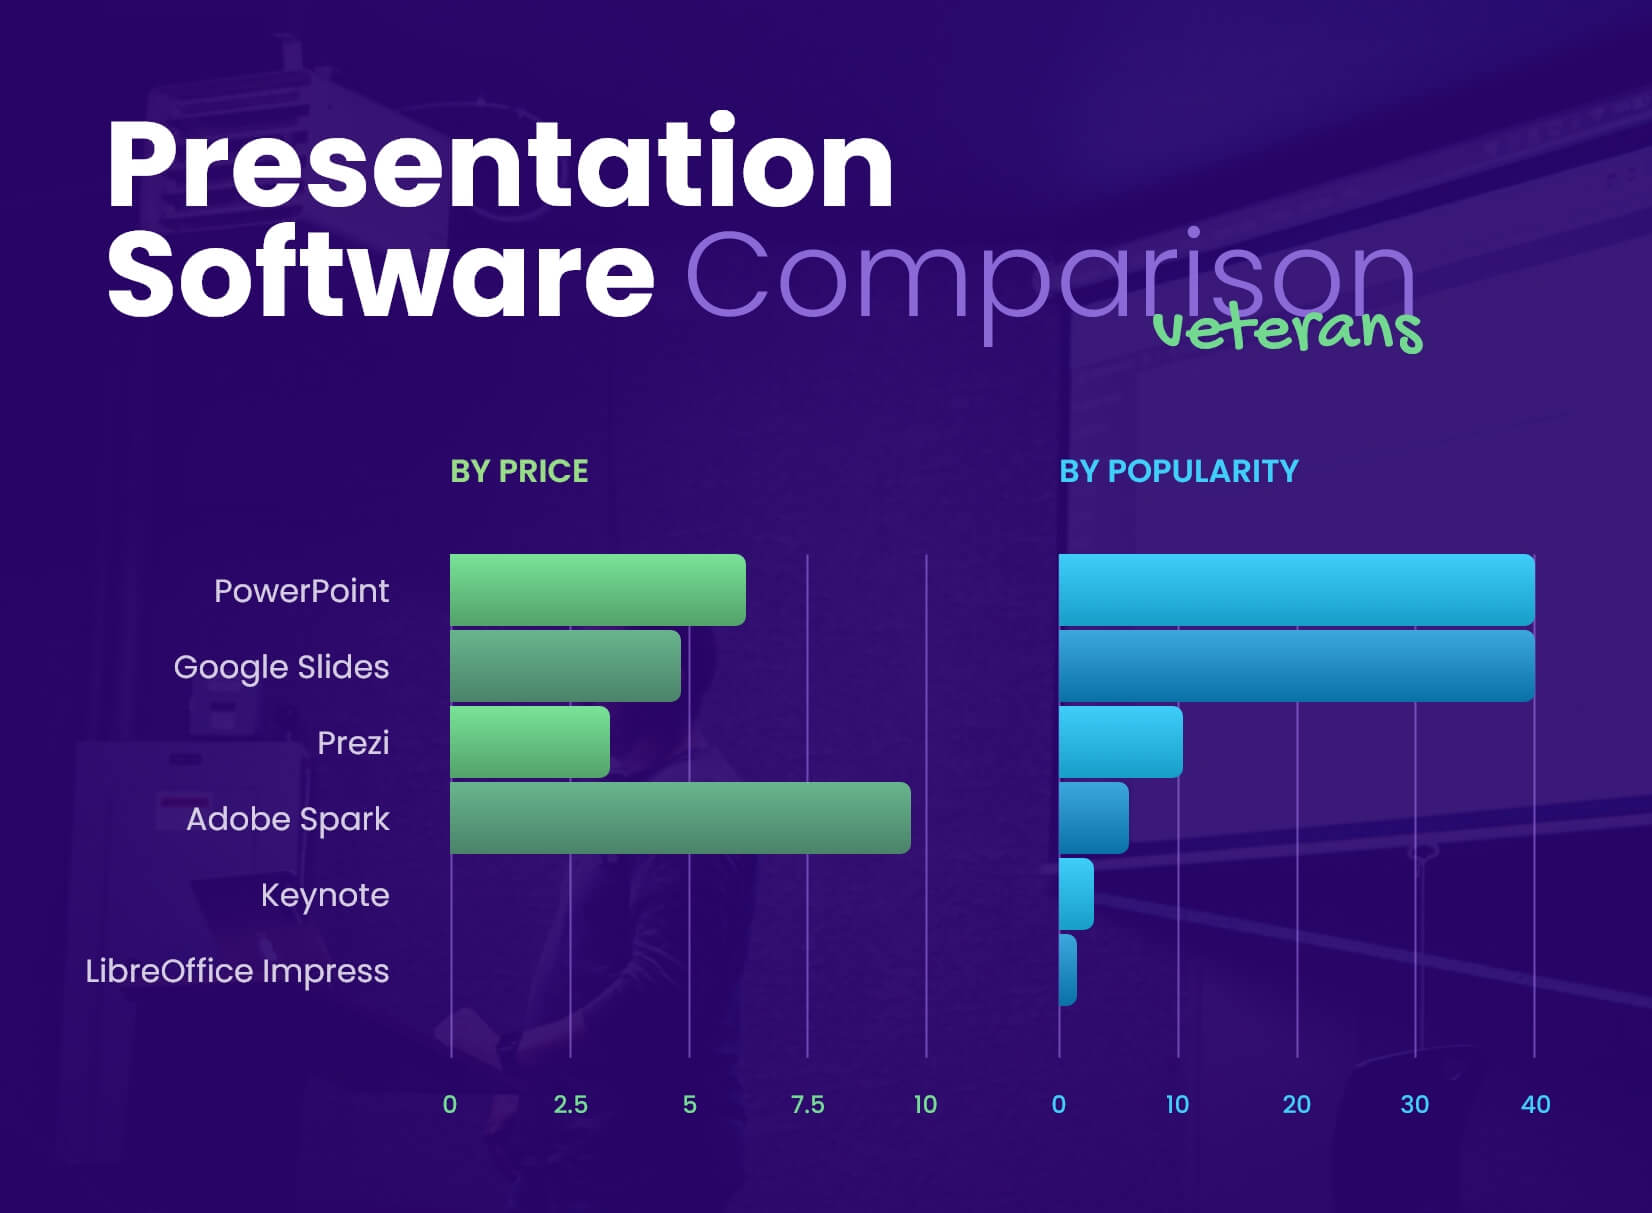
It’s no surprise that PowerPoint and Google Slides are at the top – people are used to their products, have familiar interfaces, and offer a lot of functionalities at a good price. Although, for quick, unpretentious results, their competitors are a very attractive solution.
Final words
We can conclude that there are many useful tools to help you create beautiful presentations. Some of them are well-known and have been here for a while, while others are uprising… No matter the case, we notice a trend for presentation tools catering not only to the designers’ needs but also to the newbies, marketers, and teachers. That way, enabling everyone to create stunning presentations in no time and share them easily.
We hope this presentation software list shed some light on different options out there and that we helped you evaluate quickly what would work for your situation best.
You may also be interested in these related articles:
- 12 PowerPoint Presentation Tips To Dramatically Boost Your Efficiency
- 35 Free Google Slides Infographic Templates to Grab Now
23 Online Collaboration Tools for Your Remote Team

Add some character to your visuals
Cartoon Characters, Design Bundles, Illustrations, Backgrounds and more...
Like us on Facebook
Subscribe to our newsletter
Be the first to know what’s new in the world of graphic design and illustrations.
- [email protected]
Browse High Quality Vector Graphics
E.g.: businessman, lion, girl…
Related Articles
How to create flyer design: tutorials & ideas for non-professionals, 46 fun facts about google slides that will raise your eyebrows, logo sizes and dimensions for social media, websites, and prints, infographic design guide: 10 must-follow steps, the future of web design in 2019: shaped by technology, take a look at graphicmama’s infographic templates collection. over 500 premade templates for your presentations:, enjoyed this article.
Don’t forget to share!
- Comments (0)
Bilyana Nikolaeva
Bilyana is an inspiring content writer and illustrator at GraphicMama with years of experience in art and design. When she’s not busy writing for the blog, you will usually see her working hard on new illustrations and graphic resources.

Thousands of vector graphics for your projects.
Take a look at GraphicMama's Infographic Templates Collection. Over 500 premade templates for your presentations:
Hey you made it all the way to the bottom.
Here are some other articles we think you may like:

21 of the Best Educational Cartoon Channels for Both Learning and Entertaining
by Lyudmil Enchev

How to Build Strong Brand & Visual Identity
by Bilyana Nikolaeva
Looking for Design Bundles or Cartoon Characters?
A source of high-quality vector graphics offering a huge variety of premade character designs, graphic design bundles, Adobe Character Animator puppets, and more.
How to Zoom in on Google Slides
Zooming is an important feature in Google Slides that you should familiarize yourself with. It especially comes in handy when you want to take a closer look at the elements of your slide designs, like aligning items, moving shapes, changing text, etc.
One might think of a slide deck as static, but there’s a dynamic element to crafting presentations: the art of zooming. Whether for detail-oriented design, text clarity, or for grasping the overall aesthetics, zooming plays a pivotal role.
In this in-depth guide, we will show you how to zoom in and out on Google Slides to help you create that perfect presentation.
2 Million+ Google Slides Themes, Presentation Templates + More With Unlimited Downloads
Download thousands of Google Slides themes, and many other design elements, with a monthly Envato Elements membership. It starts at $16 per month, and gives you unlimited access to a growing library of over 2,000,000 presentation templates, fonts, photos, graphics, and more.

Alloyz Business Template
Google slides.

Delica Google Slides
133+ unique slides.

Creative Template

Ciri Slides Template
Clean & minimal.

Company Profile Template

Kloe Minimal Template
Clean & simple design.
Explore Google Slides Themes
Using the Keyboard & Mouse
The Zoom Slider is a straightforward, intuitive tool found on the Google Slides interface that allows users to control their viewing magnification.
Step 1: Navigate to Your Slide

Open up your Google Slides document. Browse through the slides using the slide sorter on the left or the arrow keys to select the slide you wish to zoom into. This slide will become the central focus of your screen.
Step 2: Keyboard + Mouse

Once on your chosen slide, simply hold down the Command (Mac) or Control key (PC) on the keyboard and use the mouse wheel to zoom in and out of the slide.
Step 3: Keyboard Only
Or you can zoom in using just the keyboard keys. To do this, again hold down the Command (Mac) or Control key (PC) while using the + and – keys to zoom in and out.
It’s that easy!
Utilizing the View Menu
Google Slides’ View Menu provides a variety of specific zooming options, offering more precision compared to the slider.
Step 1: Access the Menu

Hover to the upper-left corner of your screen and locate the “View” tab. Clicking on this will drop down a menu filled with several viewing and editing options.
Step 2: Select Zoom

Within this dropdown, you’ll find an option labeled ‘Zoom.’ Hovering over this reveals a submenu with predetermined zoom levels.
Step 3: Choose Your Magnification
This submenu allows you to quickly jump to specific zoom percentages. You can opt for zoom levels like 50%, 75%, 100% (the default view), 150%, or 200%.
For those aiming to get an undistracted, maximized view, there’s also a ‘Full-screen’ mode, immersing you entirely in your slide.
Best Practices for Zooming in Google Slides
Zooming isn’t just about getting closer or farther from your slide. It’s about optimizing your workflow, ensuring clarity, and maintaining presentation aesthetics.
1. Optimal Magnification
For precision tasks and detailed editing, a zoom level between 100% and 150% is typically ideal. This range offers clarity without inducing pixelation or distortion.
2. Retain a Broad Perspective
It’s easy to lose sight of the overall design when focused on details. Periodically zoom out to the default view or broader to evaluate the holistic balance and layout of your slide.
3. Use Keyboard Shortcuts Wisely
While shortcuts expedite tasks, over-relying on them can lead to excessive zooming. Familiarize yourself with the sensitivity of these shortcuts to avoid abrupt or unintended zoom levels.
4. Keep the Audience’s Perspective in Mind
Remember that during actual presentations, your audience will typically view slides at a 100% zoom level. Ensure all elements, from text to images, are legible and visually cohesive at this default level.
5. Full-Screen Preview
Switch to ‘Full-screen’ mode occasionally. This provides a simulated presentation view, helping gauge the visual impact and effectiveness of each slide.
6. Monitor System Performance
Working on graphics-intense slides can strain system resources. Continuously altering zoom levels can exacerbate this. Find a comfortable zoom setting for editing and stick to it when possible, adjusting only when necessary.
Mastering the art of zooming in Google Slides is about more than just a closer view. It’s a balance between detail and perspective, ensuring your final presentation is both compelling and coherent.
With the above insights, you’re set to navigate Google Slides with newfound precision and confidence. Dive into your next project, and remember: it’s all in the details.
Easy PowerPoint Zoom Tutorial (Free Templates & Examples)

Sara Wanasek

Tired of navigating your slides in a chronological order? Looking for ways to spice up the way you interact with your presentation and engage your audience?
Transform your boring presentations into something more engaging and captivating with PowerPoint’s Zoom feature. PowerPoint Zoom allows you to create dynamic, non-linear presentations. Think of it as building a Prezi inside PowerPoint. Jump from one point in your presentation to the next seamlessly by creating links to the different sections of your presentation.
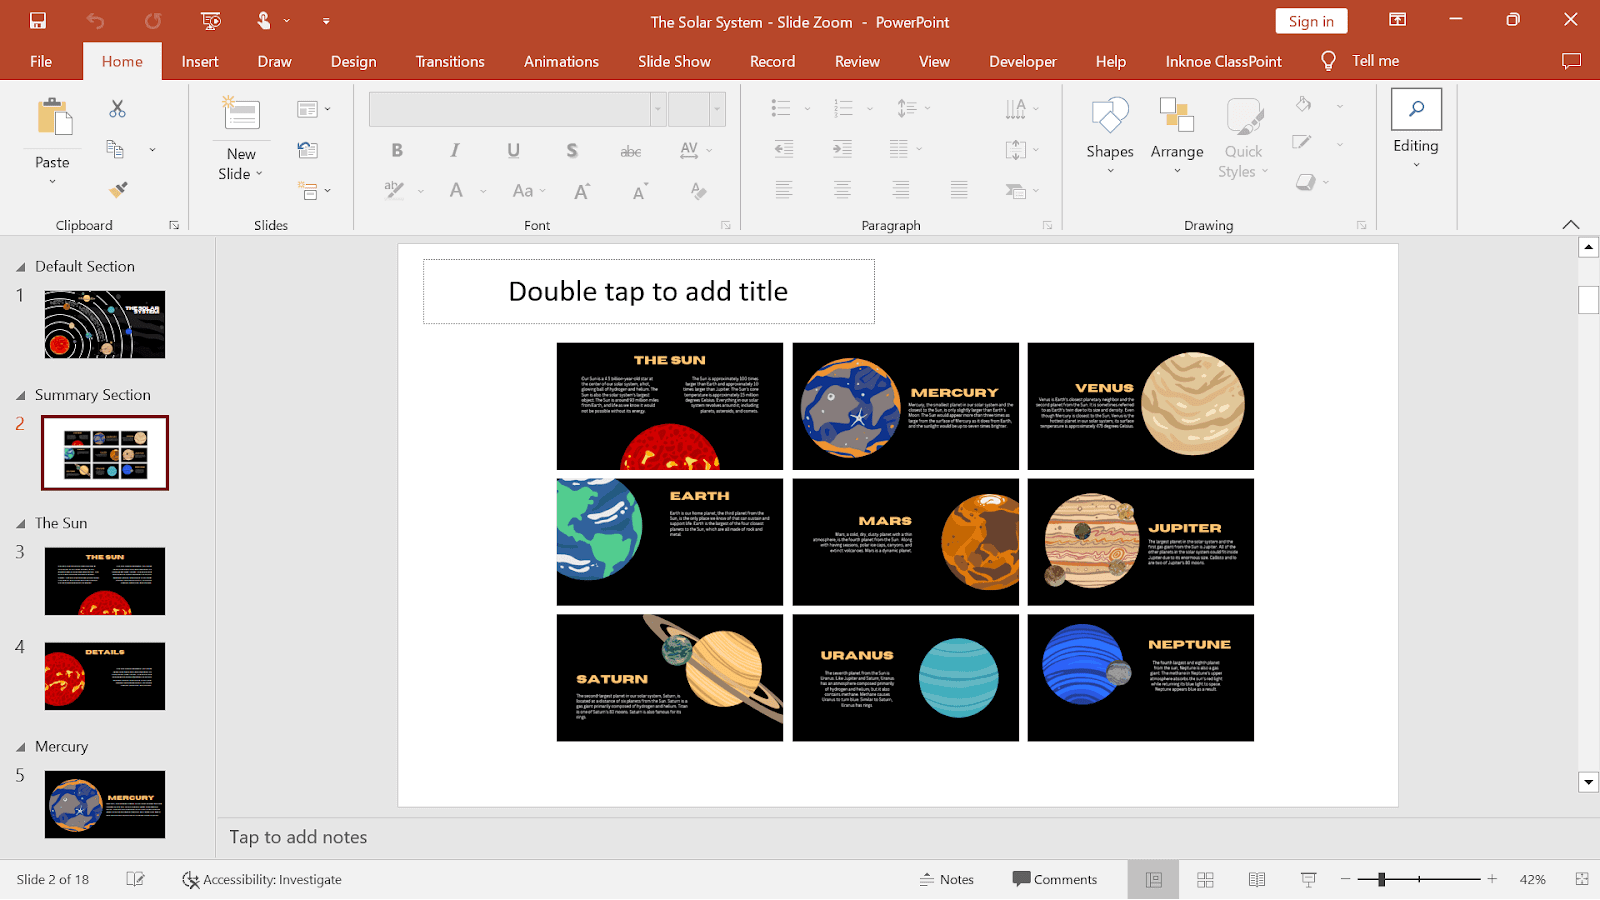
By utilizing PowerPoint’s Slide Zoom, Section Zoom, and Summary Zoom, you can easily create an entertaining and engaging presentation for your audience. There are many different ways to add these to your presentation, so read on to learn how to use PowerPoint Zoom and implement it in the best ways!
Table of Contents
What is powerpoint zoom.
PowerPoint’s Zoom feature is a tool that allows you to create interactive PowerPoint presentations . It enables you to zoom in and out of specific sections or slides, creating a more dynamic and immersive experience for your audience. With PowerPoint Zoom , you can easily create links or “zoom areas” on your slides such that when clicked during a presentation, can allow you to navigate to specific slides or sections and focus on the content that is most relevant at any given time—there’s no need to be stuck with whatever slide is chronologically next.
Why Use PowerPoint Zoom?
PowerPoint Zoom lets you present in a more flexible and interactive way. For instance, you can create a dynamic menu that allows your audience to help you choose which topics to cover first. With just a click, you can jump to that slide or section and relay that information.
PowerPoint Zoom is also particularly useful for storytelling , guiding your audience through a series of complex information without being restricted to a traditional linear slide progression.
No need for hyperlinks, tedious work, or coding—PowerPoint Zoom allows for a seamless setup and flow of your presentation.
Let’s dive right in and discover how to make a zoom effect in PowerPoint!
How to Make a Zoom Effect in PowerPoint?
PowerPoint’s Zoom feature consists of three different options: Slide Zoom, Section Zoom, and Summary Zoom. While their setups are similar, the reasons for using each one vary.

Below we will delve into each of these PowerPoint Zoom options in depth.
Download our FREE PowerPoint Zoom template to follow along! 👇
Slide Zoom PowerPoint Templates
Turn your PowerPoint into an interactive experience today with this Slide Zoom template!
When to use Slide Zoom? ⏲️
Slide Zoom, as the name suggests, allows you to create links and “zoom in” on the content of another slide without following the traditional slide-to-slide progression. This comes in especially handy when you want to direct your audience’s attention to a particular image, chart, or piece of information on a slide instantly.
How to use Slide Zoom? 💻
1. Select the Main Starting Slide : To use PowerPoint Slide Zoom, first select the starting slide where you intend to apply the Zoom effect. In our example, we are using the Iceberg Model illustration as our starting slide. We want to zoom into the different description slides from our Iceberg Model slide.
2. Access the Slide Zoom Feature : Next, click Insert > Zoom > Slide Zoom . From here, choose the slide, or slides, that you want to zoom into. Click Insert and a thumbnail or thumbnails of the slides will appear on your current slide.

3. Rearrange the Thumbnails : Rearrange the thumbnails on your slide to match your design and layout.
4. Test the Slide Zoom: Now, in presentation mode, when you click on the slide thumbnails, you can zoom into the particular slides!
With a smooth Slide Zoom effect, you will notice that transitioning from slide to slide has become significantly more engaging!
Zoom Option: Zoom Background

Notice the thick outline of each slide you added to Zoom? Let’s remove that for a cleaner, more professional look on your slides.
To do that, click on the added Zoom slide thumbnail , then click the Zoom tab in the PowerPoint ribbon. Now, click on the Zoom Background option to hide the default background and match the background of the thumbnail to the background of your current slide.
Zoom Option: Return to Zoom
Another customizable option is the Return to Zoom feature.
With the current setup of Slide Zoom, once you click on the Zoom thumbnail and navigate to the zoomed in slide, you cannot return to the main starting slide. In other words, you will move on to the next slide in a linear order, with essentially an added zoom transition.
On the other hand, by applying Return to Zoom, you will be brought back to your main starting slide every time instead. This way you can click change the order of your slides. For example, with Return to Zoom enabled, when I can click on next slide after clicking on the “Phase #3 The Structure” slide, I will be brought back to the main starting slide instead of the “Phase #4 Mental Models” slide.

To make this happen, after selecting each of your Zoom slide thumbnails, simply click on the Return to Zoom option from the Zoom tab.
Section Zoom
When to use section zoom ⏲️.
While Slide Zoom allows you to zoom into one slide at a time, Section Zoom allows you to zoom into a specific section containing multiple related slides of your presentation. This is especially helpful for longer presentations or presentations with multiple topics.
How to use Section Zoom? 💻
Here, we have a deck about the Solar System. Each planet has its own section with a couple slides underneath each section. Our main slide has an overview of the whole Solar System. In this case, I would like to be able to click on a planet, then be able to learn more about that planet. You can easily do this with Section Zoom!
1. Select the Main Starting Slide : Similar to PowerPoint Slide Zoom, you have to select a starting slide where you intend to apply the Zoom effect for Section Zoom. Here we are using the Solar System slide as our main starting slide where we can zoom into the different planet sections.
2. Access the Section Zoom Feature : On the overview slide, click Insert > Zoom > Section Zoom . Then choose the sections you would like to Zoom into and click Insert . The thumbnails of the first slide of each section will appear in your current slide.
Zoom Option: Change the Image
Don’t like how the different thumbnails are making your slide looks cluttered, fret not, you can change the thumbnail image of your slides for easier viewing.
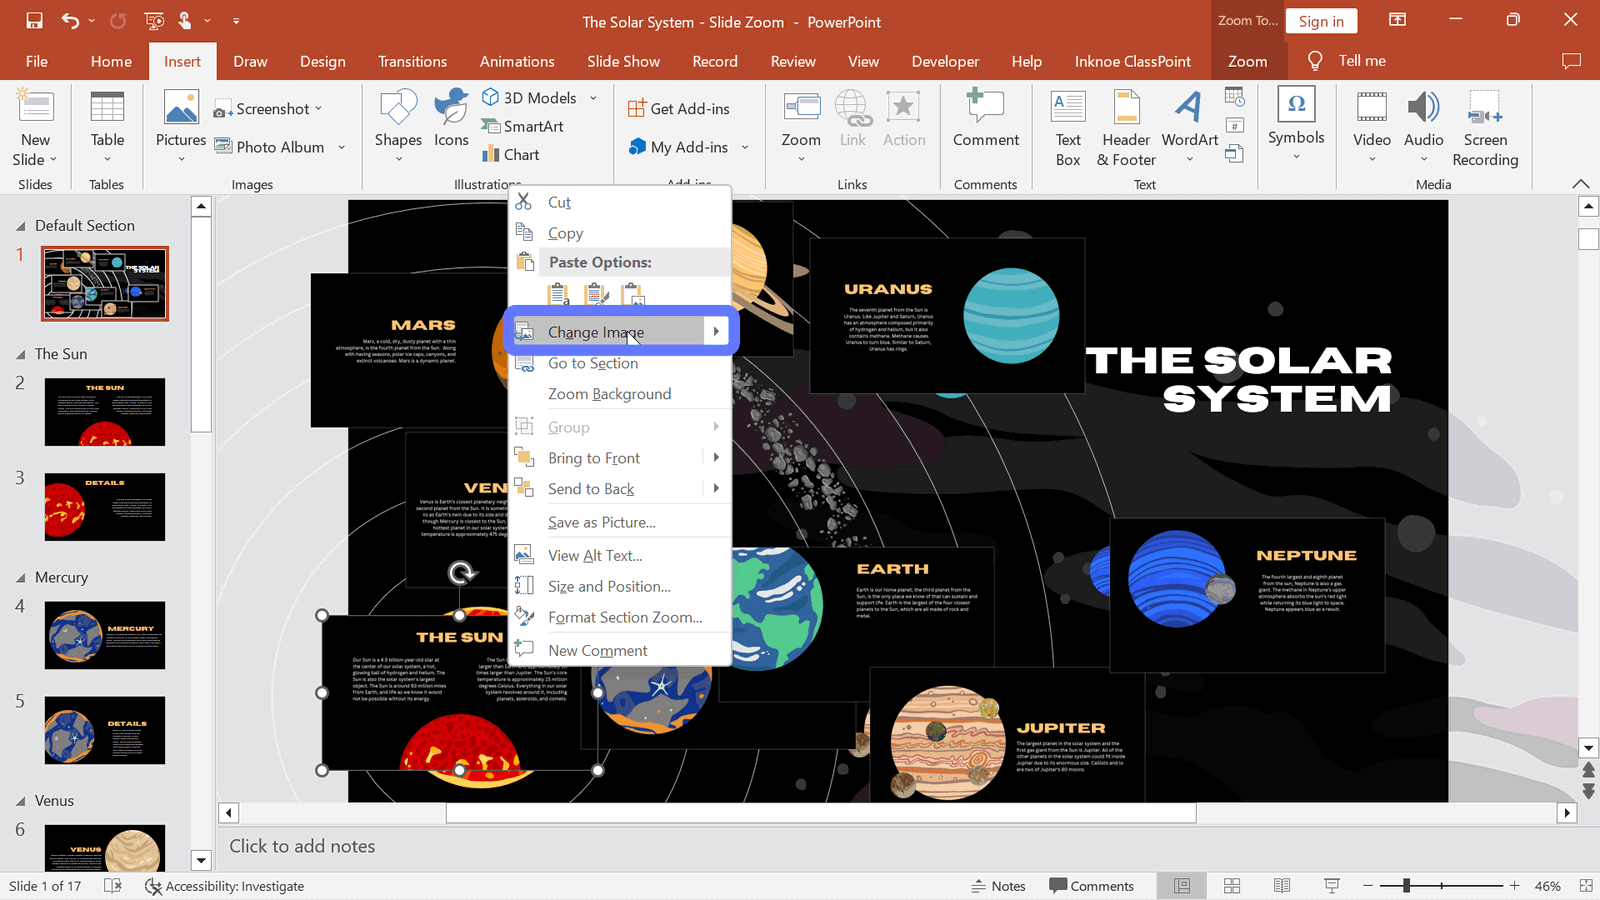
To do this, right-click on the zoom slide thumbnail and select Change Image . Then, substitute it with an image or screenshot from your device. For instance, you can take screenshots of the different segments in your slide to “hide” the zoom slide thumbnails underneath these screenshots.
Now, when you enter presentation mode, instead of clicking z zoom slide thumbnail, you can click on a planet to zoom into a desired section! Watch this video to learn exactly how to do it!
Summary Zoom
When to use summary zoom ⏲️.
The third and final PowerPoint Zoom feature is Summary Zoom. It lets you create a summary or overview slide that acts as a hub for your presentation. It is perfect for those times when you want to give your audience a quick recap or provide them with a visual roadmap of your presentation.
Similar to Section Zoom, Summary Zoom contains links to specific sections or slides in your presentation, allowing you to navigate to the most relevant parts of your presentation. The main distinction lies in the fact that the Summary Zoom feature will automatically generate a summary slide containing thumbnails of each section or slide for your convenience.
How to use Summary Zoom? 💻
1. Select the Main Starting Slide : Similar to both PowerPoint Slide Zoom and Section Zoom, you have to select a starting slide where you intend to apply the Zoom effect for Summary
2. Access the Summary Soon Feature : To use PowerPoint Summary Zoom, click Insert > Zoom > Summary Zoom . This will create a new slide that displays a summary of your presentation, with thumbnails of each slide.
3. Customize Appearance : You can customize the appearance of the Summary Zoom slide by selecting the Format tab. Here, you can choose from various layouts, fonts, and colors to make the slide visually appealing and aligned with your presentation’s theme.
During your presentation, easily navigate to any slide by clicking on the different Zoom slide thumbnails. It’s a great way to give your audience an easy-to-follow roadmap and ensure they stay engaged and focused throughout your presentation.
Real-World PowerPoint Zoom Examples to Engage Your Audience
Here are some real-life examples of how to use PowerPoint Zoom to create engaging and immersive presentations:
- Sales Pitch
Create interactive slides with zoomed-in images and key features for your products or services. By allowing the audience to explore products in detail, you can generate more interest and engagement during a pitch.
- Educational Lecture with Organised Sections
Similar to our Solar System deck, you can organize your presentation into sections so that students can go through the presentations at their own pace starting with what interests them the most.
Add interactive questions to the presentation using ClassPoint , to make it even more engaging.
- Team Meeting Roadmap
Create an engaging team meeting with Summary Zoom. Highlight key milestones and deliverables in a visual and clear roadmap to help the team stay focused and engaged throughout the meeting.
- Interactive Visuals
Use maps and charts as your overview slide and add zoom slide thumbnails of added information to showcase further data, information, and analytics.
- Virtual Tours or Walkthroughs
Simulate a virtual tour or walkthrough using images on your slides. Add the Zoom feature to replicate “moving” from one “location” to another.
PowerPoint Zoom FAQ
Here are some common FAQ’s about this powerful tool:
What are the differences between the PowerPoint Zoom Options?
Slide Zoom zooms from one slide to the next while Section Zoom zooms into a whole section of your presentation before bringing you back to the overview slide. The Summary Zoom option provides you with a Table-of-Contents-like slide for an easy overview of your whole presentation.
How to make Prezi in PowerPoint?
You can make a PowerPoint that looks similar to Prezi with PowerPoint’s Zoom feature. With your selected slide to Zoom into, click on the Insert tab, Zoom, and select Slide, Section, or Summary Zoom.
Can I use PowerPoint Zoom on any version of PowerPoint?
PowerPoint Zoom is available on PowerPoint 2019, PowerPoint 2016, and PowerPoint for Microsoft 365. Make sure you have the latest version to take advantage of this feature.
Will my audience need any special software to view the Zoom features?
No, your audience does not need any special software. The Zoom features will work seamlessly when you present your PowerPoint file on any device with PowerPoint installed.
Can I use Zoom in combination with other PowerPoint animations and transitions?
Yes, you can! PowerPoint Zoom works well with other animations and transitions, allowing you to create a truly immersive and engaging presentation.
Can I edit or remove Zoom features from my presentation?
Absolutely! You can easily edit or remove Zoom features from your presentation at any time. Just follow the steps outlined in this blog post to make any necessary changes.
Yay! You now can create an even more engaging presentation with PowerPoint’s Zoom feature.
The versatility and impact of PowerPoint Zoom can be used in various settings. By incorporating this feature into your presentations, you can captivate your audience, enhance information retention, and create a memorable experience for your listeners.
Experience the power of PowerPoint Slide Zoom firsthand! Begin by exploring our templates and seamlessly integrate this feature into your upcoming presentations.
About Sara Wanasek
Try classpoint for free.
All-in-one teaching and student engagement in PowerPoint.
Supercharge your PowerPoint. Start today.
500,000+ people like you use ClassPoint to boost student engagement in PowerPoint presentations.
Transition to growth mode
with LivePlan Get 40% off now

0 results have been found for “”
Return to blog home
How to Be Effective and Keep Participants Engaged When Presenting Remotely
Posted august 23, 2021 by eleanor hecks.

Whether you’re doing a more traditional presentation via Zoom , giving a live interview, or conducting a webinar, the experience is very different from doing so in person. There won’t be a physical audience in front of you, and sometimes timing is extremely challenging to sync up — people often try to talk over others during conference calls. What’s more, it can be just as difficult to convey the appropriate emotions and body language, especially when just the top half of you — or sometimes even just your head — is visible.
It makes one wonder: What are some things you can do to prepare for the presentation or conference? Are there any tips you should keep in mind during the live event? What else should you know?
How to prepare your Zoom presentation
The planning phase is one of the most critical, as it’s where you’ll decide your topics, your major discussion beats, and where you’ll elaborate. You may not be using a teleprompter, but you will be creating a loose script. In addition, you’ll need to create the media that will go along with your presentation, which should be error-free, captivating, and on point.
Here are some tips to improve planning and design:
1. Design for everyone
While creating your media — the slides — understand that you are creating for a wide audience who will likely be tuning in from multiple devices and platforms. The media is going to look very different on a large, HD-ready computer monitor than it will on a smartphone or tablet. Design the content, images, and layouts so that they are compatible and friendly for all. Someone browsing on their phone should be able to see precisely the same information as someone on a laptop or computer.
Be sure to test out your presentation on different devices and resolutions. Also, try to remember that too much screen time can cause focus and stimulation problems in both children and adults. Try to limit the total presentation time, so that it’s accommodating for everyone.
2. Tone down the visuals
Yes, every presentation needs captivating visual content to go along with the text and audio. But you don’t want it to take away from the meat of the experience. It’s okay to use maps, charts, graphs, videos, photos, including stock images, GIFs, memes, and more.
Just don’t overdo it on a single slide. Try to keep it relatively confined so your audience doesn’t go into a stimulation overload. If they’re trying to read a ton of text, listen to you speak, and process several images — especially animated ones — things can get really hectic.
3. Get your area ready
On a live stream, everything around you is as much the star of the show as you. Figurines, pictures on the wall, and even clutter will all feature prominently unless you alter the background — which Zoom allows you to do. Be sure to tidy up your space before the event and remove anything from the frame that you don’t want your audience to see.
4. Brighten up the room
Webcams, even UHD cams, tend to work much better in bright conditions. If you haven’t already, open your blinds to let in some natural light. Test out the camera conditions beforehand to see whether it’s too bright, or not enough. If you’re using a laptop, you can move around your home to find the best spot.
Audiences should have a clear view of your face. Most importantly, they should be able to see when you’re speaking and what gestures you’re making.
5. Test your equipment
You can make a test call to a friend or family member, or just test out the equipment locally, but make sure everything is working. Check your audio and your microphone, be sure the video is clear and bright, check your internet signal and speeds, and ensure all equipment is plugged in and not running on battery power. You should be doing this as close to the conference or event as possible. It doesn’t help if you check out your equipment days in advance and then run into issues the day of.
People do not like to encounter technical errors. For instance, when a page’s load speed increases by just 1-3 seconds, the bounce rate also increases by 32% . A 5-second increase boosts that bounce rate to 90%. So, the longer it takes to set up your presentation and get things moving, the more likely it is that people will tune you out or leave altogether.
6. Rehearse
Practice in front of a mirror, or hop on a call with friends and family and allow them to provide feedback. Never go into a presentation unprepared, especially if you’ve never given one before via Zoom or anywhere.
7. Create a checklist
A checklist is always a good way to review what you need to get done before an event or activity. Professionals use them to avoid costly mistakes , and you should be taking inspiration from that.
Try to remember every small detail or requirement that you need to complete before the presentation. You can even create a multi-tier checklist that deals with before, during, and after the big event.
Hosting the Zoom presentation
So, you’re all ready for the big event? Now, it’s time to make sure everything goes smoothly during your presentation. Here are some helpful tips.
1. Speak plainly
It helps if you write the script or guidelines similar to how you will be presenting, however, you should speak plainly and enunciate as much as possible. Unless the subject matter explicitly calls for it, try to avoid industry or specialized jargon. That will also mitigate how much you need to explain or move off-topic. Furthermore, it ensures your entire audience can follow along, regardless of skill level or expertise.
2. Minimize potential interruptions
You can’t control what happens on the other end of that presentation, but you can certainly control things on your side. Try to mitigate potential distractions as much as possible. Put your phone on silent. Wear headphones so there’s no audio echo or distortion. Close your door or isolate yourself so no one comes in to interrupt. You might also consider turning on Do Not Disturb mode on your computer to pause notifications during the meeting.
3. Keep your materials handy
Two points. First, you want to keep your notes or script handy so that if you get stuck you can continue with little to no pause. Second, those materials should be in a place that has you facing the camera. If you have a document up on a monitor, for example, you don’t want to be glancing sideways all the time to read what’s next.
Situate the screen and camera so they’re at the same angle, so you’re constantly looking at the camera while you read. It’s a lot easier to do with a laptop because the camera is usually in the top bezel. With a desktop, you might have to move your display(s) around, or reposition your webcam. If you’re using a phone or tablet, you should have those propped up on a stand or tripod to keep them stable.
4. Dress to impress
Dress just as you would if you were paying a visit to the office or making a presentation in public. Put on the whole outfit too, and not just the shirt, because you never know what’s going to happen. If the camera falls, you don’t want it to expose that you’re just wearing underpants along with that collared shirt.
5. Have your media ready
It’s a simple tip, but a crucial one. Have your slides and other media ready to go and queued up for sharing. Don’t wait until the presentation to get things in order. You should be able to swap to the necessary screen, share the content, and go. Have all hyperlinks, videos, and interactive elements prepared beforehand, as well.
6. Pause for effect and questions
After each major beat, pause for a moment to allow your audience to ask questions, raise concerns, or ask for you to reiterate the message. This is much more difficult when you’re dealing with a large audience, but most Zoom meetings are relatively intimate with a local group.
7. Pay attention to chat
Alongside every Zoom event or meeting, there is a live chat window that can sometimes be forgotten if you’re busy focusing on your presentation. Don’t neglect it. Your audience may be asking more questions, providing valuable feedback, or even pointing out something wrong — like your mic cutting out.
8. Record your presentation
Make sure you’re recording the presentation to reference later, not just for everyone else but for yourself too. It allows you to rewatch the feed to review questions and commentary, and also to perceive your mannerisms and dynamic content. You can use that information to build a better presentation later.
9. Leverage the Zoom tools
There’s a host of tools you can use with Zoom , including screen sharing, annotations, live polling, and much more. Incorporate them into your presentation whenever possible, and don’t forget they exist! They can help make the experience more fun, engaging, and memorable.
10. Keep it interesting
It’s easy when you’re talking, especially about dull subjects, to lose your audience. One way to keep them invested and interested is to add the occasional “boom” moment. It’s an impactful instant, like a shocking statistic, joke, or alarming point, that ties together everything you’ve been talking about up until that moment.
The follow-up
After the presentation is completed, don’t make the mistake of thinking your work is all done. The first thing to do is make the media and the recording of the presentation available so that anyone who wants to can go back and review the experience.
Next, you need channels in place to collect feedback. People will have follow-up questions and concerns, and they may want you to clarify certain points. Also, you’ll want people to share their experiences. What did they enjoy? What did they dislike? How could you have improved as a presenter? Don’t be too scared to ask these questions, as they’ll help improve your Zoom presentation skills.
Finally, consider wrapping it all up with a nice bow by giving away free content or materials to those who attended the event, like a free e-book written by you or your colleagues, or a promo code to your storefront.
With these ideas in mind, you’ll be ready to knock your next Zoom presentation or remote meeting out of the park!
Like this post? Share with a friend!

Eleanor Hecks
Posted in management, join over 1 million entrepreneurs who found success with liveplan, like this content sign up to receive more.
Subscribe for tips and guidance to help you grow a better, smarter business.
You're all set!
Exciting business insights and growth strategies will be coming your way each month.
We care about your privacy. See our privacy policy .

- Certifications
PowerPoint Zoom: A Great Way to Make Interactive Presentations
- December 27, 2022
- 96 Comments

The PowerPoint zoom feature is a great way to make the presentation dynamic and interactive. When you use this feature, the slides are not presented in a usual order. This feature helps present slides in any order as one likes during the presentation making it more interactive .
This feature is available in Microsoft 365 and Microsoft office 2019. It is not available in other modules.
Have you read our blog on 80 PowerPoint Shortcut Keys
Understanding the Zoom Feature
Zoom feature can be leveraged in just 2 steps
Step 1 – Create basic slides
Create the slides you want to have in your presentation.
For our example, we have 5 slides showing the Presentation rules.
Step 2 – Insert the Zoom Feature
To insert the Zoom feature. Insert an additional blank slide. Then Go to Insert > Zoom
Then Select Slide Zoom.
Choose the slides you want in the Zoom Summary slide. Then click insert. You get the screen shots of the selected slides on one slide. This slide becomes your Summary Zoom Slide .
Format the Summary Zoom Slide. Change the background (if required) and place the screen shots as required (Example shown below).
Now when you go to the presentation mode, you have the option to jump to specific slides and portions of your presentation by clicking on the relevant screen shot.
You can decide where to go based on the flow of the presentation . Summary Zoom Slide helps you control your presentation. You can get move ahead, skip a section, or revisit slides of your presentation without interrupting the flow of your presentation.
Now let us discuss a few other important points.
Here is Free PowerPoint course to learn basic skills
Section Zoom
This feature is useful if your presentation has multiple slides in one section. In such case, divide your presentation to the appropriate sections. Then insert a blank Slide and Go to Insert > Zoom > Insert Section Zoom. Seen Screen shots below.
Once you click insert. You get the screen shots of the selected sections on one slide. This slide becomes your Summary Zoom Slide .
Now you can choose specific sections you want to present based on the flow of your presentation.
Read our blog on How to Create an Effective Business Presentation in 5 Steps
Change Image
Instead of screenshots (as shown in the example) if you want to use any other image, click on the slide screenshot then Click on Zoom > Change Image
Once you click on Change image, you can select the images from a file , or select online. You can also use icons.
Once you make the relevant selection, the slide screen shot changes to the chosen image.
Return to Zoom
If you want to move to the Zoom Summary slide after discussing the chosen slide or section, you should select Return to Zoom.
Click on the slide screenshot then Click on Zoom >Return to Zoom
You should repeat this step for all the slides in the Summary Zoom slide. For select slides/section, if you do not want to move back to the Summary Zoom slide then do not choose this option.
Zoom Transition
The Zoom Transition feature helps create an impressive visual effect when you move from one slide to the other. The default option chosen is Zoom Transition. If you do not want this transition effect, then Go to Zoom> Deselect Zoom Transition
Want to master in Presentation Skills , Join our PowerPoint Online Course right here.
There are multiple design options/border/effects options available in the Zoom Feature. These can be chosen to change the images on the Zoom Summary slide.
This is how we can make our presentation lively. Rather than following the usual flow of slides, with the help of the new Zoom feature we can navigate between slides depending on the flow of our presentation.
Keep learning new things and have fun.
Sign up for our PowerPoint Presentation Skills Training Online

Share This Post:
96 thoughts on “powerpoint zoom: a great way to make interactive presentations”.
[…] sections or slides, creating a more dynamic and immersive experience for your audience. With PowerPoint Zoom, you can easily create links or “zoom areas” on your slides such that when clicked […]
I truly appreciate this blog post.Really looking forward to read more. Great.
Thanks-a-mundo for the blog post. Really Cool.
Thanks for sharing, this is a fantastic blog article.Thanks Again. Cool.
Im grateful for the blog post. Really Cool.
wow, awesome article post.Really looking forward to read more.
Major thankies for the blog article.Really looking forward to read more. Awesome.
Im grateful for the blog post.Really looking forward to read more. Much obliged.
Hey, thanks for the blog.Really looking forward to read more. Awesome.
Fantastic blog post.Really thank you!
Wow, great blog post.Thanks Again. Keep writing.
Thank you for your article post.Really thank you! Awesome.
I think this is a real great article post.Thanks Again. Much obliged.
I cannot thank you enough for the blog. Will read on…
Thanks again for the blog post.Really thank you! Really Great.
Thanks so much for the blog post.Thanks Again. Really Great.
Very good blog.Really thank you! Really Great.
Thanks for the blog post.Really looking forward to read more. Cool.
Really informative post.Thanks Again. Will read on…
Really enjoyed this post.Really looking forward to read more. Really Great.
I really enjoy the blog.Much thanks again. Really Cool.
Thank you for your blog article.Thanks Again.
Thank you for your blog.Really looking forward to read more. Really Cool.
Very good blog article.Thanks Again. Cool.
I value the blog article.Thanks Again.
A round of applause for your blog post.Really thank you! Will read on…
Great, thanks for sharing this article.Much thanks again. Really Cool.
Awesome blog.Really thank you! Great.
Thanks again for the blog post.Really looking forward to read more.
Enjoyed every bit of your blog article.Really looking forward to read more. Really Great.
Thank you for your post. Really Cool.
I think this is a real great blog.Really thank you! Great.
This is one awesome blog post. Will read on…
Hello everyone I am new here, I am waiting for all the guests!
Looking forward to reading more. Great blog.Really thank you! Awesome.
I am so grateful for your post.Really thank you! Great.
I appreciate you sharing this blog article.
I appreciate you sharing this blog article.Really thank you! Really Great.
A round of applause for your blog. Really Cool.
I really like and appreciate your blog.Really thank you! Really Cool.
Enjoyed every bit of your blog article.Really looking forward to read more. Want more.
Fantastic blog post.Thanks Again. Really Great.
This is one awesome post.Much thanks again. Fantastic.
I really liked your blog article.Much thanks again. Cool.
A big thank you for your blog.Thanks Again. Awesome.
Wow, fantastic weblog format! How long have you ever been blogging for?
you made running a blog glance easy. The total glance of your website is magnificent, as smartly as the content! You can see similar: dobry sklep and here sklep online
Im thankful for the blog article.Much thanks again.
Appreciate you sharing, great blog.Much thanks again. Much obliged.
Appreciate you sharing, great article.Much thanks again. Much obliged.
Great, thanks for sharing this article. Keep writing.
Im thankful for the blog post. Great.
Im thankful for the post.Much thanks again. Much obliged.
Fantastic blog post.Thanks Again. Really Cool.
Thank you for your article post.Really thank you! Cool.
wow, awesome blog article.Really looking forward to read more. Keep writing.
Thanks again for the article post.Thanks Again. Keep writing.
I appreciate you sharing this blog article.Really looking forward to read more. Want more.
Say, you got a nice blog.Really looking forward to read more. Will read on…
Looking forward to reading more. Great blog post.Much thanks again. Really Great.
Thanks a lot for the article.Thanks Again. Want more.
Great, thanks for sharing this post.Really thank you! Really Cool.
Im thankful for the blog article.Thanks Again.
I really enjoy the blog.Much thanks again. Will read on…
I appreciate you sharing this post. Will read on…
Thank you ever so for you article.Much thanks again. Cool.
Fantastic article.Really looking forward to read more. Really Great.
I appreciate you sharing this article post. Want more.
Looking forward to reading more. Great blog.Much thanks again. Awesome.
I really liked your blog article.Really thank you! Really Cool.
Thanks-a-mundo for the blog. Fantastic.
Wow, great blog post.Really looking forward to read more. Cool.
I cannot thank you enough for the article post. Will read on…
Wow, great post.Really thank you! Will read on…
Really appreciate you sharing this blog article.Much thanks again. Keep writing.
Thanks so much for the blog post.Much thanks again. Cool.
A round of applause for your blog post. Really Cool.
Thanks so much for the blog post.Really thank you! Awesome.
Im grateful for the post.Much thanks again. Really Cool.
A big thank you for your blog post. Much obliged.
Im thankful for the blog.Much thanks again. Cool.
I am so grateful for your blog.Thanks Again. Cool.
I really like and appreciate your blog article.Really looking forward to read more. Awesome.
Thanks-a-mundo for the blog post.Thanks Again. Will read on…
Very neat article.Really thank you!
Major thanks for the article post.Really thank you!
Really appreciate you sharing this blog.Much thanks again. Cool.
Very informative blog post.Really thank you! Keep writing.
Im obliged for the blog post.Thanks Again. Cool.
wow, awesome article.Really looking forward to read more. Cool.
Awesome blog.Much thanks again. Fantastic.
I think this is a real great post. Really Cool.
Thank you ever so for you blog.Really thank you! Really Cool.
Im grateful for the article post.Really looking forward to read more. Awesome.
Very informative post.Thanks Again. Really Cool.
A big thank you for your blog article.Much thanks again. Really Cool.
Thanks again for the article post.Really looking forward to read more. Really Great.
Add a Comment Cancel reply
Save my name, email, and website in this browser for the next time I comment.
Get A 5X Raise In Salary

Reset Password
Insert/edit link.
Enter the destination URL
Or link to existing content
The Ultimate Guide to Giving Virtual Presentations on Zoom
An irreverent and shockingly-actionable companion for anyone who wants to communicate to invisible audiences through a laptop screen.

I read a lot of “ultimate guides to X.” Most are not ultimate. Most aren’t even very readable. This is different. Oli Gardner has put together an extraordinary resource for both newcomers and experienced speakers. If you apply the tactics in this guide, I promise you’ll be among the best presenters online (or off) at your next engagement.
— Rand Fishkin. Co-founder & CEO, SparkToro.

What’s in the guide?
17 Chapters
29,584 words
84 Screenshots
Roughly speaking—and by that I mean super specific—the Ultimate Guide to Giving Virtual Presentations on Zoom contains six thematic parts, seventeen chapters, 29,584 words, eighty four precision-crafted interface screenshots to show you how to do cool things, high-production instructional videos full of fun, insights, marvellous techniques to marvel at, and did I mention that it’s twenty nine thousand, five hundred and eighty four words long?
Wait. If I add this paragraph to the number it’s actually 29,656. So, roughly speaking, it’s awesome.
This guide is actually free . I’m not asking for an email address. Helping you be a better presenter is my goal.
My only ask is that you consider sharing it with others, if you like the guide.
A few highlights from the guide
18 Zoom Features
Cool Zoom Features You Should Know About
Learn how to use the lesser-known features of Zoom for a more dynamic presentation.
7 Bad Techniques
Things to Avoid Doing in a Virtual Presentation
Learn the most common mistake in a virtual presentation and how to avoid making them.

13 Good Techniques
Definitely Do These Things When Presenting
With a few simple techniques you can drastically improve your chances of pulling off a successful virtual presentation on Zoom. And no, I don’t expect you to build an actual stage like I did, but you can at least put a plant in the background.

Your Talk’s Purpose
Create Experience Moments
A key trait of successful speakers is that they understand their personal brand. They know what they represent, how they want to be perceived, and what success looks for them. This leads directly into how we should be designing our talk experiences.

Presentation Structure, Story, & Flow
Learn how to craft a story arc by reducing your big idea to it’s simplest form and chunking it into structured elements.

40 Slide Design Tips
Slide Design Tips for Virtual Presentations
Take a deep dive into the art of presentation design in this incredibly actionable chapter that will elevate your skills overnight. And yes, there are forty tips in this chapter alone.

Real People
Virtual Audience Engagement
They may be invisible, but they’re still there, and they’re still real people who want to have a good time. Learn techniques for audience participation and five simple tricks to help maintain eye contact while presenting virtually.
Audio & Video
Create Professional Recordings of Your Talks
Learn the six elements of a great presentation recording. Plus techniques, tools, and lists of equipment you need to record professional high-resolution videos of your talks. It also covers editing in post-production, and how to add closed captions for enhanced accessibility.

6 Whoopsies
What to Do When Things Go Wrong
There are many things that can go wrong in a virtual presentation, most of them technical in nature. This chapter covers six serious issues, and offers creative solutions to turn a catastrophic and embarrassing moment, into a calm, collected, professional delivery.
5 Advanced Tips
Advanced & Creative Virtual Presentation Tips
Proxy hosts, shortlinks, customized meeting rooms, landing pages, and clickers, oh my. Enhance your expertise with these technical tips, and the best virtual speaking strategy of all—standing up.

23 Settings
Zoom Settings to Turn On or Off for a Successful Presentation
Zoom has a grand total of 301 settings—I counted them with my finger and brain—which can make it really hard to find a critical feature when it’s crunch time. This chapter breaks down the essentials and is your game-day checklist for success.

Intro Introduction to Virtual Presentations on Zoom
Chapter 1 18 Cool Zoom Features You Should Know About
Chapter 2 12 Things You Should Do in Your Zoom Presentation
Chapter 3 8 Things You Shouldn’t Do in Your Zoom Presentation
Chapter 4 Defining Your Presentation’s Purpose
Chapter 5 How to Define Your Talk’s Structure, Story, & Flow
Chapter 6 41 Slide Design Tips for Virtual Presentations
Chapter 7 6 Ways to Make Eye Contact With an Invisible Audience
Chapter 8 How to do Audience Participation in a Virtual Presentation
Chapter 9 How to Share Content during a Zoom Presentation
Chapter 10 How to Create a Stunning Video and Audio Recording
Chapter 11 Using Post-Production to Add Value to Your Zoom Recording
Chapter 12 How to Use Your Phone as a Beautiful Webcam
Chapter 13 What to Do When Things go Wrong in Your Presentation
Chapter 14 How to Ground Yourself and Get Ready to Present
Chapter 15 Advanced & Creative Zoom Presentation Techniques
Chapter 16 The Difference Between Zoom Meetings and Zoom Webinars
Chapter 17 23 Zoom Settings to Enable or Disable for a Smooth Presentation
Critical PowerPoint Shortcuts – Claim Your FREE Training Module and Get Your Time Back!
How to zoom in on PowerPoint slides (3 different techniques)
- PowerPoint Tutorials
- Shortcuts & Hacks
- December 27, 2017
How do you zoom in on something in PowerPoint without PowerPoint first centering in on your slide?
This was a great question we got from subscriber Derek (thanks Derek!).
And it’s not so intuitive…
For example, let’s say you want to zoom in on a specific icon or two to edit them, like in the picture below. How do you do it without scrolling around, driving yourself crazy?

In this tutorial, you’ll learn 3 different ways to zoom in PowerPoint, plus a few sneaky places you might never have thought of zooming in PowerPoint before.
Looking for the NEW Zoom Transition?
If you want to learn all about the brand new Zoom Transition in PowerPoint that was added in 2016, see our other guide here .
The problem with the standard PowerPoint zoom
The problem with the standard PowerPoint zoom, is that PowerPoint automatically goes to the center of your slide as you zoom in.
The center zoom is great if the object that you want to edit is in the center of your slide, but if it’s not, that means you have to use the scroll bars to find what you are looking for.
The problem with the scroll bars is that they are hard to control, often jumping you over to the next slide as you try to find the object that you want to edit.
So instead of making your life easier (which is what they were designed to do), they make it harder.
3 Ways to Zoom in on an Object

There are three different ways you can zoom in on a PowerPoint slide:
- The View tab Zoom command (zoom dialog box)
- The Zoom slider at the bottom of the screen
- The CTRL + mouse spin wheel shortcut (my personal favorite because it’s universal, as you’ll see in a second)
If you are looking for the new zoom transition, you can learn more about what that is on the Microsoft blog here .
Pro Tip: Use the ‘Fit to Window’ tools
After zooming in on something in PowerPoint, you can quickly refit your PowerPoint window in one of two ways:
- ‘Fit slide to current window’ in the lower right-hand corner your screen
- ‘Fit to Window’ in the View tab

Zoom in on a Picture in PowerPoint
To zoom in a on a specific picture (or object) in PowerPoint, all you need to do is first select the object before you zoom. Once you select an object, any of the 3 zoom methods described above will zoom you specifically in on the object:
- The zoom dialog box
- The zoom slider
- Using CTRL plus your mouse spin wheel
This zoom trick works on anything that you can select in PowerPoint, including zooming in on a table, zooming in on a chart, zooming in on a text box, etc.
Note: If you are trying to zoom in on a picture to show a specific part of it, you can also just crop your picture down to the desired piece.
To learn all about how to crop pictures in PowerPoint, read our step-by-step guide here .
If you have multiple objects that you want to zoom into and edit in PowerPoint, the fastest way to do that is to:
- Select and zoom in on your first object
- Edit or format your first object
- Hit Fit Slide to Current Window
- Select and zoom in on your second object
- Edit or format your second object
If you have more than two objects, you can continue zooming in and out of your slide in this way to make all of your adjustments.
PowerPoint Thumbnail Zoom
Besides zooming in on a slide while editing it, you can also use the CTRL + mouse spin wheel shortcut to zoom in on the thumbnail images of your PowerPoint slides on the left.

Zooming in on the thumbnail images allows you to control how much of your presentation you see, and how much slide editing space you give yourself on the right.
Zooming in allows you to get a big thumbnail image of each of the preceding and following slides, while zooming out gives you an idea of how many slides are in your presentation.
Slide Sorter View Zoom
Another place you can zoom in PowerPoint to see the overall flow of your presentation, is Slide Sorter View. To open the Slide Sorter View, simply click the slide Sorter command at the bottom of your screen.

All three zoom methods work in the Slide Sorter View:
Zooming in and out of the Slide Sorter View is useful when you want to see the overall flow of your slides within your presentation at varying levels of detail.
Slide Show View zoom
Two other places you can zoom in PowerPoint are the Slide Show Mode (F5) and Presenter View (SHIFT + F5) of your presentation. To see these PowerPoint shortcuts in action, check out the video below.
Start Slide Show PowerPoint Shortcuts
There are four keyboard shortcuts for starting slide show in PowerPoint:
Once you are in one of the presentation views of your slides, you can zoom in or zoom out by either using the CTRL + mouse spin wheel shortcut (if you have a mouse), or you can use the keyboard shortcuts listed below.
- Zooming in allows you to focus on a specific section of your slide (focusing your audience’s attention on that section).
- Zooming out allows you to see all the slides in your presentation as thumbnails.

This is often an easier way to navigate the slides in your presentation if someone wants to go back and see something, rather than trying to remember where it was in your presentation.
Knowing how to properly zoom in and out of the objects you want to edit in PowerPoint will save you a ton of time.
The key to remember is that PowerPoint will use the object you have selected as the focal point of your zoom.
If you enjoyed this tutorial and want to learn more about our other PowerPoint tutorials and free resources, visit us here .
What’s next?
Related articles, about the author.

Popular Tutorials
- How to Strikethrough Text (l̶i̶k̶e̶ ̶t̶h̶i̶s̶) in Word, Excel & PowerPoint
- How to Make Animated Fireworks in PowerPoint (Step-by-Step)
- Strikethrough Shortcut (l̶i̶k̶e̶ ̶t̶h̶i̶s̶) for Word, Excel & PowerPoint
- How to Create a Flash Card Memory Game in PowerPoint (Like Jeopardy)
- Keyboard Shortcuts Not Working: Solved
PowerPoint Tutorial Categories
- Strategies & Opinions
- Presentation Design
- Pictures, Icons, Videos, Etc.
- New Features
- Miscellaneous
- Charts & Data Viz
We help busy professionals save hours and gain peace of mind, with corporate workshops, self-paced courses and tutorials for PowerPoint and Word.
Work With Us
- Corporate Training
- Presentation & Template Design
- Courses & Downloads
- PowerPoint Articles
- Word Articles
- Productivity Resources
Find a Tutorial
- Free Training
- For Businesses
We help busy office workers save hours and gain peace of mind, with tips, training and tutorials for Microsoft PowerPoint and Word.
Master Critical PowerPoint Shortcuts – Secure Your FREE Training Module and Save Valuable Time!
⌛ Master time-saving expert techniques.
🔥 Create powerful presentations.
🚀 Propel your career to new heights.
We value your privacy – we keep your info safe.
Discover PowerPoint Hacks Loved by Industry Giants - KKR, AmEx, HSBC!
Over 114,880 professionals in finance, marketing and sales have revolutionized their PPT skills with our proven methods.
Gain FREE access to a full module of our premium PowerPoint training program – Get started today!
We hate spam too and promise to keep your information safe.
You are currently viewing a placeholder content from Facebook . To access the actual content, click the button below. Please note that doing so will share data with third-party providers.
How-To Geek
How to zoom in and out on part of a powerpoint presentation.
Magnify parts of your presentation by taking advantage of PowerPoint's different zoom features.
Microsoft PowerPoint lets you zoom in and out on a specific part of your PowerPoint slideshow, which can be handy both while editing and for drawing attention to important objects or ideas during the presentation. Here’s how to do it.
Whether you’re in normal view or slideshow view, PowerPoint lets you zoom in and out as the need arises. There are a few ways you can do this, depending on which view you're in.
The first method is by using the zoom bar at the bottom-right of the window (which isn’t available in the slideshow view). This method is convenient as the zoom bar is immediately accessible. To use the zoom bar, click and drag the bar left or right to zoom out or in, respectively. You can also resize the slide to fit your current window by clicking the box to the right of the zoom bar.
Another method is using the “Zoom” tool, found on the “View” tab.
In the “Zoom” window, you can select a zoom percentage from the list of available options or enter a precise percentage into the “Percent” box. Once ready, click “OK,” and your slide will zoom to the selected amount.
Those two methods are great for when you're editing and need to take a closer look at something. But if you’re in the middle of giving your presentation and want to zoom in on a specific part for emphasis, you can do that too.
Select the magnifying glass from the presenter view and then click the part of the slide you want to zoom. Once zoomed in, you can click and drag to move the slide around. When you’re finished, click the magnifying glass again to zoom back out.
One last tip: In both normal and slideshow view, you can hold the Ctrl key while scrolling your mouse wheel to zoom in and out. This also works if you want to resize your slide thumbnails .
That’s all there is to it!
How to Give a Presentation on Zoom? [A Step-by-Step Guide!]
By: Author Shrot Katewa
![How to Give a Presentation on Zoom? [A Step-by-Step Guide!]](https://artofpresentations.com/wp-content/uploads/2021/03/Featured-Image-How-to-Give-a-Presentation-on-Zoom.jpg "zooming presentation editor")
If you’ve never used Zoom, giving a presentation on it might seem a bit challenging. But, that’s a challenge we will have to learn to overcome as the world moves digital more and more day by day. The key question really is how to give a presentation on Zoom!
To give a presentation on Zoom, first, start by joining a meeting. Now open the presentation file on your computer and share the slides on Zoom using its “Share Screen” feature. You should test your camera, mic, speaker, and internet connection before you start with your presentation.
As easy as it may seem, some of you may need further detailed instructions. So, in this article, I will provide a step-by-step guide on things that you need to do in order to deliver a presentation on Zoom successfully! Plus, I will also share some tips that can help you ace your presentation on Zoom!
So, without any further delay, let’s get started!
Understanding the Zoom Application Interface
Before we understand the steps to give a presentation using Zoom, it is perhaps a good idea to acquaint yourself with the Zoom user interface first. If you are well-versed with it, then perhaps you may want to skip this section and click here instead.
Logging into Zoom
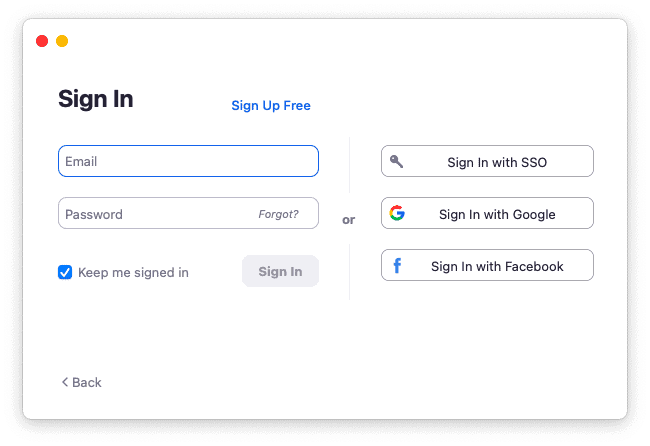
Although you can login to your account using zoom website too, but it is best to download and use the zoom app .
Once you have download the app, you will be prompted to login to your account. If you don’t have an existing account, you can either sign up or even login using your social account such as Google or Facebook. It’s actually quite simple.
If you feel that you don’t want to sign up or even use the social accounts for your meeting, you can choose to use “Sign In with SSO” option. SSO stands for single sign on and this allows you to sign in even when you don’t have an account with Zoom just once.
Zoom Home Screen
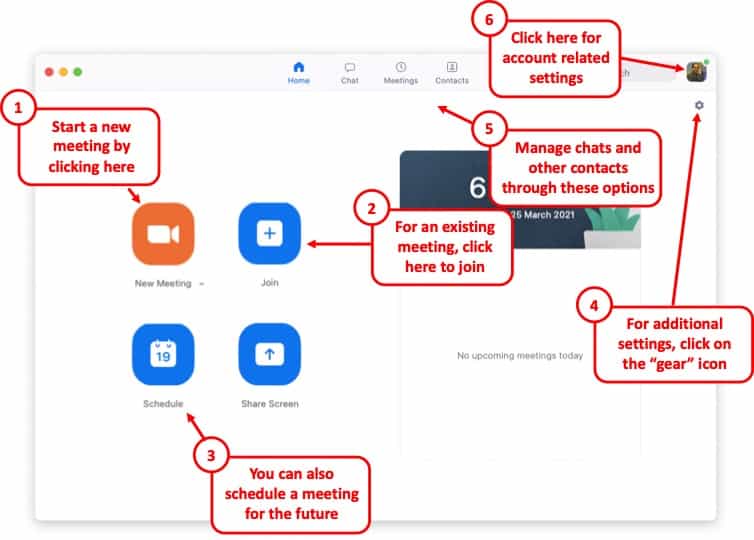
Once you’ve logged in, you will be taken to the home screen on Zoom.
There are a bunch of different things that you ca do with the home screen on Zoom. If you have been invited for a meeting, you will need to click on “ Join “. However, you will also need the meeting ID and the password for the meeting. If you don’t have the details, you will perhaps need to contact the person hosting the meeting.
You can also host the meeting yourself by using the “ New Meeting ” button. You can set a new meeting and invite others to join using this option.
Likewise, you can also schedule a meeting in the future using the “ Schedule ” option.
Furthermore, for changing the account related information, just click on your profile picture in the top-right corner of your window.
Lastly, there are several other detailed settings that you can tweak for your Zoom application. Almost all the other settings can be found in the “ Settings ” section by clicking on the “ Gear Icon “.
Zoom Virtual Meeting Window Interface
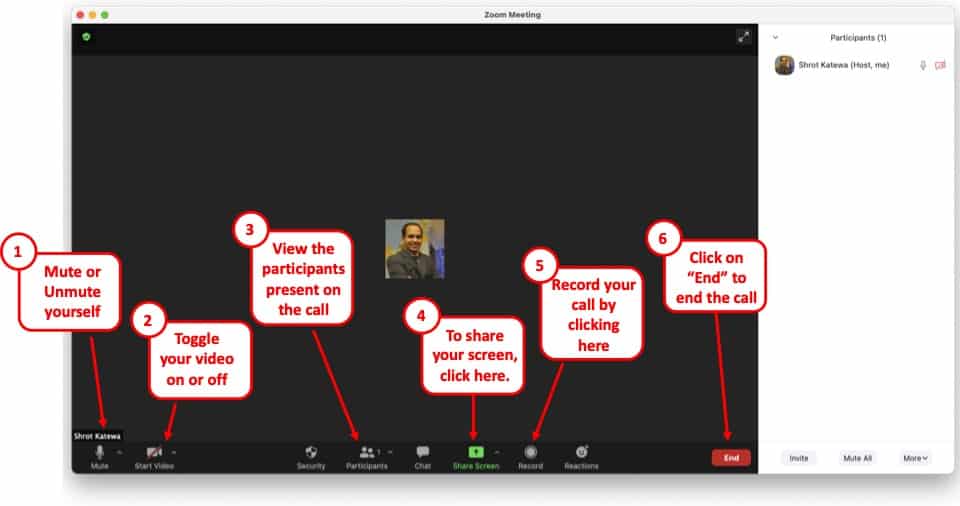
Once you are a participant in a virtual meeting, either by joining an existing meeting or by starting a new meeting, you will be greeted with an image similar to the one mentioned above.
On this screen, you will be presented with several different options. Some of the key functions that you will need to be aware of are as follows –
- Mute – Turning on the Mute or Unmute
- Video – Toggling between your Video
- Participants – Checking the names of the Participants
- Share Screen – to deliver a presentation (more on this later)
- Record – To record a meeting session
- End – Knowing how to end a meeting and exiting a call.
All the above functions will be visible on a small bar at the bottom of the window. If you are not able to see this option bar at the bottom, just hover over at the bottom part of your screen and all the options will appear .
Although there are other features that are also available for a zoom user or a participant, however, the aforementioned features should be good enough to deliver a presentation. These 6 features are at the very least something that you should be aware of.
How to Give a Presentation on Zoom (Step-by-Step)
Zoom has become a common tool for giving virtual presentations today. It is a widely used tool at conferences, meetings, and other events! If you are giving a presentation on Zoom for the first time, then perhaps you should be aware of a few things –
Here is a quick step-by-step guide on how you can give a presentation on Zoom:
Step 1: Install Zoom
Download and install the Zoom application to your desktop. To download the application, visit https://zoom.us/download and download the Zoom Client to your computer.
Step 2: Login to your Zoom Account
After installing the application, open it and log into your Zoom account. If you don’t have one, you can sign up for free using your email account.
Zoom also has options to sign in using SSO (Single Sign-On) or with your Facebook or Google account.
Step 3: Test Audio and Video Settings
Before you start or join a meeting, you will need to configure and test your audio and video settings.
To do that click on the gear icon on the Zoom application’s home screen. This will open the settings menu.
Now click on the “Audio” tab and select the microphone you are going to use. Try our different audio settings. After the microphone, select the speaker for audio output. If you can’t hear anything, try out another speaker source.
After configuring audio, click on the “Video” tab. From there, select the camera that is connected to your desktop. Tweak different video settings and find out what works best for you.
Step 4: Join or Schedule a Meeting
Now start a meeting by clicking on “New meeting”. You can also schedule a meeting on Zoom. To do that, click on “Schedule” and set up when you want to start the meeting. After completing the set-up, Zoom will give you a URL. Share it with the team members to join the meeting.
Or you can join a meeting by clicking “Join” on the Zoom client’s home screen. You can use a meeting ID or URL to join a meeting in Zoom.
Step 5: Open the Presentation
Once you have everything setup, you then need to prepare to show your presentation with your audience. To do that, open the presentation slides on your computer.
Step 6: Share Your Presentation
The last step in giving your presentation is to make sure that you share your presentation with your audience. To do that, click on “Share Screen” from the Zoom clients meeting window , select the screen where your presentation slides are open, and click “Share”. Now start presenting your slides to the audience.
Step 7: Stop Sharing to end the Presentation
One thing to know is how to end the presentation. To stop screen sharing, simply click on “Stop Share” located at the top of the screen . This option will only appear when you start sharing your screen.
How to Share a PowerPoint with Presenter View on Zoom?
To share your PowerPoint presentation slides with presenter view on Zoom, follow the steps given below:
Step 1: Open the Zoom App and Login
The first step really is to open the zoom app and login to your account.
Step 2: Join or Setup a Virtual Meeting on Zoom
Next, join the meeting. Remember, you need the meeting ID and password to join a meeting. Make sure you have requested for the details beforehand.
Step 3: Open Your PowerPoint Presentation
First step is really to open your presentation file that you want to present on the PowerPoint application.
Step 4: Put the Presentation in Presenter View
Now select the “Slide Show” tab from the top of the screen and click on either “From Beginning” or “From Current Slide” depending on your preference. This will open the slides in the “Presenter” view.
Step 5: Switch to the Zoom Application
Now, go to the Zoom application, start or join a meeting. While you are in the “Presenter” view on PowerPoint, press “ Alt+Tab ” to switch between applications in Microsoft Windows-powered computers. For iMac, use “Command+Tab” to move through open apps.
Step 6: Share Screen on Zoom’s Meeting Window
Once you are in Zoom’s meeting window, click on “Share Screen”, select the window where your PowerPoint slides are open in the presenter’s view, and click “Share”.
And that’s all you have to do in order to share PowerPoint with the presenter’s view in your Zoom meetings.
How to Share PowerPoint on Zoom Without Showing Notes?
There are two methods that you can use to share PowerPoint slides on Zoom without sharing your presenter notes. For the first method, you will need to have two monitors connected to your computer.
As for the second one, you can still share your PowerPoint slides on Zoom without sharing your notes (and you won’t need two monitors either). I’ve briefly explained both methods below.
Method 1 – Dual Monitor Method
In this method, you will be presenting your PowerPoint file on one monitor while looking at your presenter’s notes on the other one. Here’s how you can do that:
Step 1: First of all, open your slides on PowerPoint.
Step 2: Now join or start a Zoom meeting.
Step 3: Now click on “Share Screen” and select “Screen 1”. Then click “Share”. Here, “Screen 1” is your primary monitor.
Note: If you are not sure which one is your primary monitor, select where the PowerPoint file opened in.
Step 4: Now go to the PowerPoint application, click on the “Slide Show” tab, and from there click on “Monitor” and select “Primary Monitor”.
Step 5: Open the presentation file in the presenter’s view by clicking on the “Slide Show” tab and selecting “From Beginning” or “From Current Slide”.
If you have done everything correctly, participants will only be able to see the presentation slides while you have your presenter’s notes open on the second monitor.
In case you shared the wrong monitor on Zoom, click on “Screen Share” on Zoom’s meeting window, select “Screen 2” and click on share. This should fix your problem.
When you are sharing a screen on Zoom, you will notice a green border around that screen. This indicates which monitor you are currently sharing.
Method 2 – Sharing Portion of Your Screen
Follow the steps below if you have only a single monitor connected to your computer.
Step 1: Join or start a meeting on Zoom.
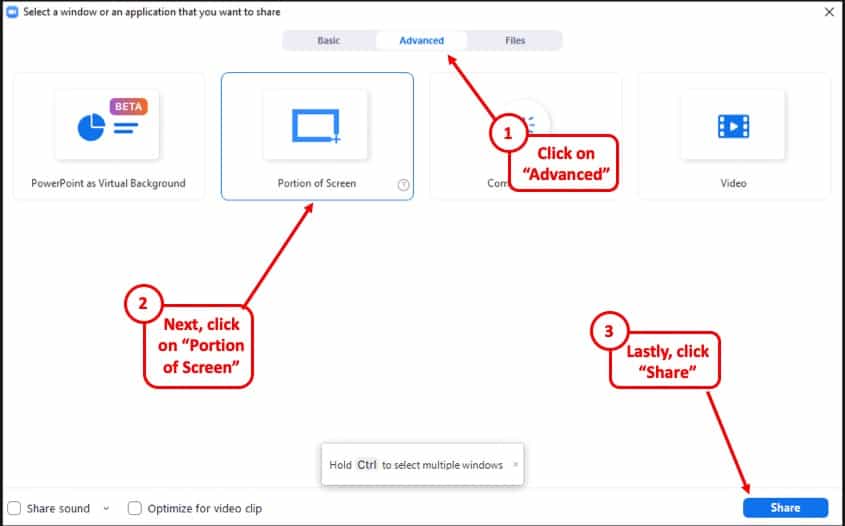
Step 2: Click on “Share Screen” and from the pop-up window select “Advanced”. From there select “Portion of Screen” and click on “Share”. This will give you a green border on your screen that you can adjust. Only the things that are inside this border will be shared on Zoom.
Step 3: Now open the presentation file in PowerPoint, and go to the presenter’s view by selecting “Slide Show> From Current Slide or From Beginning”.
Step 4: Adjust the size of the green border so that it only shows the presentation slides in the presenter’s view.
And that’s all you have to do. By doing so, your audience will only see the slides that you are presenting, but not your notes.
How to Show Yourself During a Zoom Presentation?
Ensuring that you are visible from time to time during a presentation can make it slightly more engaging and much more interactive. Here is how you can do that-
Step 1: First, start or join a Zoom meeting.
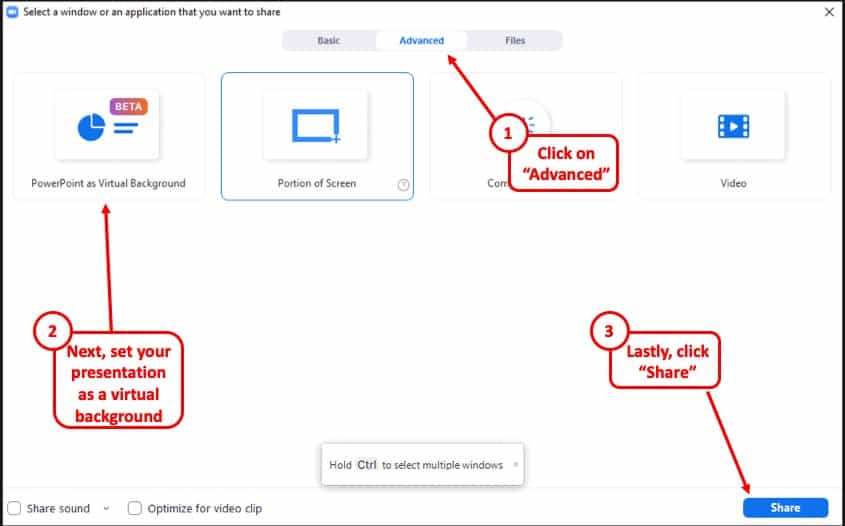
Step 2: Click on “ Share Screen ” and select the “ Advanced ” option. From there, select “ PowerPoint as Virtual Background ” and select the file you want for your presentation. Then click on “ Share ”.
Step 3: Make sure your video is switched on so that you are also visible to your audience. You can do that by clicking on “ Start Video ” on the Zoom Virtual Meeting Interface.
It will take some time for your slides to appear on the Zoom client. When it is done, participants will be able to see your face in front of the slides in Zoom. Make sure that your camera is connected to your computer and configured correctly.
This feature works best if you have a green screen behind you . If you have one, go to Zoom’s settings menu, select the “Background and Filter” tab and check “I have a green screen”. If you want to stop showing yourself during a zoom presentation, click on “Stop Video” on the meeting window and that will do the job.
Furthermore, you may sometimes want to show just yourself to the audience and not show the presentation at all. For that, all you need to do is simply click on “Start Video” in the Zoom Virtual Meeting Interface.
How to Record a Presentation on Zoom?
If you want to record your presentation on Zoom, you can do it easily. After joining or starting a meeting on Zoom, click on the “Record” icon located at the bottom of the meeting window. Once the recording starts, you can pause the recording or stop it whenever you like.
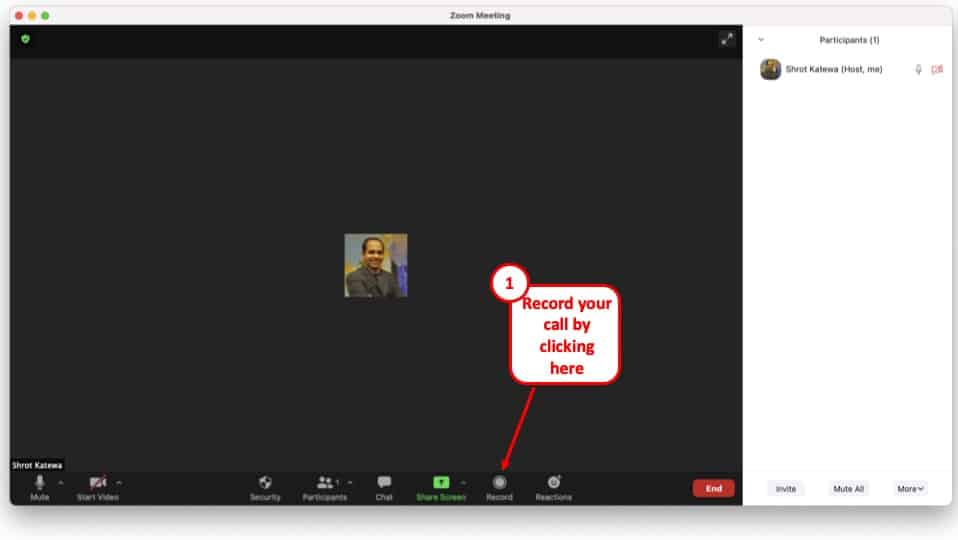
After the end of the meeting, the recorded video will be automatically converted into “.mp4” format and stored on your computer.
Tips for Giving an Awesome Presentation on Zoom
Giving a presentation in front of an audience is always a challenging task. Especially if it is online, many things can go wrong during your presentation. This is why I’m sharing some tips that can help you deliver an awesome presentation on Zoom. These are as follows –
1. Make a Professional Looking Presentation
There are several ways to make your presentation look really professional and high quality. One obvious method is to outsource your presentation to a specialised design agency! But, that can become really expensive depending on your budget.
Another (non-obvious) option is to use a PowerPoint Presentation Template! There are several high-quality and professional templates that you can get quite easily! In fact, using these Presentation Designs is quite inexpensive! You can download as many presentation templates as you want for as little as $16.5/month!
My favorite one is Agio PowerPoint Presentation template. It is perfectly suited to give a professional look to your presentation and yet it is quite quick and easy to use. Check out some of the images below –
Agio PowerPoint Presentation Template
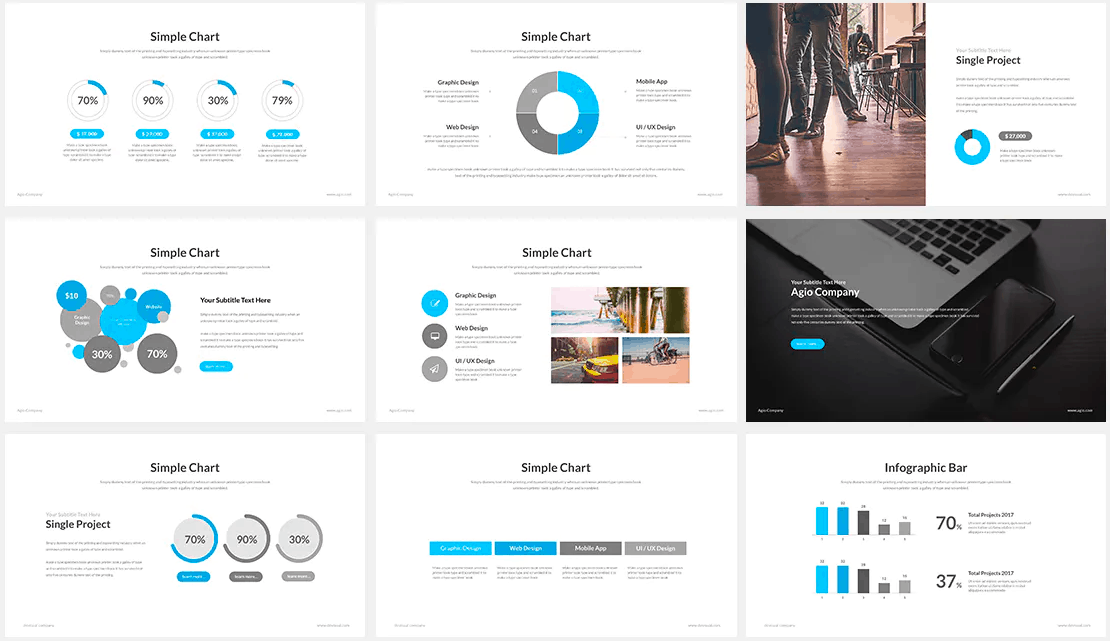
Furthermore, make the presentation as simple and straightforward as possible. Do not confuse your audience with a network of colorful texts, graphs, or other contents.
Only use data and graphs that are relevant to your presentation. Also, the clever use of transition animations can make the slide appear much more engaging.
2. Check Your Equipment Beforehand
Whenever you are giving your presentation online, many things can go wrong. For example, your camera or mic may not function properly. Such interruptions will only make you a laughing stock in front of the participants.
Check your mic, camera, and speakers to find out whether they are working properly or not. Also, check your internet connection and your laptop’s battery level. If everything is ok, then you are good to go on with your presentation.
More Related Topics
- Change the Style of Your Bullet Points and Stand-out from the Crowd!
- 7 EASY Tips to Always Make your Presentations Attractive! (Even if You are a Beginner)
- How to Reduce the Size of Your PowerPoint File? The Perfect Method!
- Auto Create Your PowerPoint Slides using Design Ideas Feature!
- Main Features of PowerPoint! [I bet You DIDN’T Know These]
Credit to Cookie_Studio for the featured image of this article
Learning Center
Go from a camera-shy beginner to a video marketing pro.
- Developer Docs
- Customer Stories
- Asset Library
Blog Categories
- Product Updates
- Wistia Culture
2024 State of Video Report
Level up your video strategy with insights from over 90 million videos, 100,000 businesses, and 2,000 professionals.
How to Edit A Zoom Recording of Your Meeting or Webinar
Learn how to use Wistia’s editing feature to trim your Zoom webinar recording and share it with your audience.
March 21, 2023
- Post-Production
Austin Canary
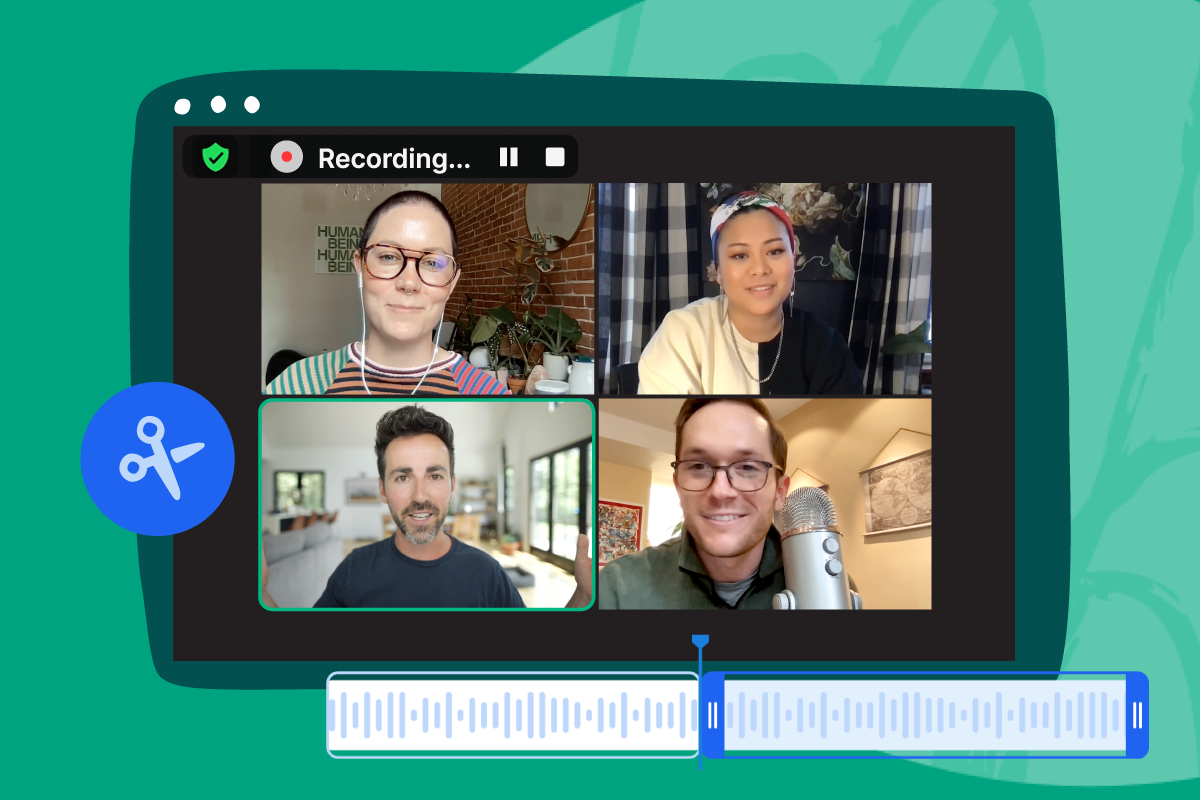
Zoom zoom! You’ve got a Zoom event that needs to be recorded and shared with your audience, and there’s a tight deadline to get that recording up and ready to watch.
If you have no time to fire up the ole video editing software or enlist the help of a video expert, don’t worry. You can do it all on your own with Wistia’s handy editing feature and Zoom integration . We’ll walk you through the process in this guide.
Here’s what we’ll cover:
How to record a zoom meeting, how to edit a zoom recording, how to share a zoom recording.
Let’s zoom right into it!
The first step to getting a Zoom recording into Wistia is to, well, make sure that you record your Zoom event! All you need to do is press the “Record” button when you start the meeting or webinar.
Once the meeting wraps up, Zoom will work its magic and turn your event into a video file. Now, let’s dive into the exciting part: adding the recording to your Wistia content library so you can edit it!
Manually upload the recording from your computer
One way to get your recording from Zoom to Wistia is to manually do it in two steps:
- Download the Zoom recording to your computer.
- Upload the video file to Wistia.
This works just fine, but there’s an easier (and more automated) way.
Automatically import the recording from the Zoom cloud
The fastest way to get your Zoom recording into Wistia is by automatically importing it with our Zoom integration . Here are the steps:
- Open your Wistia Content Library.
- Hit the blue “New” button at the top right corner and then select “Import from Zoom” from the drop-down menu.
- Set up the integration to connect your Wistia account to Zoom.
- Select the Zoom cloud recording you wish to import.
It’s as simple as that! You can learn more about how to integrate Wistia and Zoom to set up this magical workflow.
With your Zoom recording in Wistia, it’s time to trim it in our video editor .
Open the recording in the editor
There are two easy ways to do this:
Open it from the Content Library
- Find the recording in the Content Library.
- Select the media file.
- Press “Edit” on the left sidebar menu.
Open it from the editor
- From the Home screen, select “Edit” on the left sidebar menu.
- Find the recording to open in your timeline.
Now, let’s move on to how to edit videos online in Wistia .
Trim the recording
One of the first (and possibly only) edits you’ll want to make to a Zoom recording is trimming the start and end of the video. This is especially true if you’re editing a Zoom webinar recording or a Zoom meeting recording where you want to keep the presentation itself unedited, but you want to clean up the intros and outros a bit.
To trim a video in Wistia, you can simply:
- Click, drag, and move the start and end points.
- Move the playhead and use keyboard shortcuts to mark the in point (i) and out point (o).
With your recording trimmed, you can now consider some fancier editing techniques.
Split and delete clips
When editing a webinar recording, there might be times when you want to cut out a dramatically long pause or an awkward silence caused by a technical issue during your presentation. We’ve got you!
To trim down or delete a clip in the middle of your recording, simply move your playhead to the place in the timeline where you wish to make the edit and then:
- Select “Split” or use the “s” keyboard shortcut.
- Trim out the part you don’t want.
- Or split again later in the timeline and delete the split clip or use the “delete” key.
Stitch in multiple video clips
Did you know that you can jazz up your Zoom recording by adding clips from other media in your Wistia account right in the editor? Here are a couple of ideas:
Add a personalized video message
Whether you plan to share the edited video in a personal email or on your company blog, adding a quick message at the beginning can help hook viewers as soon as they hit play.
Add a bumper video
If you plan to share your edited webinar on your website or in a follow-up email, you might want to consider adding a video bumper.
What’s a bumper video? It’s a short clip that helps polish up the intro or outro of your video. This can be something as simple as a quick animation of your company logo with a sound effect or an animated title card with some intro music. Whatever it is, bumpers can give your videos a more professional watching experience.
To learn more about our editor, check out this video:
With your edited Zoom recording looking fresh and profesh, let’s get it out in the wild!
Embed it on your website
If you have a Zoom webinar recording, you’ll likely want to share it on your website or a landing page. You can put your video on your website with a Wistia embed . To do this:
- Open the media in Wistia.
- Select the “Embed and Share” button at the top right.
- Choose the “Inline Embed” tab and copy the embed code.
- Paste the embed code to your webpage editor.
With the video embedded on your site, you’re ready to share it! However, you might consider adding some conversion actions to get the most out of your webinar recording.
Add conversion actions
With Wistia, you can add the following interactive video tools to your videos:
- Annotation links
- Calls to Action (CTAs)
- Email collection forms
All of these timeline actions are useful additions to any long-form content like a webinar recording. Annotations work great for linking out to additional resources that you reference throughout your webinar presentation. CTAs are a good way to guide your viewer to take the next step, whether it be to another video, article, product page, or sign-up form.
Email collectors are ideal for gated webinars where you want to require viewers to enter their email in order to watch the content. You don’t have to place the form right at the beginning. In fact, try placing it somewhere in the middle or at least after a few-minute teaser. That way, you’ll know folks who fill out that form are super interested in the content you’re sharing!
Share it on social media
While you likely won’t post an entire Zoom recording on social media , you might want to share clips or a highlight reel from your webinar.
Whenever you’re ready to share, start from the “Embed and Share” popover (from before) and:
- Open the “Publish to Social” tab.
- Select the social channels on which you want to post the video.
- Hit that “Publish to Social” button!
Get the most value from your Zoom recordings
We hope this guide helps you kick-start your Zoom webinar marketing strategy! With this new workflow, it’s easier than ever to streamline the process of editing Zoom recordings and sharing them online with Wistia.
Start importing your recordings into Wistia so you can edit, share, and measure the impact of your on-demand webinars all from one platform.
Mailing list sign-up form
Sign up for Wistia’s best & freshest content.
More of a social being? We’re also on Instagram and Twitter .
IMAGES
VIDEO
COMMENTS
Give more engaging, meaningful, virtual presentations in Zoom. Prezi Video for Microsoft Teams. ... Prezi has been a trusted presentation partner for over 15 years. 180+ countries. 140,000,000+ 140M+ people who ️ Prezi. 25%. more effective than slides* 40%. more memorable*
3. From here you can add zoom area or zoom out to overview, topic, or subtopic/page. If you select an object on the canvas, you can also add a zoom to animation to it. 4. The animations you add will be added to the presentation path in the left sidebar where you can move, edit or delete them. Add zoom area. Click Add zoom area and a rectangle ...
Presenting on Zoom doesn't have to mean sharing your screen. With Prezi, you can now keep the face-to-face connection with your audiences for more engaging Zoom presentations. Try for FREE. Let's talk! 1-844-773-9449. 8:30 am-5 pm PST.
You need high-quality business presentation software to take your slides to the next level. Some of the best presentation software include Visme, Haiku Deck, Prezi, Microsoft Powerpoint, Canva and Google Slides. In this comparison guide, we'll analyze each of these tools and many more to understand what the difference is between them so you ...
The editor is a little different from most presentation apps, but it's still intuitive—and you'll start off with a quick two-minute tutorial. When creating a new slide, scroll through "inspiration slides" to find a layout you like; once you choose, the app will pull the layout and automatically adapt it to match the design of the rest of your ...
Plenty of integrations. Our PowerPoint plug-in means you paid users can easily import their go-to presentations. The Mentimeter app for Zoom is now available and can be downloaded and used for a seamless Zoom experience. Mentimeter is likewise available on the Microsoft Teams marketplace. Interactivity is now available for more Teams calls.
By zooming into the details from the birds-eye view of the big picture, you can help your audience understand their importance within your story. Take a look at the chart in this presentation—by zooming into the inflection point, you can highlight information in context that would be difficult for your audience to glean from the big picture.
With Visme's Presenter Studio, you can record your presentation and share it with your audience. Record your screen, audio, and video, or switch off your camera for an audio-only presentation. Present asynchronously on your own time, at your own pace. Let your colleagues watch it at their convenience. Create Your Presentation.
1. Powtoon. A web-based presentation tool, which means you can access your presentations wherever you are, with an internet connection. It is known for its animations, cartoons, and infographics, which help the user to create more interactive presentations and explainer-style videos. Example by Focusky.
Zooming isn't just about getting closer or farther from your slide. It's about optimizing your workflow, ensuring clarity, and maintaining presentation aesthetics. 1. Optimal Magnification. For precision tasks and detailed editing, a zoom level between 100% and 150% is typically ideal.
We want to zoom into the different description slides from our Iceberg Model slide. 2. Access the Slide Zoom Feature: Next, click Insert > Zoom > Slide Zoom. From here, choose the slide, or slides, that you want to zoom into. Click Insert and a thumbnail or thumbnails of the slides will appear on your current slide.
Giving a Zoom presentation is more common than ever and presents unique challenges. Here are 17 tips to prepare and execute an effective remote presentation. ... Eleanor Hecks is editor-in-chief at Designerly Magazine. She was the creative director at a prominent digital marketing agency prior to becoming a full-time freelance designer. Eleanor ...
Step 1: Publish your presentation. When you're finished designing your presentation in Visme, navigate over to the top right corner of your screen, and click on "Share". Next, click on "Publish for Web" on your left, type in a title and description for your presentation, and click on "Publish and get my link".
The PowerPoint zoom feature is a great way to make the presentation dynamic and interactive. When you use this feature, the slides are not presented in a usual order. This feature helps present slides in any order as one likes during the presentation making it more interactive. This feature is available in Microsoft 365 and Microsoft office 2019.
17 Chapters. 29,584 words. 84 Screenshots. 10+ Videos. Roughly speaking—and by that I mean super specific—the Ultimate Guide to Giving Virtual Presentations on Zoom contains six thematic parts, seventeen chapters, 29,584 words, eighty four precision-crafted interface screenshots to show you how to do cool things, high-production ...
ALT + SHIFT + F5. Once you are in one of the presentation views of your slides, you can zoom in or zoom out by either using the CTRL + mouse spin wheel shortcut (if you have a mouse), or you can use the keyboard shortcuts listed below. Zoom in (Slide Show Mode) CTRL + =. Zoom out (Slide Show Mode) CTRL + -.
7. Embed entertaining video content. Video can make your Zoom presentation go from boring to fun. It's a key attention-grabbing element that can help keep your audience engaged and attentive throughout the meeting. Your attendees may even generate their own personal discussion after watching the clip.
Select the magnifying glass from the presenter view and then click the part of the slide you want to zoom. Once zoomed in, you can click and drag to move the slide around. When you're finished, click the magnifying glass again to zoom back out. One last tip: In both normal and slideshow view, you can hold the Ctrl key while scrolling your ...
In this article I am using the Zoom app in Windows 10. The six options are: Share your entire screen/desktop. Share the Slide Show window. Share the editing window with a clean look. Run the Slide Show in a window and share that window. Use Presenter View to show the audience your slides while you see Presenter View.
We want to zoom into the different description slides from our Iceberg Model slide. 2. Access the Slide Zoom Feature: Next, click Insert > Zoom > Slide Zoom. From here, choose the slide, or slides, that you want to zoom into. Click Insert and a thumbnail or thumbnails of the slides will appear on your current slide.
Here is how you can do that-. Step 1: First, start or join a Zoom meeting. Step 2: Click on " Share Screen " and select the " Advanced " option. From there, select " PowerPoint as Virtual Background " and select the file you want for your presentation. Then click on " Share ".
Here are the steps: Open your Wistia Content Library. Hit the blue "New" button at the top right corner and then select "Import from Zoom" from the drop-down menu. Set up the integration to connect your Wistia account to Zoom. Select the Zoom cloud recording you wish to import. It's as simple as that!